When it comes to video editing, no matter what type of a project you're working on, unless it's purposely planned to be without any sound, the audio production should be about a fair amount of the work.
What the viewer sees on the screen is important, but what they hear alongside the visuals can dramatically impact their overall experience, as sound design needs to subtly compliment everything perceived by the eyes.
This is why, even as a video editor, you'll often be responsible for the final, packaged product as a whole, so knowing how to clean up audio and remove things such as unwanted background noise or level the background music across multiple audio clips is of great importance.
In this guide, we'll cover everything you need to know about cleaning up audio in Adobe Premiere Pro, so without further ado, let's dive straight into it.
Methods to Clean up Audio in Premiere Pro
Adobe Premiere Pro is one of the most popular video editing workspaces, versatile and beginner-friendly, while simultaneously offering all the features an advanced professional would require to produce top-notch content.
That said, Adobe Premiere Pro offers various tools and panels for various tasks, such as the Essential Sound Panel and Effects Control Panel, so when it comes to cleaning up and editing audio, it has us covered.

You can clean up audio in Premiere Pro in the following ways:
Normalize Audio Levels
What it does: Adjusts the volume of your audio to ensure a consistent overall level across the clip, preventing sudden volume jumps.
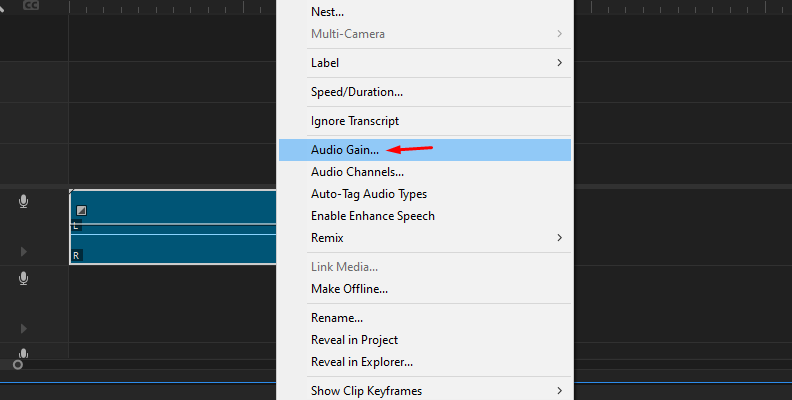
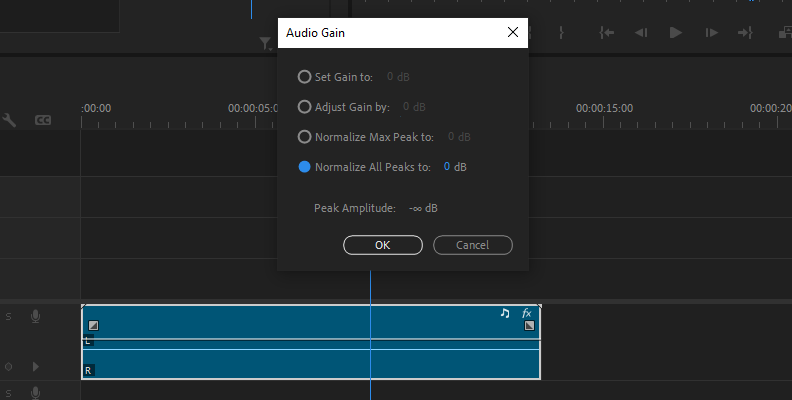
How to do it: Right-click on your audio clip > Select Audio Gain > Click Normalize All Peaks and set a desired level (e.g., -3dB). This will bring the loudest part of your audio to the set dB.
Reduce Background Noise
What it does: Minimizes unwanted ambient sounds, such as hum, air conditioning, or distant traffic, to make the main audio clearer.
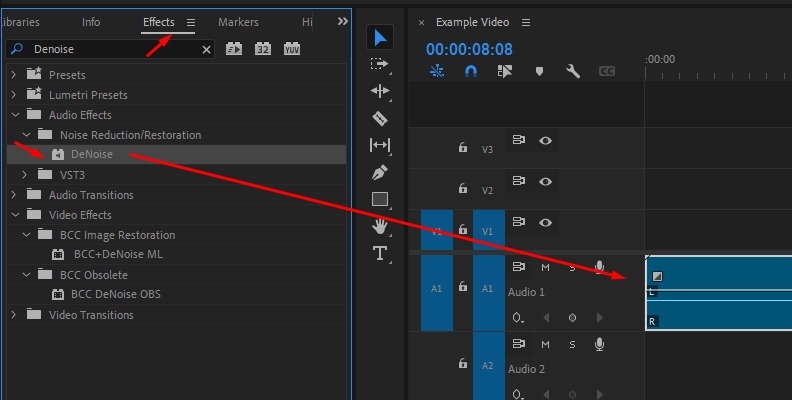
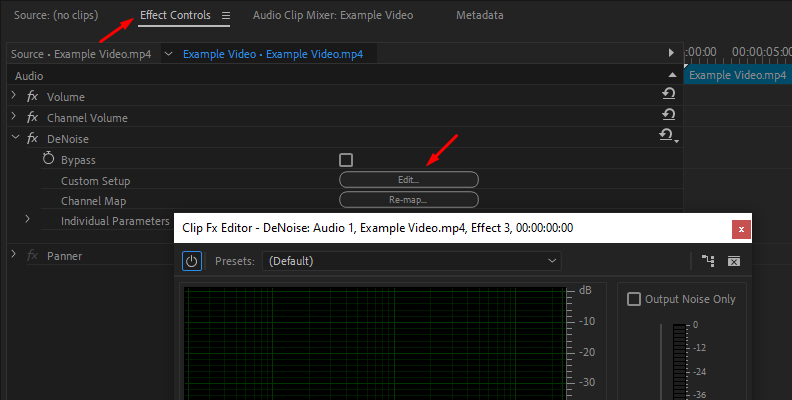
How to do it: To remove background noise, go to Effects > Search for DeNoise. Drag the DeNoise effect to your audio clip. Adjust the ReduceNoiseby slider in the Effect Controls to fine-tune the noise removal.
Use EQ to Enhance Audio
What it does: Allows you to boost or cut certain frequencies to improve clarity, particularly helpful for enhancing vocal quality.
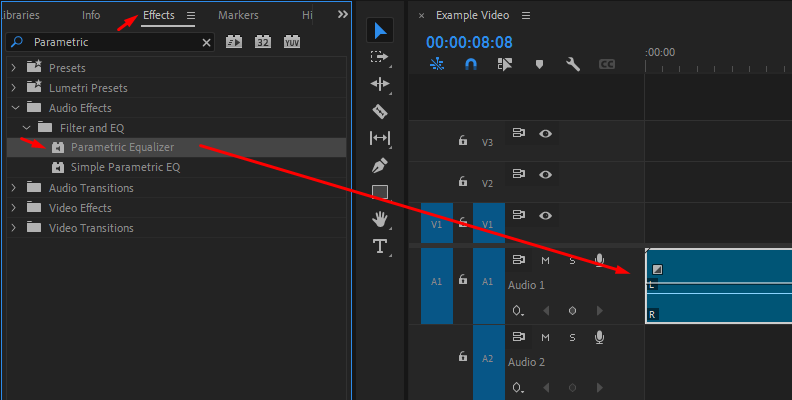
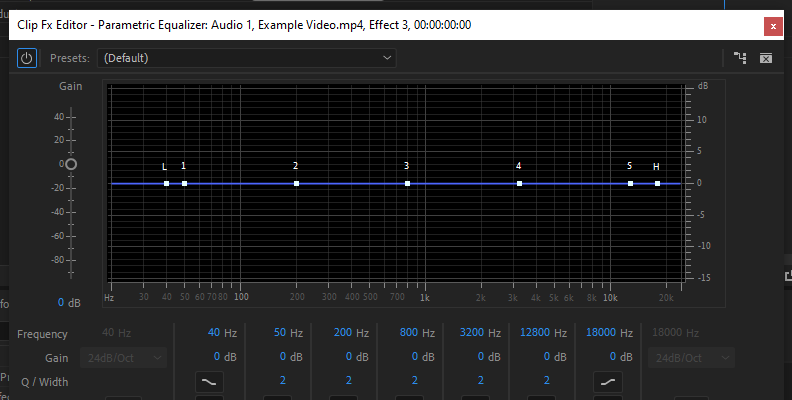
How to do it: Apply the Parametric Equalizer from the Effects panel. In the Effect Controls, use the EQ curve to enhance vocal frequencies (around 1kHz - 5kHz for clarity) or reduce bass rumble (under 100Hz).
Remove Reverb
What it does: Reduces the echo or reverb effect caused by recording in large or reflective spaces, making the audio sound cleaner and more direct.
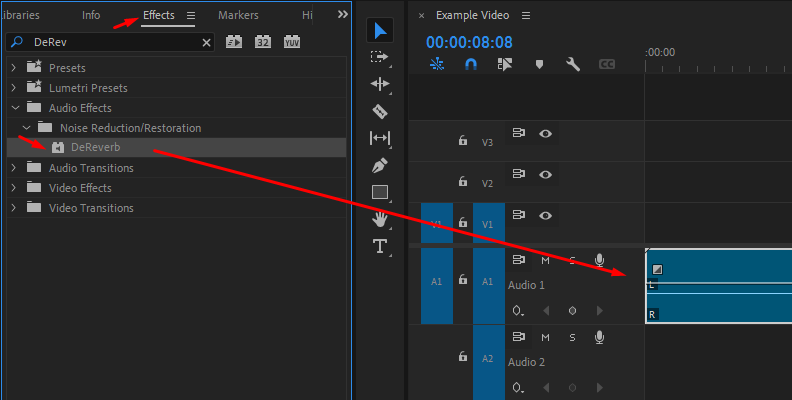
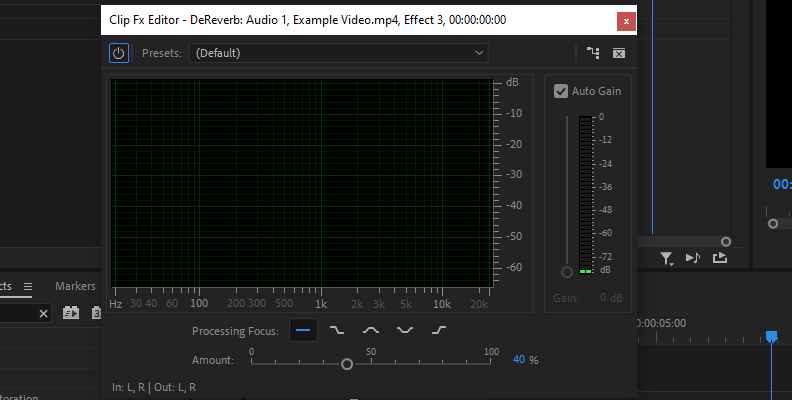
How to do it: Apply the DeReverb effect by searching for it in the Effects panel. Drag the effect to your audio clip and adjust the Reduce Reverb slider to taste.
Compression
What it does: Evens out the dynamic range by making softer sounds louder and louder sounds softer, resulting in a more balanced audio track.
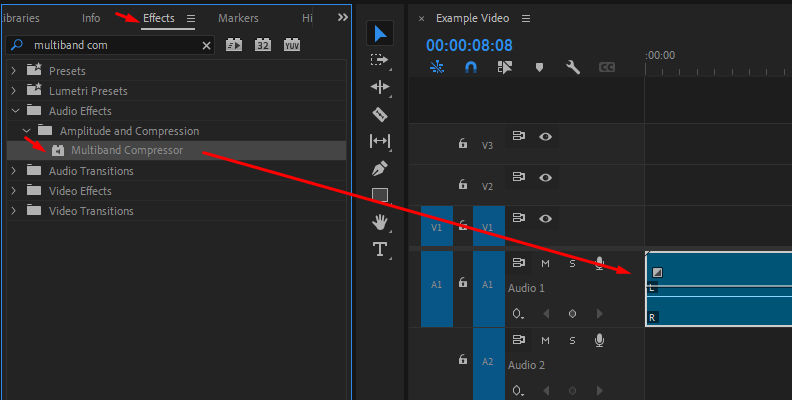
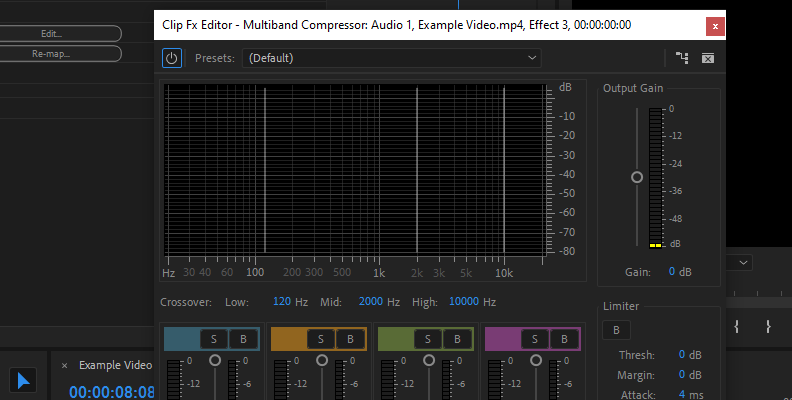
How to do it: Apply the Multiband Compressor from the Effects panel. In Effect Controls, adjust thresholds and ratio settings to even out dynamics (a good starting point is a 3:1 ratio).
Apply Hard Limiter
What it does: Prevents audio from exceeding a specified volume threshold, avoiding distortion and clipping during playback.
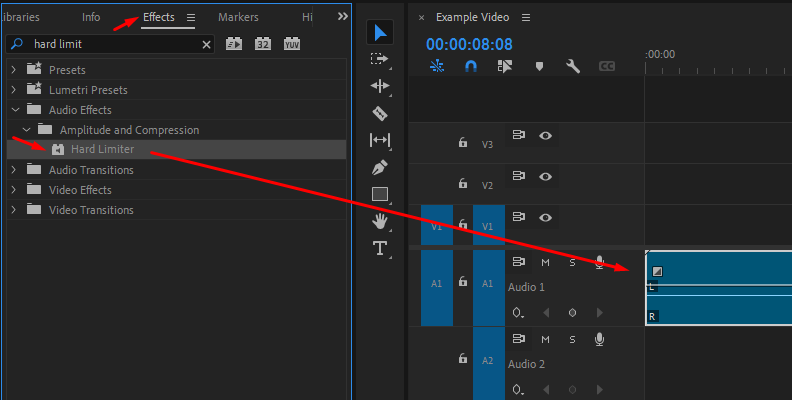
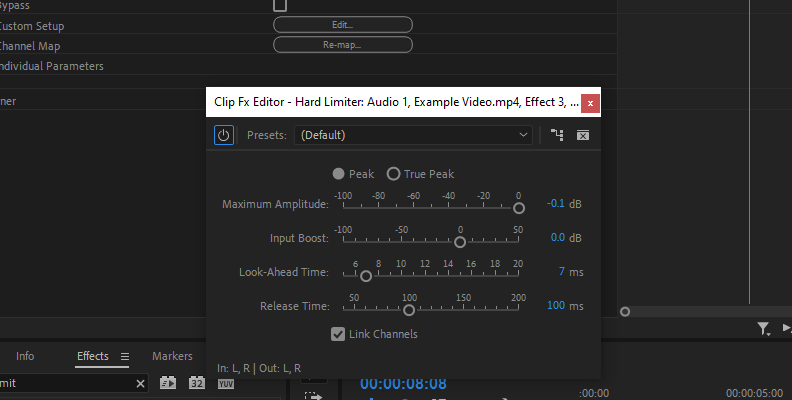
How to do it: Search for Hard Limiter in the Effects panel and apply it to your audio clip. Set the Maximum Amplitude to something like -3dB or -6dB to avoid clipping.
Adjust Fade In/Out
What it does: Smooth the transition at the beginning or end of audio clips, reducing abrupt starts or stops in sound.
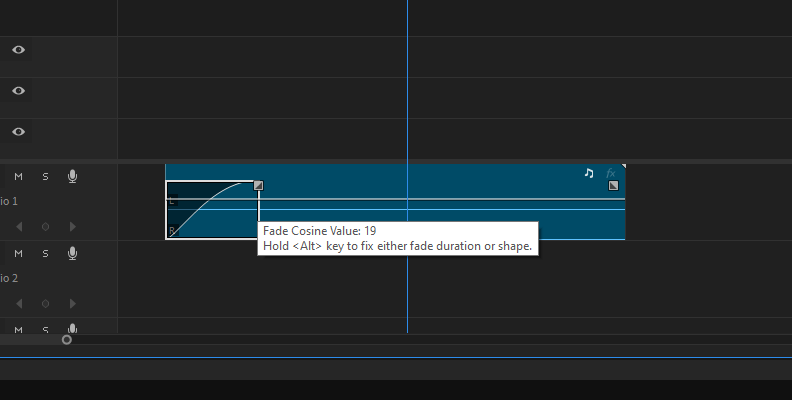
How to do it: Select your clip and click and drag the square icon as shown in the image below. The more you drag it the "smoother" the fade will be. The shorter the fade the more abruptly the volume increase will happen.
Manual Keyframing
What it does: Provides precise control over audio levels by allowing you to adjust the volume at specific points within the clip.
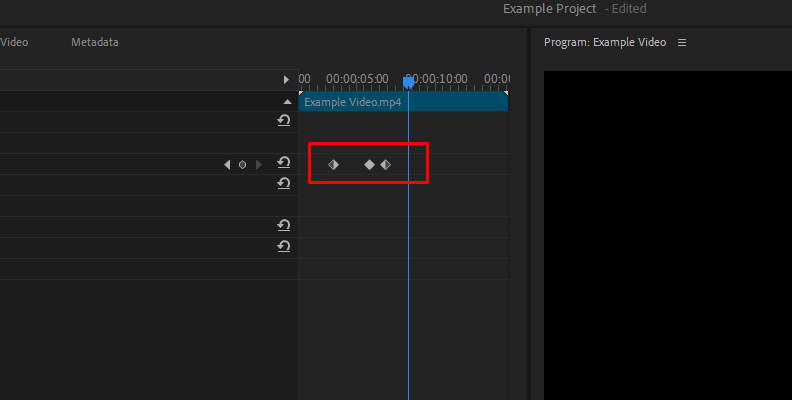
How to do it: Manually add keyframes to raise or lower audio levels in the timeline, then adjust the keyframes in the Effect Controls panel.
Use Noise Gate
What it does: Mutes sections of the audio where the sound is below a certain threshold, cutting out low-level background noise during quiet moments.
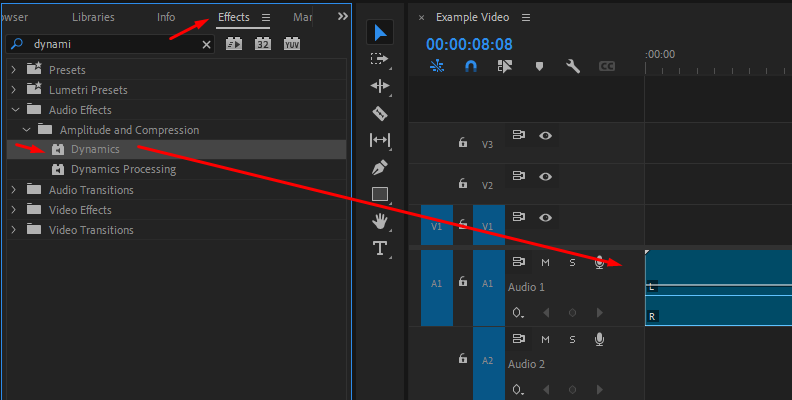
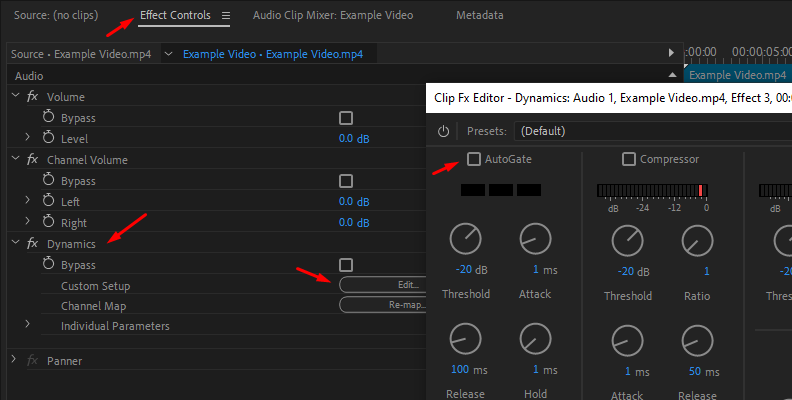
How to do it: Add the "Dynamics" effect to your clip, then open Effect Controls and click on "Edit" under the "Dynamics" effect section. Then, check AutoGate and adjust the threshold to cut out low background noise.
Which method you choose depends on what needs to be done with your project's audio, and every case may benefit most from a different method. You'll also sometimes need to combine multiple methods, once again, depending on the task.
Clean up Audio in Premiere Pro With Voice Enhance
Although programs like Premiere Pro offer various built-in tools to solve different problems and complete tasks, there are sometimes other choices that offer more control and customization, as well as save you a lot of time.
If you want to improve the sound quality of your video, whether through noise reduction or other means, you should take a look at the features and effects available in the Boris FX CrumplePop pack.
CrumplePop offers a tool called Voice Enhance and it is what we'll use in this section to clean up audio within Premiere Pro. It removes echo and noise, while improving your vocal clarity and smoothing out your audio levels. All you need to do is drag and drop the effect onto your footage. No need for effects chains full of tools with individual settings changes, all you need is Voice Enhance - saving you time and effort.
Try Voice Enhance Now!
Instantly transform any voice recording into professional-quality sound with the power of AI. No internet access required- your audio stays private and secure. Toggle it on/off to hear the difference.
On-location Interview
Selfie-style Phone Audio
Zoom Call
Ridiculous Echo
Traffic Noise
Far from Mic
Untreated Room
Recording at Home
On-location Interview
CrumplePop's plug-ins work in all popular video editing software, including Adobe Premiere Pro, so you won't have to change your familiar working environment to use them in your projects.
Once you download and install CrumplePop for Adobe Premiere Pro, this is how you can use Voice Enhance to clean up your audio.
Create a new Premiere Pro Project and Import Media
Once you launch Premiere Pro, create a new project and head over to the "Project" panel to import media. Click the blue "Import" button and find the files on your disk that you wish to import.
This can be videos with audio or just audio files.
Create Sequence/Timeline and Apply Voice Enhance
Now that you've imported the files you want to work on, drag and drop them over the timeline area. This will create a sequence.
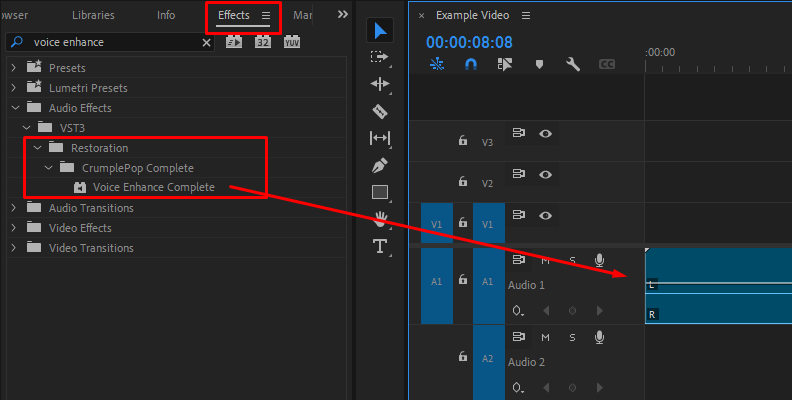
With a sequence ready, open the "Effects" panel and use the search bar to find Voice Enhance. Then, drag and drop it over the file on your timeline.
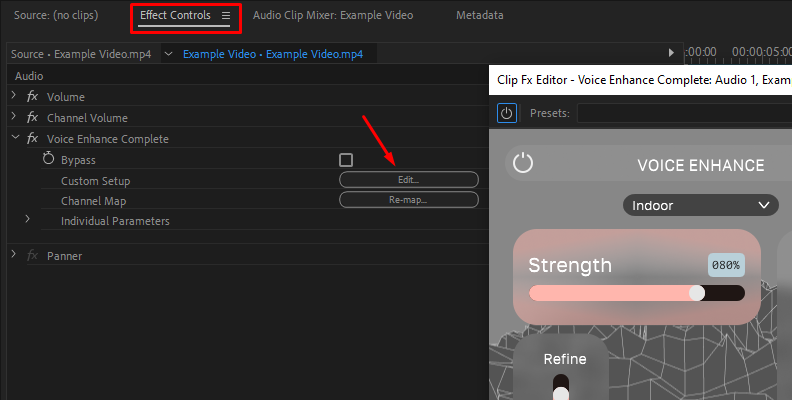
Once the effect is applied, you can open the Effect Controls panel in the upper-left corner, then find "Voice Enhance Complete" and click on "Edit" under "Custom Setup".
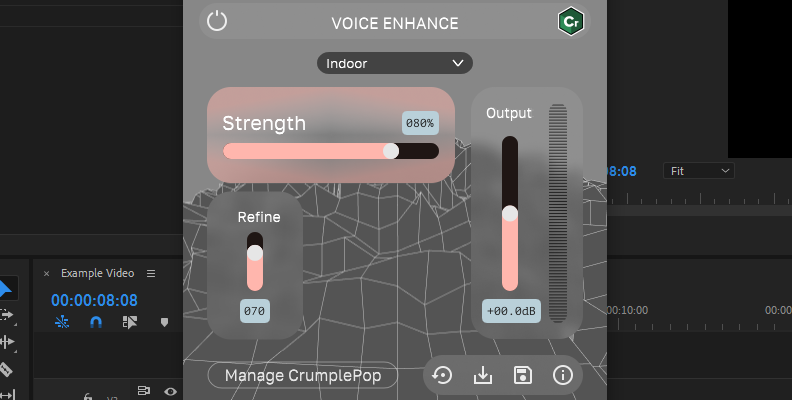
Simply adjust the "Strength" slider, and you're done with most of the work. Preview the changes and try adjusting some of the other sliders to fine-tune your results.
Final Words
Hopefully, this covers everything you need to know about cleaning up your imperfect audio files in Adobe Premiere Pro.
Thanks for reading and wish you the best of luck with all your future projects.


