


Quality video editing means paying attention to detail.
Most content we watch nowadays is edited. You may not notice it as a viewer, but that's the beauty of it, and it's what distinguishes experienced editors from beginners.
In this guide, we'll talk about expanding your editing arsenal with the camera shake effect.
Excited to learn more? Let's crack straight into it.
What is a Camera Shake Effect?
Before getting into creating the effect, let's explain what it is and why you should consider using it in your videos.
A camera shaking effect is useful both in "amateur" video editing and professional films. Here are some examples:
Camera Shaking Effect In Music Videos (Combined With Motion Blur)
In some content, the editor relies on this effect to amplify the "powerful" moments in the song even further, like bass "drops" or powerful guitar riffs. Combined with the motion blur effect, this could make the viewer feel "goosebumps," further "winning" their attention. Here's an example.
Camera Shake For Earthquake Effect and Other Visual "Wow" Factors
Adding camera shake to shots with visual "wow" factors (like explosions or an earthquake) makes them more exciting to watch.
For example, this shot was recorded with a drone that's stable while flying. However, the earthquake shown in it wouldn't look as intimidating without the artificially-added shake effect.
Camera Shaking Effect in Comedic Edits
Memes and comedy compilations are amongst the most widely-served types of videos nowadays. If you pay attention while watching, you'll notice how often camera shakes are used in such content.
When the editor wants to showcase the comical "rage" of someone in the clip, adding a shake effect will amplify their reaction and make it funnier. Here's an example of the "rage/triggered" effect.
Shake Effect to Create Fake Handheld Camera Illusion
Another use case of the cam shake effect is adding artificial, handheld camera instability to shots that we're stabilized or on a tripod during recording.
Imagine a POV of a person running but recorded with a camera stabilizer. The viewer may find it odd that the camera doesn't shake during such an unstable movement. Here, the cam shaking effect can make the shot more realistic.
When to Avoid Adding a Shake Effect
More does not always equal better. Sometimes, too many effects can have the opposite effect. Instead of "grabbing" the viewer's attention, you could drive it away.
It's usually best to avoid adding a shake effect during serious shots requiring the viewer to focus and pay attention to detail, as it will likely be distracting. However, this is up to you to decide depending on multiple factors, like the scene position.
How to Create and Add Shake Effect in Adobe Premiere Pro
Now that you know more about the multiple applications of the shake effect, let's see how to create and implement it within Adobe Premiere Pro.
There are two ways to do this, both manually or by using a plug-in such as Sapphire from Boris FX, which is quicker and with more customization options.
We'll show you both, so let's start with the first one.
Method 1: How to Add Shake Effect with Boris FX Sapphire Plug-in in Adobe Premiere Pro
It's a long list, but some of the included examples in the Sapphire kit are their upgraded version of the transform effect with motion blur and modifiable shutter angle, distortions, various seamless transitions, and of course, the camera shaking effect. Applying a shake effect with it is really simple, requiring only a few clicks.
Once you download and install Sapphire for Adobe Premiere Pro, follow these steps to apply the shake effect to your video.
Step 1: Open Adobe Premiere Pro, load your project, and add any video material (clips) to your timeline.
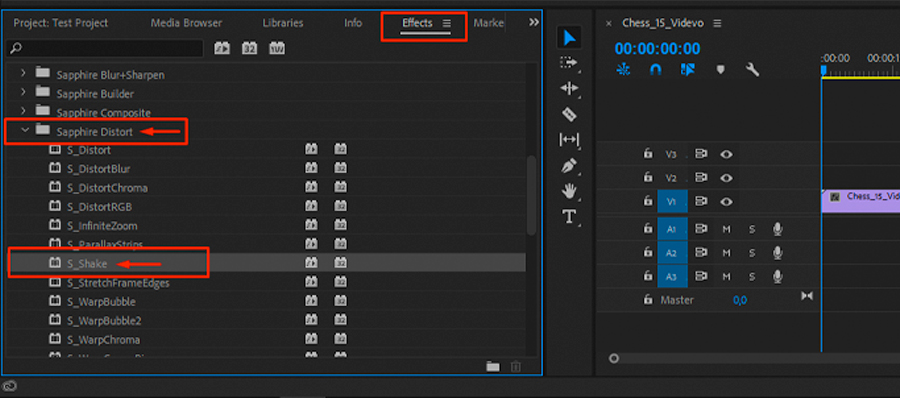
Step 2: Open the "Effects" panel, expand the "Video Effects" and "Sapphire Distort" folders, then find the "S_Shake" effect.
![How to Add Shake Effect in Premiere Pro]()
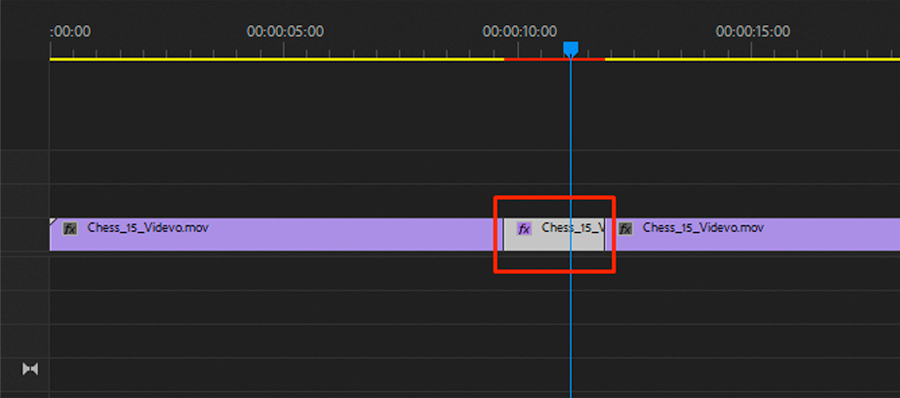
Step 3: Drag and drop the effect over the video on your timeline. Use the razor tool ("C") to cut a segment beforehand if you don't want to apply the shake effect to the entire shot.
![]()
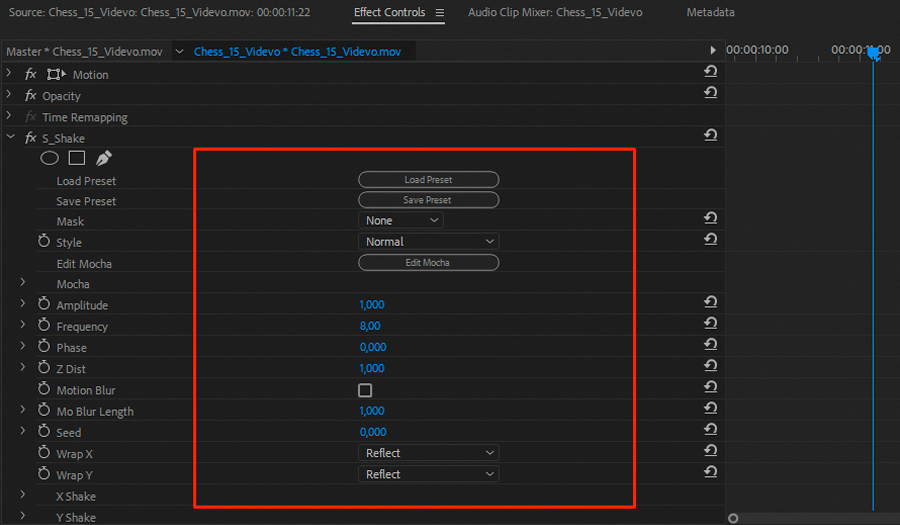
Step 4: If it's not perfect for you on the first try, click on the clip and select "Effect Controls" to open the effect values modifying panel. Adjust the shake effect settings and customize it for your specific needs by changing the original values.
![]()
Step 5: When done, save your modified shake effect as a preset to use it in other shots, or keep on experimenting. Apply motion blur or the zoom effect to see if it improves the effect.
You've now successfully created a shake effect in Premiere Pro with the help of a plug-in. If you wish to do it manually, take a look at the next method.
Method 2: How to Manually Create Shake Effect in Adobe Premiere Pro
So, you've decided to learn how to create a shake effect without the help of a plug-in. Is that possible? Absolutely! Here are the steps to manually create a shake effect for your video in Premiere Pro.
Step 1: Open Adobe Premiere Pro. Load a project and add any video material to your timeline.
![]()
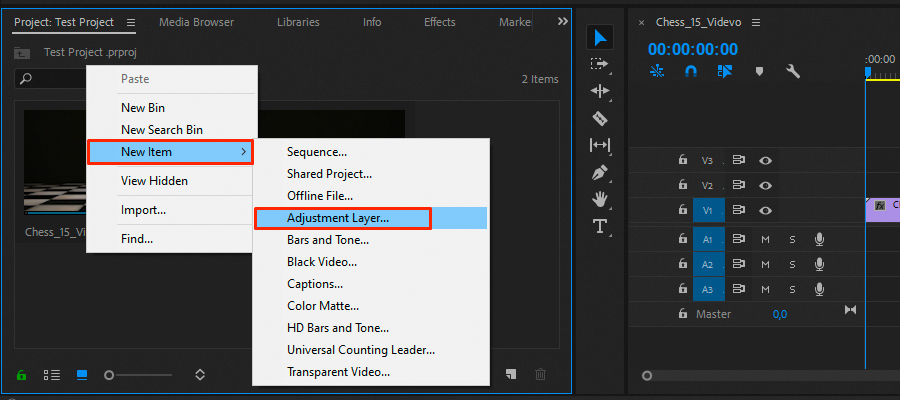
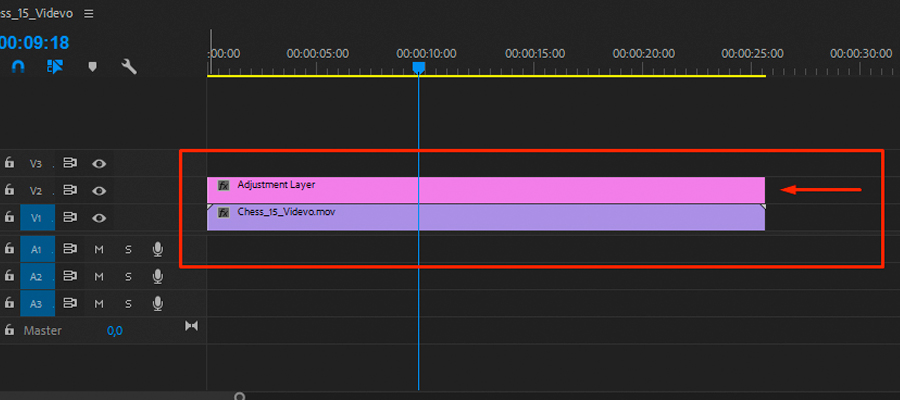
Step 2: Open the "Project" panel and right-click an empty area. Choose "New Item" -> "Adjustment Layer" and drag the new layer over your clip. Consider changing its default name into something like "top layer for camera shake" to find it easier in a complex project.
![]()
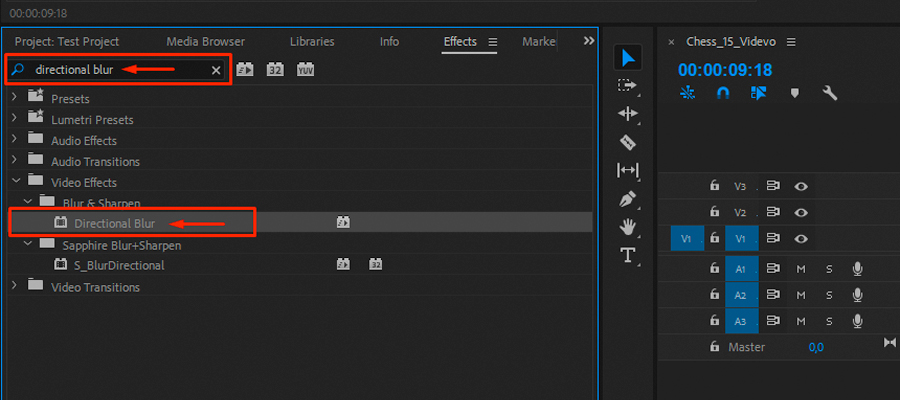
Step 3: Open the effects panel and search for the "Directional Blur" effect. You will find it in the built-in Premiere Pro "Video Effects" presets folder.
![]()
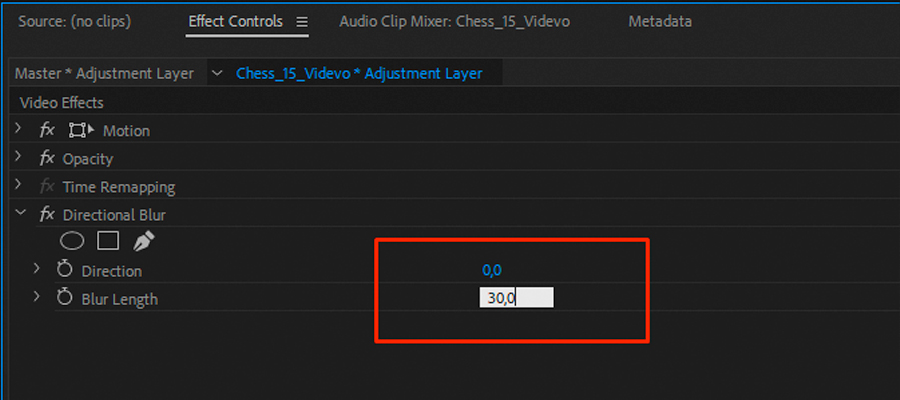
Step 4: Select and drag the effect onto the top layer (that you positioned over the original clip on your timeline), then click on it and open the "Effect Controls" panel. Change the "Blur Length" value from zero to something like 35.
![]()
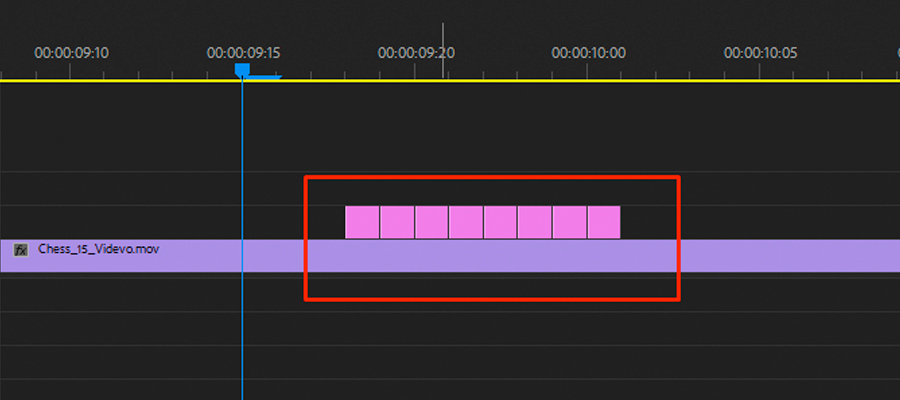
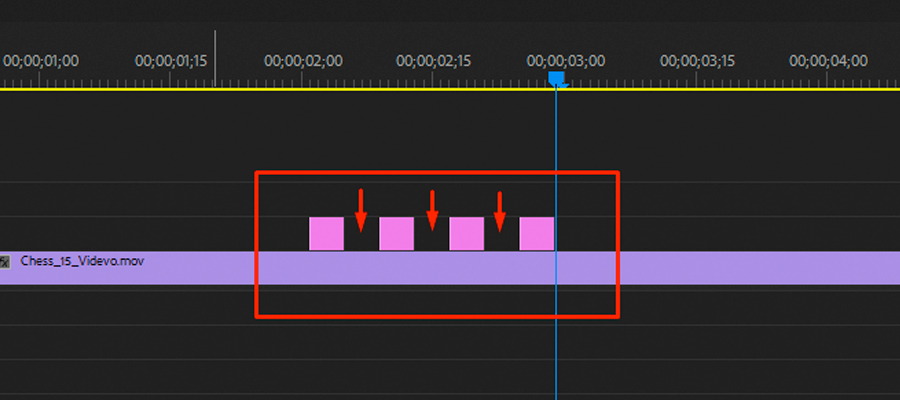
Step 5: Cut the adjustment layer so it starts at the same frame you want your shake effect to start. Move the playhead forward on your timeline one frame at a time and cut at each frame for as long as you want the shake effect to last. When done, cut out the rest of the adjustment layer.
![]()
Step 6: Delete every other frame of the adjustment layer starting from the second one. This is very important as it will prevent the effect from looking like a constant shake. Feel free to space out the frames as much as you need, though. It doesn't have to be every second frame. It can be every third, or fifth, depending on what you're trying to show.
![]()
Step 7: Play the video to see the shake effect in action. Go back into the "Effect Controls" panel and adjust some of the parameters to modify the effect.
Step 8: You can use the duplicate "Alt" key shortcut on your keyboard to copy the shake effect sequence you just created and use it in other parts of the video. Select the parts of the adjustment layer with the added effect by holding the CTRL button on your keyboard and clicking them, then hold the "Alt" key and drag them to any part of the video where you want the effect to be.
That's it! Now you know how to create shake effect in Premiere Pro.
You can experiment by adding zoom to make the motion a bit more realistic or apply motion blur to create a "fancier" effect. Note that you may need to use the position panel to zoom in on the video so that the shake effect doesn't cause the shot to go outside of its borders and show black bars on the sides.
Unfortunately, unlike the first method involving the Sapphire plug-in, this method takes more time to manually adjust the parameters to create a suitable shake effect for your clip.
Final Words
When used correctly and in suitable situations, adding shake effect in Premiere Pro can make your audience feel more "immersed" while watching.
Hopefully, this guide helped you understand when and how to use it correctly.


