Particles can bring your animation and movies to life. Adding particle effects to your projects can help you achieve unique titles and add more realism to a scene by creating magic effects, bubbles underwater, snow, rain, or fireworks.
Particle systems can seem complex to master, but once you familiarize yourself with them, they are incredibly powerful in modifying the particle's appearance, direction, and velocity to create impressive effects.
In this tutorial, you'll learn how to create particle effects in Adobe After Effects. I'll start with the steps using After Effects particle effects and then a separate guide using the Continuum BCC Particle Illusion plug-in.
Let’s dive in!
Creating Particle Effects in After Effects

Adobe After Effects features several particle effects to create different types of particles for your animations and videos. Some specific effects are CC Bubbles, CC Drizzle, CC Rainfall, CC Snowfall, and CC Star Bust, and more advanced particle effects are CC Particle Systems II and CC Particle World, which supports particles in an x, y, and z-axis 3D environment.
For this first part of the guide, I’ll show you how to create particles using the CC Particle Systems II effect and customize them. I’ll also give you some tips for using the Particle Playground effect to customize particles using three different types of generators.
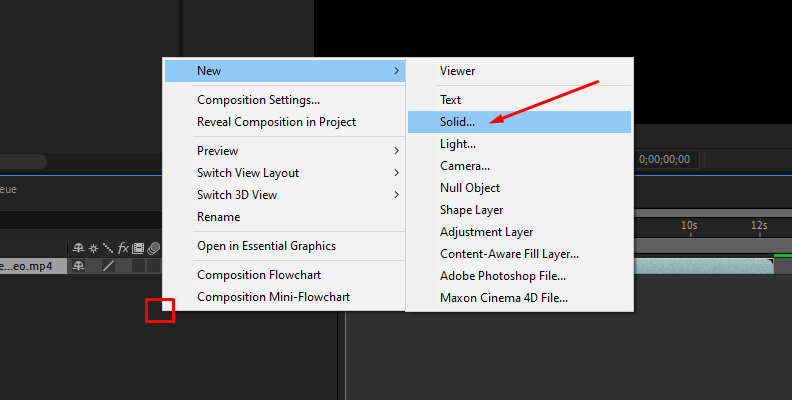
Step 1: Create a New Solid
Create a new solid in the timeline and name it the particles you want to create so everything is in order. Make it to the full composition size so it fills the composition.

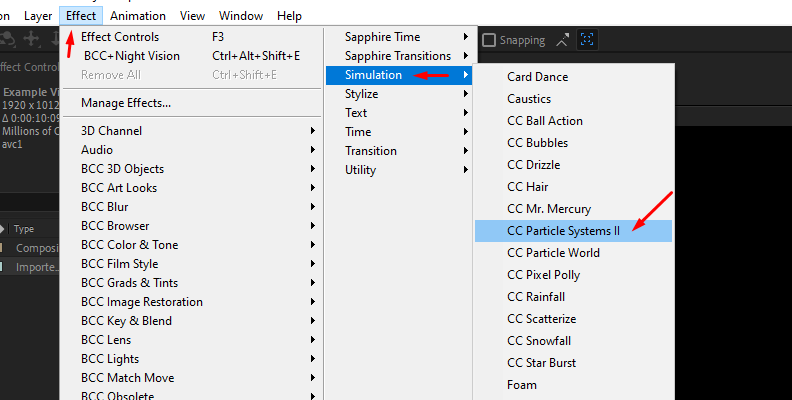
Step 2: Add CC Particle Systems II
Go to the Effect menu Simulation > CC Particle Systems II to add the CC Particle Systems II effect to the solid layer. You can also search for it in the Effects & Presets panel and drag it to the solid layer.

Step 3: Customizing the Particle Emitter
Open the Effect Controls panel to begin crafting the particles. I'll review the parameters individually, so you know where to look for when editing the effect.

Let’s begin with the Birth Rate. This parameter controls how many particles are generated from the emitter. Decrease the birth rate value to produce scarce particles or increase it to make more particles.
Next, you have Longevity. This parameter regulates how long each particle lasts from originating until it disappears on screen. Reduce it to make the particles last longer to create a more sparkling or bright effect, or increase it to make longer particles that fall like water or rain.
The Producer parameter controls the particle emitter or generator. Here, you can adjust the position to move the particle producers to where you want the particles to originate. You can also keyframe the position if you want the particles to move around a title or object.
Use the Radius X and Y settings to adjust the size of the particle producer. For example, if you’re creating sparks from an ignition or electrical discharge, you can reduce them to make a small flare, then adjust the longevity to make it a quick spark.
In Physics, you have more customization settings for creating particles.
You can change how the particles are generated in the Animation dropdown menu.
Velocity sets how fast the particles are emitted from the producer.
Gravity sets how fast particles fall. Increasing the number will make the particle look heavier, and decreasing it to a negative number will make it look like it’s flying up. So, you could use negative gravity for smoke and fire and increase the gravity to make falling water or sand.
Resistance restricts velocity, creating a barrier that causes the particles to slow down by the end of the animation.
The Direction rotates the producer, creating the motion that makes the particles move.
Extra is only enabled for certain types of animations.
Change the style of the particles in the Particle parameter. Depending on the chosen particle type, some settings, such as birth size, death size, and size variation, will be enabled. You can adjust other settings like the particles' opacity map, color map, and death and birth color.
Play and experiment with different combinations, adjust physics, and then go back to changing the birth rate or longevity to see how each parameter affects the others.
Step 4: Particle Playground
The particle playgrounds allow you to choose three types of generators for your particles in one effect, including using a layer as a source and customizing it. Start by adding the Particle Playground effect from Effects > Simulation > Particle Playground.
The three first parameters, Cannon, Grid, and Layer Exploders, are the emitters types in the Particle Playground.
Cannon produces flowing particles as exploding from a cannon. You can set the barrel radius, direction, positions, how many particles per second are generated, color, and velocity.
Grid creates a field of particles across and down the screen. You can set the position, width, height, the number of particles across and down, radius, and color.
Layer Exploder lets you choose a source layer used to generate the particles.
By default, all particles are dot-shaped, regardless of the emitter type. You can use a layer to change the shape of the particle. Add the layer to the composition and display the Layer Map controls to change the source to the layer.
Gravity controls the particles' physics. Adjust the Force to change how heavy the particles fall, randomize the force for every particle, and change the direction of the movement.
Repel will make the particles repel or attract each other in the animation. Combining this parameter with Wall can create a bouncing animation for your particle effect.
As with the Particle Systems effect, your best result will come from experimentation.
How to Do Particle Effects in After Effects with Continuum BCC Particle Illusion
Particle Illusion is a plug-in included in Continuum for creating dynamic particle effects. This powerful plug-in lets you combine emitters to create explosive particles for your projects. BCC Particle Illusion presets make particle creation easier and Mocha tracking and masking for more advanced compositions.
Step 1: Apply BCC Particle Illusion
Search for the effect from Effect > BCC Particles > BCC Particle Illusion or from the Effects & Presets panel and drag it directly to the layer where you want the particles.

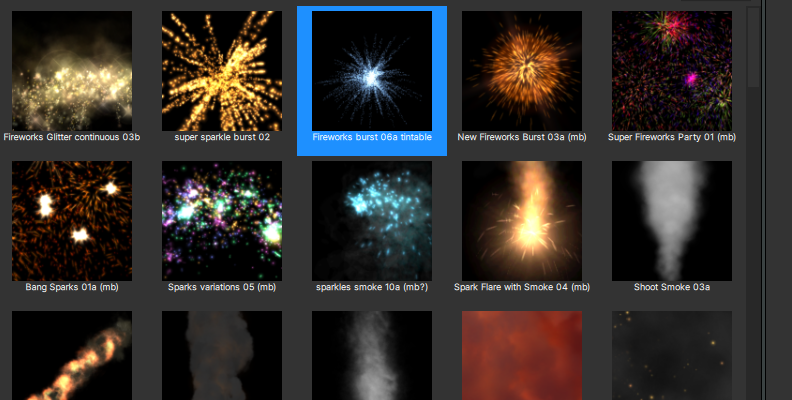
Step 2: Browse the Presets Library
BCC Particle Illusion has a preset library you can explore for diverse effects. You have presets for falling leaves, lights, mist, embers, waves, rain, snow, and more. All these presets are customizable from the Particle Illusion UI.

Step 3: Creating Particles
Click the Launch Particle Illusion button to edit and craft the particle effects.

The Particle Illusion interface can feel daunting at first, but once you know where to find everything and become more familiar with it, you'll navigate it more smoothly. I'll review what each panel in the user interface shows.
On the left side of the screen, you have the emitter library and the emitter preview. You can search for a specific particle emitter in the library using keywords. For example, searching for fire will give you results for sparks, fireballs, fire burns, flames, explosions, fireworks, and more. Select an emitter that’s close to what you’re looking for. Double-click an emitter to add it to the project.
The middle panel is the Controls view, which displays the parameters for each emitter. Here, you can adjust emitter parameters such as shape, 3D options, general appearance, transformation, emission, motion, physics, and turbulence settings. Play with these settings to create unique particle looks and behaviors.
On the right side is the Composite view or Stage, which previews the final result of the particle effect. You can work on the composite view by dragging the emitter to change the position and angle. Press the spacebar to play the animation for your particles.
Below the composite view, you find the Node view and Graph view. The Node view shows everything added to the project, from emitter to forces, deflector, etc. You can select and navigate for each object to modify the composition.
The Graph view helps you to control and animate parameters with keyframes to create more dynamic particle effects.
When you finish customizing a preset or creating a particle effect from scratch, you may render the output directly from the Particle Illusion UI by clicking the R icon in the playback toolbar or clicking Apply to return to After Effects.
Final Words
Particles can be a great addition to your projects as they can improve and make your videos and animations more attractive. Plug-ins like BCC Particle Illusion can help you create more complex animated particles easily by combining emitters and using keyframes.
Download a Continuum free trial and experiment with the BCC Particle Illusion plug-in.
Good luck!


