


Photographers frequently use motion blur to take their work to the next level.
This technique works by setting longer exposure times. Motion blur can showcase movement and action within your shot in unique ways and add depth - so knowing when and how to apply it correctly is a must for every creative artist.
This guide will explain how to add motion blur in Photoshop, the industry's leading digital photography-editing software, so without further ado, let's get right into it.
What is Motion Blur?
The motion blur effect occurs when a photographer uses a longer shutter speed to capture a moment from the real world.
This means their camera's sensor will be exposed to light a bit longer than usual, so if an object is in motion during that time, it will come off as blurry in the final image.
If you want a crisp image and to avoid getting any motion blur while taking the photograph, you should set your device's exposure time (shutter speed) to as fast (shorter exposure) as possible. So, to conclude:
Using a fast shutter speed (minimal exposure) means your sensor is exposed to light for a much shorter period, which results in "crispier" photography that represents the fraction of that moment much more accurately. This means no motion blur, as the camera captures the image so quickly that you can see the smallest detail as if it were frozen in time.
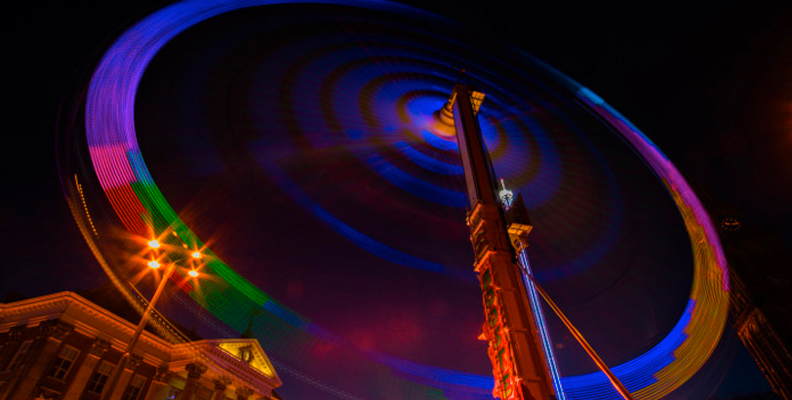
Using a slower shutter speed (longer exposure) means your sensor is exposed to light longer, resulting in a more "drawn-out" photography that represents "multiple fractions" of that moment, therefore allowing any objects in motion during that time to appear blurry, smeared, or leave a trail, also known as "motion blur streaks" (car lights on a highway, lights on a Ferris wheel, etc.)
How to Add Motion Blur in Photoshop
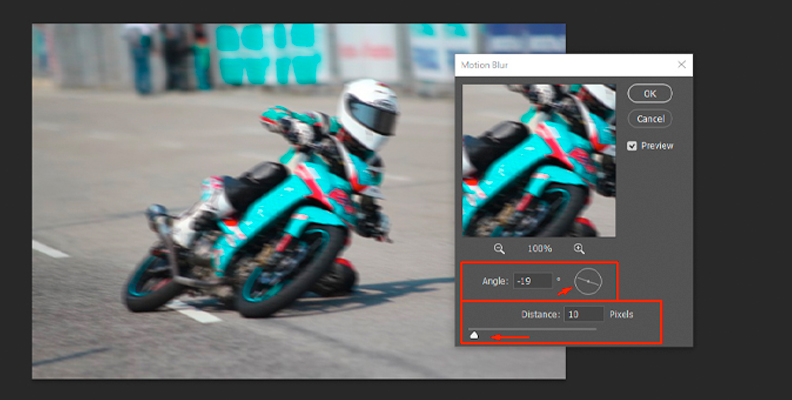
Give an object within your photo the appearance of quickness by applying the motion blur effect. Click Filter > Blur > Motion Blur to apply the effect, then manually adjust the Angle based on the object’s direction of movement. For larger a blur amount, adjust the Distance.
Here's how to do it step by step if you're new to photo editing in Adobe Photoshop.
Open the Image You Want to Blur in Photoshop
To add motion blur to an image in Adobe Photoshop, you first need to open the software, create a new project (or use an existing one, but we recommend creating a new one for testing purposes) and import the image.
So, load up Photoshop, click File > Open and double-click on the image you wish to add motion blur to from your Desktop or another location. This will import it into the program and then it's ready to be worked on.
Make the Image a Smart Object
Before you can create motion blur for your image, you first need to convert it to a smart object. To do this, click on the image within the "Layers" section, then choose Convert to Smart Object.
Now you can add effects to the entire image and modify it as you wish without changing or "damaging" the original background layer. You can also use the traditional way, which is just making a duplicate layer and working on it to keep the original one safe.
Apply The Motion Blur Effect
From the top-bar menu in Photoshop, click "Filter," then hover with your cursor over the "Blur" category to expand the options menu, and finally, choose Motion Blur.

This will add motion blur to your image, and you'll be immediately able to tell the difference by comparing it with the original photo. The process is the same if you wish to experiment with other effects, like the Radial or Gaussian Blur.
Modify The Parameters
Now the only thing left is to modify the parameters of this Adobe Photoshop motion blur filter and get the result you need for the photo.
The "Distance" slider will determine how strong the motion blur is, and the "Angle" will change the direction of the motion blur, so you can use this to fake the effect of someone driving downhill or falling off a cliff.
To get the most natural motion blur look, match the angle with the movement of the object within your shot.
That's all there's to it!
How to Add Motion Blur Filter in Photoshop Using Boris FX Optics
Adding motion blur in Photoshop is relatively simple. Adding motion blur with the help of a renowned plug-in is even better.
For this task, we recommend Optics by Boris FX. It uses the same effects from their industry-leading Sapphire package that you may have used to apply Premiere Pro motion blur if you've followed one of our guides on that topic, and it's super easy to work with.
Of course, it contains a blur image effect that you can use in Photoshop.
There's a free trial version available for Optics, and it comes both as a standalone software or a plug-in if you prefer having all tools in one place. Download it, install it, and load up Photoshop (or Lightroom), then follow these steps to apply motion blur to your images.
Insert The Image Into Photoshop
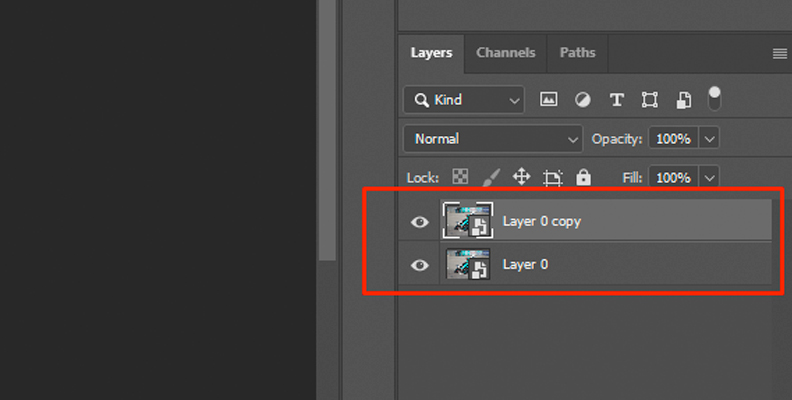
Once you've inserted the image in Photoshop, duplicate the background layer so you have a safe copy of it to work on and revert the changes if needed.
To do this, click on the image within the "Layers" panel, then use the CTRL + J shortcut on your keyboard to duplicate it, or right-click the original layer and choose "duplicate layer." Now you can work on the image carefree.
Add Motion Blur Through Optics
To launch Optics, click "Filter" and use your cursor to hover over "Boris FX," then choose Optics, as shown in the image below.

This will load the interface you need to take your images to the next level. Now, use the search bar to type in "Motion" and choose the "S_BlurMotion" effect from the list. Select a preset from the left-side Presets panel if any of them match your criteria.
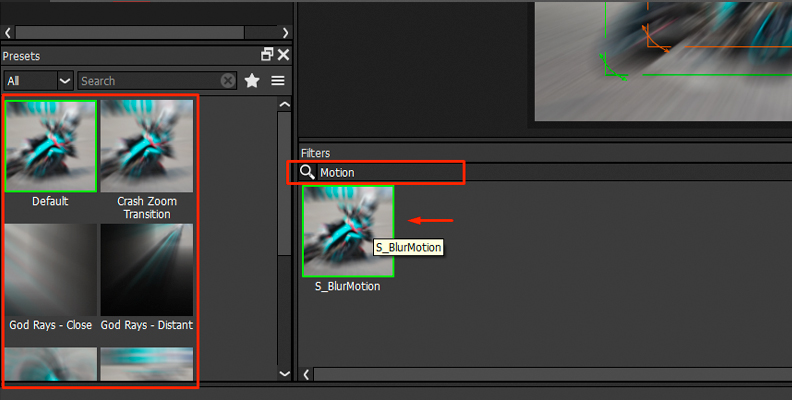
The default preset is already suitable for many different photos, and you can customize it even further.
Fine Tune The Effect
After selecting a preset within Optics, you'll be able to customize it using a myriad of settings available in the "Parameters" section on the right side.
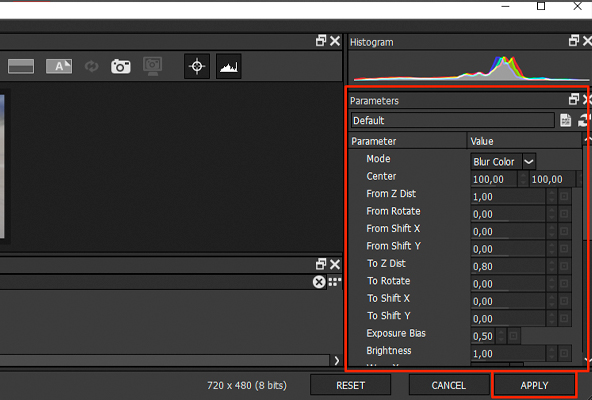
Simply move the sliders and you'll preview the motion blur changes in real-time. When done, click Apply in the bottom-right corner and the effect will be saved on your image.
Create A Layer Mask (Optional)
If you don't want the motion blur you just added to apply to the whole image, you can use the built-in tools in Optics to easily create a layer mask and isolate only one person or one object within your shot.
To do this, click on "Add Mask" within the Optics panel, then choose your preferred method of adding a mask. Optics makes this very easy through their many available options.
After creating the layer mask, make sure the effect is applied to it, then choose to merge layers if you have multiple for better organization. Mark your blur layer to know which one adds the effect and the work is done.
Final Words
That's all you need to know in order to easily add artificial motion blur to moving objects or even still elements within your photos. Amongst all Photoshop effects, motion blur is definitely one of the most useful ones and allows for so much creativity within your work if you know how to use it correctly.
Hopefully, this tutorial came in handy and the knowledge presented will be of good use to you in all future projects.


