
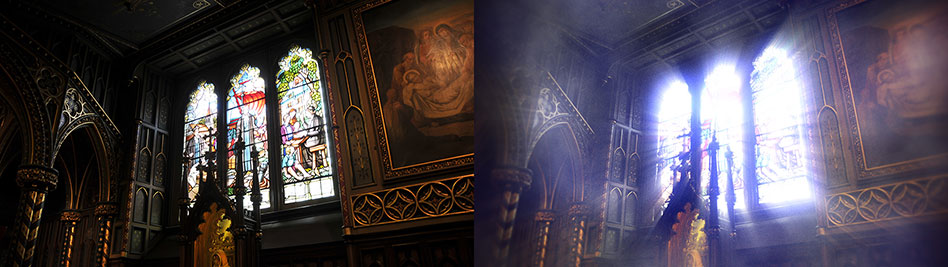
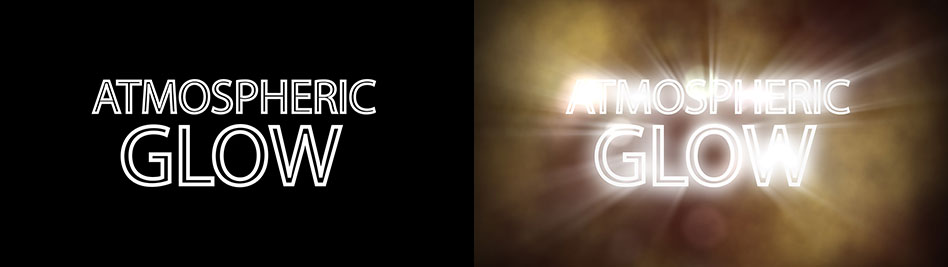
The BCC+ Atmospheric Glow is an exciting new glow style mega-filter effect that brings instant atmospheric looks to an otherwise flat scene.
Based around a film glow, this effect includes 9 independently controlled groups, including volumetric light rays, a smoke/fog generator, light flickering, chromatic aberration, on-lens orbs, film grain and a vignette with color/blur options, each of which adds a new element to the scene. Many of the effect groups are auto-animating and the effect is capped with a full suite of color correction tools. This effect includes dozens of professionally designed user modifiable presets to get you started with generating some exciting atmospheric looks.
Presets and the FX Editor
The FX Editor provides a convenient way to store and retrieve factory installed and/or user generated filter presets. To select a preset, open the FX Editor interface and pick one from the Presets panel. Click the apply button in the FX Editor to return to the host user interface.
To save a custom preset, click the “Create Custom Preset” icon in the top right corner of the parameter list, next to the filter name, set a name for the new custom preset in the dialog that appears and click done.
Filter Parameters
Mocha Mask: Click to launch the Mocha custom UI
The BCC PixelChooser provides a way for the user to select which pixels in the filtered source are actually going to be affected by the filter, via the generation of image based mattes, gradient mattes and vector shape masks. Mocha planar tracking and vector shape masking options are included in the PixelChooser, which allows for the generation of motion-tracked mask shapes as a hold-back mask.
For more information on the PixelChooser, Click Here.
The Beat Reactor Group: The BCC Beat Reactor is an animation control suite which drives effect properties based on the contents of an audio track. This lets you seamlessly tie visual FX to an audio soundtrack without the need for ANY manual keyframing.
For more information on the Beat Reactor, Click Here.
Glow group
The glow serves as a foundation of this filter and is the basis on which the entire look is generated. As you work with the filter, you’ll find that some groups in the filter can be applied either before or after the glow stage of the effect, which can be used to generate more photorealistic or more highly stylized looks. The glow section includes over 20 different apply modes which blend the glow result back into the filtered source.
View: allows for the selection of the view to aid in setting up the filter.
- Output: This is the main result of the full glow effect applied back over the input clip
- Glow: Displays just the generated glow prior to being applied back to the input clip via the apply modes.
- Threshold: Displays the intermediate result of the threshold setting
Intensity: Use to control the intensity of the glow result. Higher values yield a stronger glow with a total white image when this parameter is set to it’s highest value.
Color: Used to set the color of the glow. Default is white.
Radius: Used to set the radius over which the glow spreads to surrounding regions.
Threshold: Used to set the pixel values that are affected by the glow – a setting of 0 will apply a glow to all of the pixels in the input clip, while a setting of 100 will not apply any glow to the image.
Glow from Alpha: The Glow From Alpha option generates the image glow from the alpha channel instead of or in addition to the color channels. The selection in the Glow From Alpha Mode determines how the alpha glow and the color channel glows are combined.
Glow Under Source: Use this function to control how the glows are composited with alpha source clips – a setting of zero composites the glow on top of the source and disregards the source alpha channel, while a setting of 100 composites the glow behind opaque regions in the source but allowing them to extend out into the transparent regions.
Edge Mode: Determines how edges of the filtered frame are handled.
- Transparent: allows the edge of the result to become transparent.
- Repeat: repeats edge pixels to generate opaque pixels along the edge of the result.
- Reflect: reflects pixels back into the result to generate opaque pixels along the edge of the result.
- Wrap: wraps edge pixels to generate opaque pixels along the edge of the result.
RGB Independent Glows: This checkbox enables independent scaling of the glow dimensions for Red, Green, and Blue color channels.
Red Scale: Scales red glow uniformly.
Green Scale: Scales green glow uniformly.
Blue Scale: Scales blue glow uniformly.
Blend Mode: This pop-up is used to set the apply mode that the filter uses to composite the glow over the input image. The default apply mode is “Screen”.
Flicker group
The flicker option emulates a flickering light source and includes a pre/post glow option - setting the flicker to pre glow will result in a flickering glow while setting it to post glow will composite the flickering light on top of the glow. Included in the flicker group is a way to control the light pulse - the smooth setting provides a smooth ramp up and down of the flickering light, while spiky generates an abrupt and fast spike of light. The light can be set to flicker randomly over the course of the effect or in evenly timed pulses.
Enable: Used to enable/disable the flicker effect.
Pre/Post Flicker: Allows the flicker to be set before the glow effect has been applied, or after it has been applied.
Speed: Used to adjust the overall speed of the flicker. Higher values will result in shorter intervals between the flicker effect.
Amount: Used to adjust the intensity of the flicker effect. Higher values will result in a more intense flicker effect.
Red Amount: Used to adjust the intensity of the flicker effect in the red channel. Higher values will result in a more intense flicker effect.
Green Amount: Used to adjust the intensity of the flicker effect in the green channel. Higher values will result in a more intense flicker effect.
Blue Amount: Used to adjust the intensity of the flicker effect in the blue channel. Higher values will result in a more intense flicker effect.
Flicker Type: Allows for the selection of the style of flickering.
- Smooth: generates curved pulsing flickers that fade in and out.
- Spiky: generates sharp flickers that flash on and off.
- Linear: generates flickers that ramp up and down.
Flicker Style: Used to set the style of the flicker.
- Brighten Only: When selected, the flicker will consist of bright flashes only.
- Darken Only: When selected, the flicker will consist of dark dropouts only.
- Alternate Bright and Dark: When selected, the flicker will alternate between bright flashes and dark dropouts with a flat interval between each of the bright and dark light spikes. So the resulting cadence would be: bright-flat-dark-flat-bright-flat-dark etc.
- Bidirectional: When selected, the flicker will alternate between bright flashes and dark dropouts with a flat interval after the bright and dark light spikes. So the resulting cadence would be: bright-dark-flat-bright-dark-flat etc.
Time Symetry: Used to adjust the timing between each flash.
Flatness: Used to adjust the duration of the light spike peak hold, with higher values producing a flatter curve and extending the duration of the flash.
Flicker Randomness: Adds more variability to the flickering animation. Higher values result in more random intervals between flickers. Lower values result in more regular flickering.
Intensity Randomness: Adds more variability to the intensity of the flickering animation. Higher values result in more intense contrast between brightness and darkness.
Noise: Use to add a level of noise to the animation curve, resulting in a more erratic pulsing of light.
Noise Smoothing: Use to add some smoothing to the level of noise added to the animation curve.
Random Seed: Used to change the randomized look of the effect.
Curve View: Used to view a graph of the effect over the clip or over black. Allows for easy visualization of the effect animation.
Time View: Used to change the time scale of the curve view.
Volumetric Rays group
The Rays option generates volumetric light rays that pull color either from the filtered source or from a user defined color. By default, the light beams will pull color from the filtered source but setting the color chip to anything other than white will override that and tint the light with the user selected color. The source for the rays can be set to use the alpha channel from the filtered source and the rays, which works great for title matte effects, and the rays can be composited over or under the source alpha. Also included in this group are screen and add blend modes.
Enable: Used to enable/disable the rays effect.
Pre/Post: Allows the rays to be generated before the glow effect has been applied, or after it has been applied.
Blend: This pop-up is used to set the apply mode that the filter uses to composite the rays over the input image. The default apply mode is “Screen”.
Position: Move the x/y position of the source point from which the rays will emanate.
Length: Used to set the ray length.
Brightness: Used to set the brightness of the rays.
Color: Used to set the color of the rays.
Blur: Used to blur the rays.
Threshold: Used to control the amount of rays based on a brightness threshold. Fewer rays with more definition are generated at higher threshold values.
Rays from Alpha: Used to generate the image glow from the alpha channel instead of or in addition to the color channels.
Rays Under Source: Use this function to control how the rays are composited with alpha source clips – a setting of zero composites the glow on top of the source and disregards the source alpha channel, while a setting of 100 composites the glow behind opaque regions in the source but allowing them to extend out into the transparent regions.
Smoke/Fog Group
This section is where things get more atmospheric. Fog and smoke clouds are generated in this group and depending on the pre/post option setting, the clouds can be set to interact with the rays for added photorealism. This group also features blending modes and individual parameter control over pretty much every aspect of the cloud generator - speed, color, contrast, density and more.
Enable: Used to enable/disable the fog effect.
Configuration: Used to configure how the fog is composited into the effect, as well as view the matte.
- Pre Glow: Used to composite the smoke and fog onto the clip prior to applying the glow effect.
- Post Glow: Used to composite the smoke and fog onto the clip after the glow effect has been applied.
- Smoky Rays: Used to composite the smoke and fog texture into the volumetric rays.
- View Smoke Matte: Used to view the smoke matte. Disable before rendering effect.
- View Rays : Used to view the rays pixels. Disable before rendering the effect.
- View Smoky Rays: Used to view the Smoky Rays. Disable before rendering the effect.
Smoky Rays Tuning: Used to adjust the black and white levels of the smoky rays.
Add Smoke/Fog: Used to when Smoky Rays is selected. Mixes smoke/fog effect back into the clip.
Smoke group
Speed: Used to set the overall speed of the smoke noise movement.
Opacity: Used to to set the brightness of the opaqe pixels.
Contrast: Used to set the contrast between the light and dark areas of the smoke.
Color: Used to set the color of the smoke.
Coherence: Used to adjust the random movements of the smoke. Lower values will produce more random movement, whereas higher values will cause the smoke to move in a specific direction.
Scale: Used to set the scale of the smoke effect.
Density: Used to to set the intensity of the overall smoke effect.
Fog group
Opacity: Sets the opacity of the fog effect.
Scale: Used to set the scale of the fog effect.
Fog Contrast: Used to set the contrast between the light and dark areas of the fog.
Fog Color: Used to set the color of the fog.
Level: Used to set the gamma of the fog effect.
Speed: Used to set the overall speed of the fog noise movement.
Use Source Alpha: Used to apply the fog to the alpha areas of the clip.
Blend Mode: Used to set the apply mode that the filter uses to composite the fog. The default apply mode is “Screen”.
Random Seed: Used to adjust the randomness of the fog.
Prism group
The Prism group offers a way to generate chromatic aberration where the RGB light is split in a way that emulates poor quality glass or plastic lenses and is great when adding that extra level of spookiness to the result.
Enable: Used to enable/disable to the prism effect.
Amount: Used to adjust the overall amount of the prism effect.
Weight: Sets the smoothness of the prism with lower values generating a more visible stepped offset and higher values yielding a smooth continuous prism
Short Color: Sets the color of the short color waves. The default is blue.
Mid Color: Sets the color of the medium color waves. The default is green.
Long Color: Sets the color of the long color waves. The default is red.
Grain group
Use this group to add grain to the effect. The grain generator can produce auto-animating grain or static grain and there’s a checkbox option to set the grain to be RGB or B/W. Sometimes a little static B/W grain is a nice way to add a pleasing texture to the result. The Response Position, Range and Minimum parameters allow you to control where grain is added to the shot and can be thought of as a way to matte back the grain generator.
Enable: Used to enable/disable the grain effect.
Monochrome: When checked, the grain is monochrome. In this mode, only the Red Size, Red Amount and Red Softness sliders are active. Since the grain is monochrome, only one slider is needed.
Size: Controls the size of the grain. The larger the Size setting, the larger the grain will be.
The Amount parameters set the red, green and blue intensities of the grain. Film stocks generally have varying amounts of red, green and blue intensities with the blue intensity generally higher than the rest. If you turn the red, green and blue amount sliders to a value of 0, the grain will disappear.
Red Amount: Controls the intensity of the red grain.
Green Amount: Controls the intensity of the green grain.
Blue Amount: Controls the intensity of the blue grain.
Softness: The Softness parameter controls the softness of the grain. Normally, only minor softness adjustments are necessary, usually between a value of 0-1.
Response Position: Defines the portions of the image where grain will be added. A low Position value places grain in the darkest image values, while a high Position value places grain in the brightest areas.
Response Range: Increases or decreases the area where grain is added to the image based on the value of the Position slider. A low Range value indicates a narrow range of values, while a high Range value indicates a large range of values.
Response Minimum: Sets the minimum level of grain that is always added to the image. A Position value of 0 and a Range of 80 is typical of standard film, with grain applied to the entire range except the brightest whites with black being the most affected.
Note: You may not see an accurate representation of the grain in the viewer unless your timeline/composition is set to high quality and the viewer is set to a 1:1 pixel ratio.
Animate: Used to enable/disable animation in the grain. When enabled the grain will randomly animate to create a noise effect.
Random Seed: Used to adjust the randomness of the animation.
Orbs group
The Orbs group emulates the look of moisture on the surface of a camera lens and includes a slew of controls. The orbs can completely cover the lens surface or you can set them so that they appear on the outside edges by using the invert illumination option. Depth blurring of the orbs is included as is a way to control their brightness, color and scale. And they are auto-animatable - you can make them appear to float over the surface or they can remain static.
Enable: Enable/Disable this feature and access the feature’s parameter controls.
Count: Used to set the number of orbs in the effect
Illumination Radius: Used to control the area that is covered with orbs. Higher values will result in orbs covering more of the image.
Invert Illumination: Inverts the illumination and alters the area in which the orbs will appear.
Falloff: Used to set the feathering of the orb edge. Higher values yield a softer edge.
Depth Blur: Used to set the apparent depth blur of the Orbs in z space. Higher values make the Orbs appear to be moved out of focus.
Depth Blur Randomness: Used to randomize the depth blur sorting of the Orbs in z space. Higher values create a more randomized blurring of the Orbs.
Intensity: Used to set the opacity of the orb. Higher values yield a more opaque result.
Intensity Randomness: Adds more variability to the intensity of the individual orbs. Higher values result in more random intensity between orbs. Lower values result in more uniform intensity between orbs.
Light Source: Used to set the XY position of the light source in relation to the orbs.
Scale: Used to control the scale of the orb.
Scale Randomness: Randomizes the scale of the orbs across the image.
Color: Used to set color that will be used for the orbs.
Color Randomness. Used to randomize the color of the orbs.
Speed: Used to adjust the speed of the orb movement.
Coherence: Used to adjust the random movements of the orbs. Lower values will produce more random movement, whereas higher values will cause the orbs to move in a similar direction.
Flicker Amount: Used to adjust the intensity of the flicker present in the orbs.
Flicker Speed: Used to adjust speed at which the orbs flicker.
Flicker Randomness: Used to change the randomized timing of orb flicker effects.
Flicker Smoothness: Used to change the curve animation of the flickering orbs. Higher values will result in smoother animations.
Blend Mode: Used to select how the orbs are composited into the scene.
Seed: Used to set the random seed starting point of the orb position on the lens.
Post Color Correct group
A suite of color correction tools are available in this group which allow for incredible control over the final color of the effect. Bear in mind that these controls will control the final result, including the filtered source. Every stage of the effect that is before this stage will be subject to color changes made in this section.
Enable: Used to enable/disable to Post Color Correct effect.
Hue: Rotates the hue of the image.
Saturation: Adjusts the saturation of the image. Positive values saturate, negative values desaturate.
Brightness: Adjusts the brightness of the image. Positive values brighten, negative values darken.
Contrast: Adjusts the contrast of the image. Positive values increase contrast, negative values decrease contrast.
Gamma: Adjusts the gamma of the image. The gamma adjustment leaves the white and black points the same and only modifies the values in-between. Positive values lighten the midtones, negative values darken the midtones.
Temperature: Sets the color of the image to be either warmer or cooler. Dragging the slider to the right makes the image cooler (bluer) and dragging the slider to the left makes the image warmer (redder).
Cyan/Magenta: Adds either Cyan or Magenta to the image. Dragging the slider to the right makes the image more magenta and dragging the slider to the left makes the image more cyan.
Red: Adds or subtracts red from the image.
Green: Adds or subtracts green from the image.
Blue: Adds or subtracts blue from the image.
Vignette group
The last section in this effect is a vignette, which includes options for controlling the size, position and softness of the vignette as well as control over the color. And there is a blur option to produce out of focus edges.
Enable: Used to enable/disable to vignette effect.
Color: The Color parameter sets the color of the vignette through the use of a standard color picker. The default color is black.
Opacity: Sets the opacity of the colored vignette. For defocused vignettes, you may want to turn down the Opacity so you can see the defocused effect.
Blur: Sets the softness of the image in the area of the vignette.
Blur X: Used to independently set the softness of the image in the area along the X axis.
Blur Y: Used to independently set the softness of the image in the area along the X axis.
Roundness: Sets the roundness of the vignette. The vignette can either be circular or square or anywhere in between.
Size: Used to set the size of the vignette.
Aspect Ratio: Used to set the aspect ratio of the vignette. A value of -100 would be wider, and 100 would be taller.
Softness: The Softness parameters control the softness of the vignette edge.
Softness X: Used to set the edge softness along the X axis.
Softness Y: Used to set the edge softness along the Y axis.
Mix with Original: Used to blend the filter effect back with the unfiltered input image.
GPU Rendering: allows for the selection of GPU or CPU software rendering.
- Transparent: allows the edge of the result to become transparent.
- Repeat: repeats edge pixels to generate opaque pixels along the edge of the result.
- Reflect: reflects pixels back into the result to generate opaque pixels along the edge of the result.
- Warp: warps edge pixels to generate opaque pixels along the edge of the result.