Appendices
Appendix A - Preferences
Preferences allow you to customize default settings and can be accessed by selecting File > Preferences on Windows and Linux or Silhouette > Preferences on Macintosh.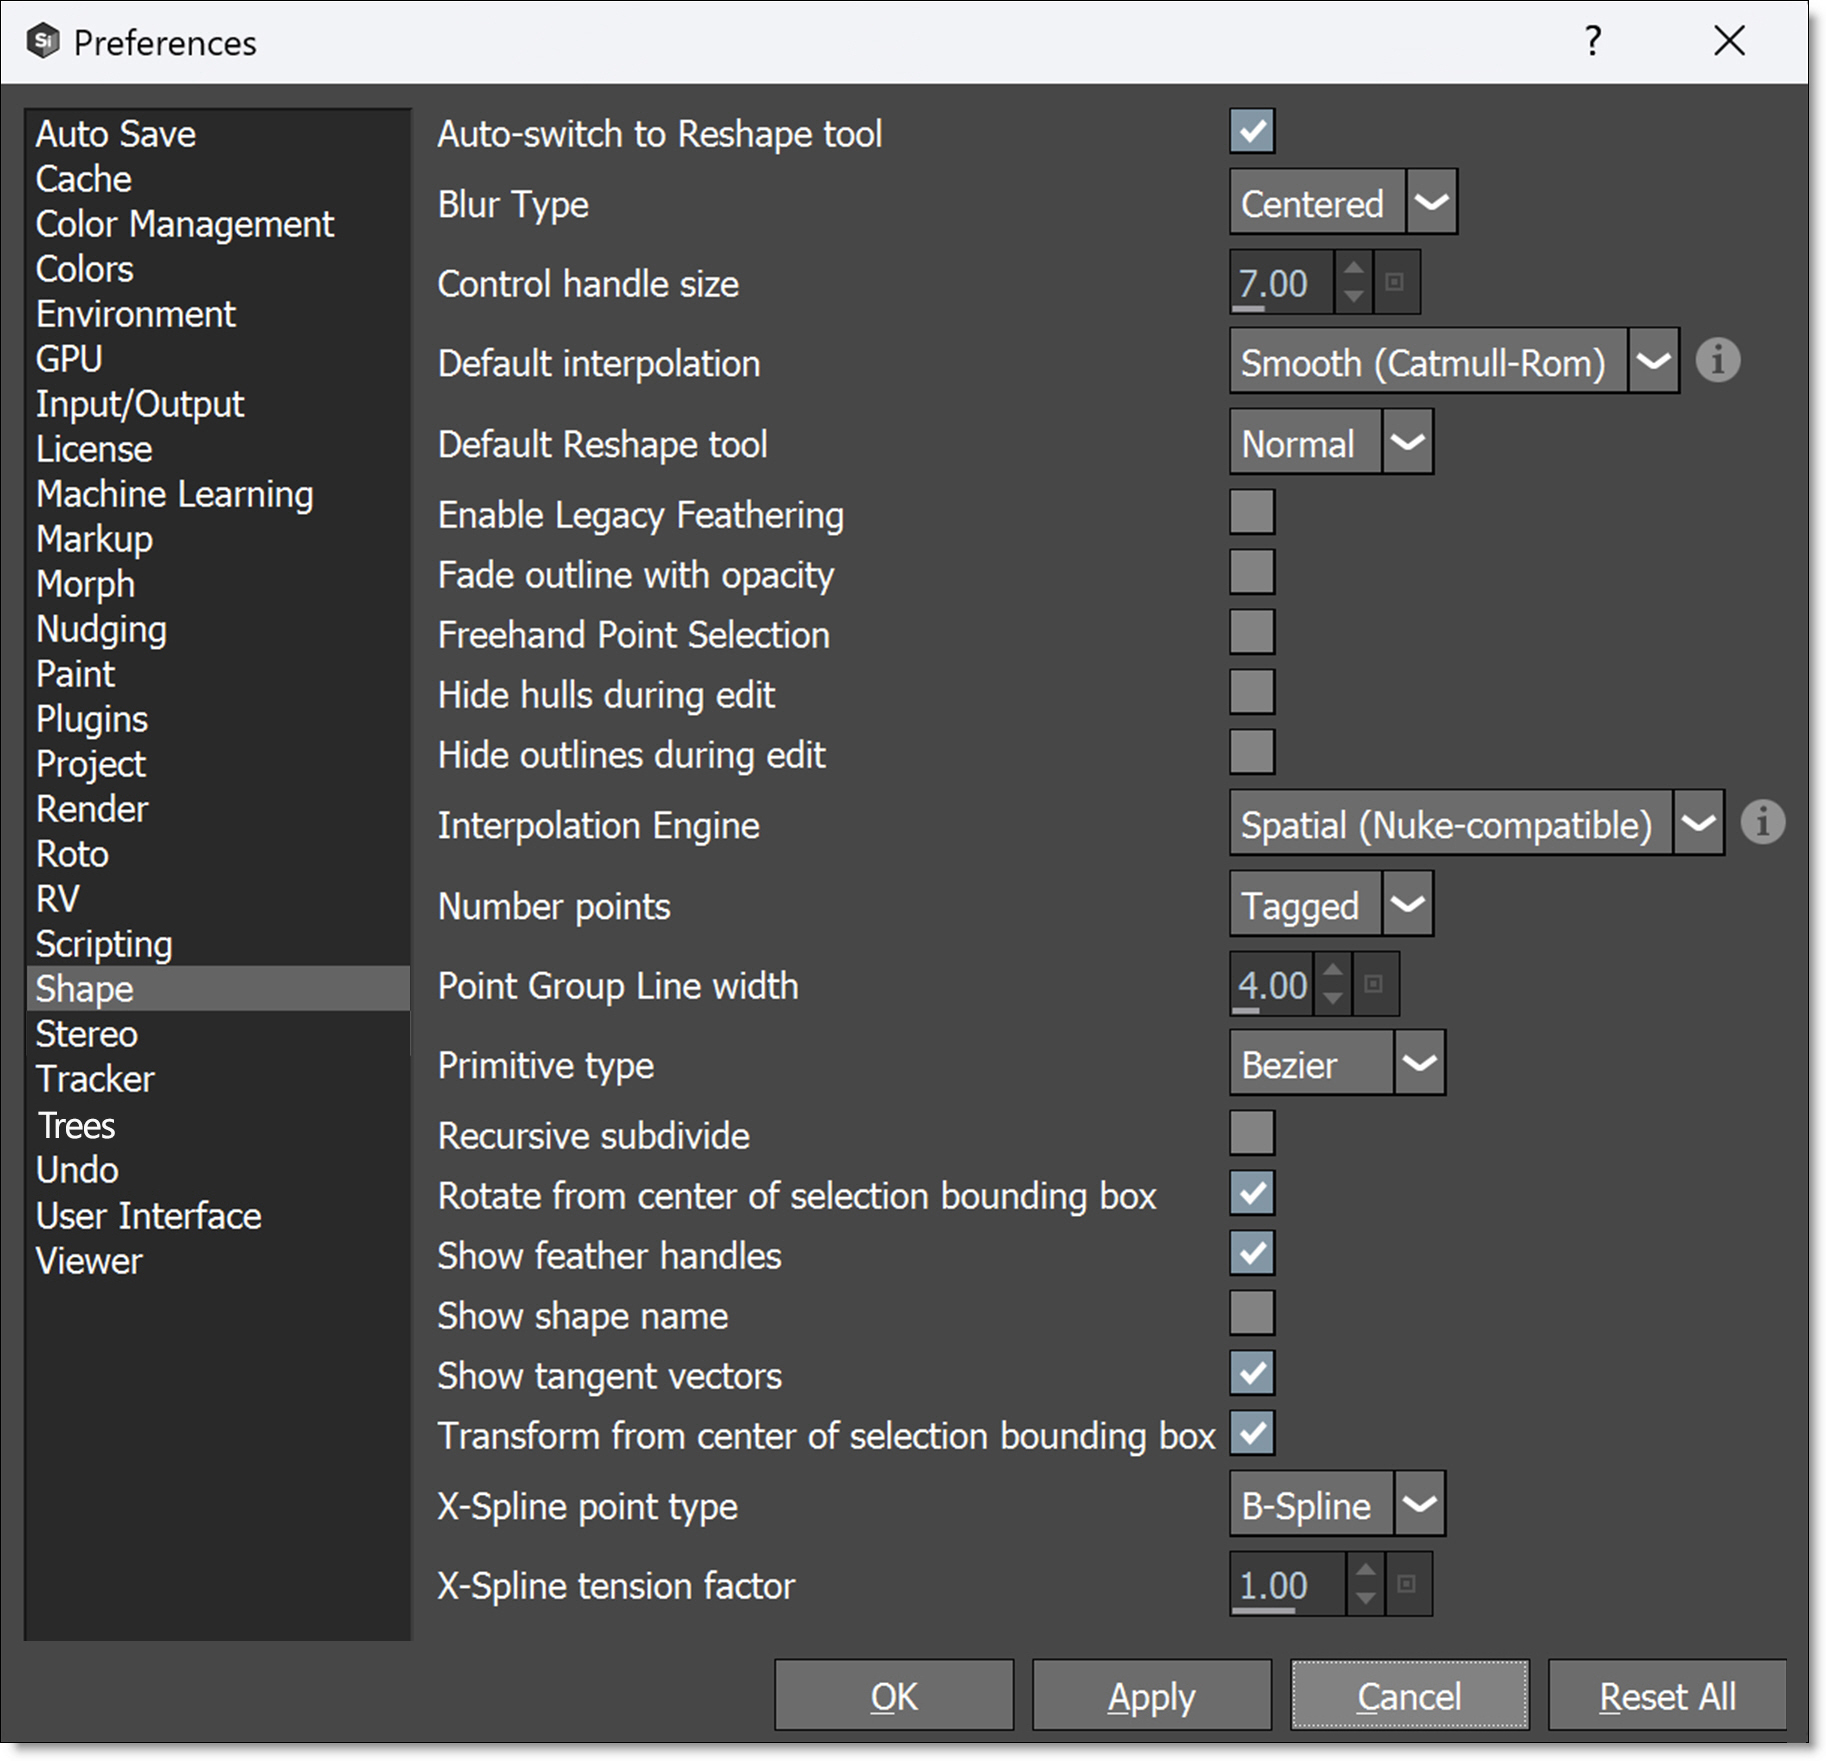
Note: If you see a gray triangle icon to the right of a preference, a restart is required for a change to take effect.
Once adjusted off the default setting, the icon will turn red indicating a restart is required.
Autosave
Interval (minutes)
Sets the default time for autosaving the project. Set interval to 0 to disable autosave.
Maximum # of Backups
Controls how many backup files are created. Each time a project is saved, a copy is stored in the project folder.
Cache
% ROI Overscan
Sets the amount of extra pixels to save around the ROI in the Cache.
% Total Physical RAM
Sets the amount of RAM to be used for playback. The default is 50% and the range is 10-90%.
Note: A program restart is needed to enable % Total Physical RAM changes.
Cache > Mode
Sets the caching mode.
None
Caching is disabled.
Adaptive
When playing or scrubbing, it will only cache the currently active node. When parked or editing, it'll cache the immediate upstream node and the active node. In all cases, Silhouette will cache nodes that have multiple downstream branches.
Aggressive
Every node that can will cache.This is the behavior in 2024 and below.
Preload Frames
Controls how many source frames are preloaded into the cache.
Purge Cache on Project Load
When selected, the cache is purged when a Project is loaded.
Local Cache
The Local Cache automatically copies media from a slow network drive to a fast local drive once you specify the source and storage locations. Then, when you load a sequence from the slow network drive, the source node will see that it’s in the source path and copy it to the local storage path. The next time the media is requested from the network drive, it will read it from the local cache instead.
Maximum Size(GB)
Sets the maximum size of the local cache in gigabytes.
Source Paths
Sets the location of the media to be cached.
+
Adds a source path.
-
Deletes a source path.
Storage Path
Sets the local cache’s storage location.
Render Server
The Render Server preferences are used by the Silhouette plug-in.
% Physical Memory
Sets the maximum image cache as a percentage of physical memory. The default is 10%.
IPC Buffer Size
Sets the buffer size for both input and output between the host and the plug-in. The default is 500MB.
Note: Changes to the render server preferences require a restart of the host application.
Color Management
Cineon/DPX Working Colorspace
Controls whether or not Cineon and DPX images are converted to scene linear.
Linear
Converts the Cineon/DPX images to scene linear.
Log
Cineon/DPX images are kept in log space.
Note: After changing this preference, you must restart Silhouette for changes to take effect as the value is cached.
Warning: It is not a good idea to change this preference in the middle of a paint session, since when in Linear mode, it physically alters the pixels on import/export.
OCIO Configuration
This preference is a path to a global configuration file to use. The default is “$(OCIO)”. Silhouette will initially look for $SFX_OCIO and will use that first. Otherwise, it will use whatever the configuration preference is set to and finally it will check for $OCIO. If it still can't find a configuration, it will fall back to the embedded configuration in the resources/ocio folder.
Colors
Active Point Color
Sets the default color of the active point (the point that the cursor is hovering over) through the use of a standard color picker.
Alpha Overlay Color
Sets the color of the alpha overlay.
Anchor Color
Sets the color of the Transform tool anchor point.
Background Color
Sets the border color in the Viewer.
Bounding Box Color
Sets the default color of shape bounding boxes through the use of a standard color picker.
Callout Color
Sets the Notes view callout line color.
Control Point Color
Sets the default color of control points through the use of a standard color picker.
Default Outline Color
Sets the default color of the shape outline through the use of a standard color picker.
Hull Color
Sets the default color of the hull (lines that connect tangents) through the use of a standard color picker.
Layer Transform Color
Sets the default color of the layer’s on-screen transform controls.
Markup Color
Sets the default color of Markup objects.
Mask Fill Color
Color
Sets the color of the mask.
Opacity
Set the opacity of the Mask Fill Color by clicking on the percentage field (to the right of the color picker) and typing in a new number.
Mask Outline Color
Color
Sets the color of the mask outline.
Opacity
Set the opacity of the Mask Outline Color by clicking on the percentage field (to the right of the color picker) and typing in a new number.
Motion Vectors
Sets the color of the motion vectors in the Optical Flow ML node.
Object Colors
Defines the colors used in the color grid when you right-click on color pots in the Object Window as well as the colors used for the Edit > Auto Color action.
Point Groups
1-8
Sets the color of the point groups.
Premultiply Background Color
Sets the background color for premultiplied display modes. You can premultiply the image in the Viewer by using Shift-0.
Selected Point Color
Sets the default color of selected points through the use of a standard color picker.
Surface Color
Sets the default color of the layer Surface.
Template Color
Sets the color and opacity of unselected shapes. This Template feature is enabled by using Shift-W.
Environment
The Environments preference sets environment variables directly inside Silhouette without having doing so in the operating system. Once applied, variables are immediately available in Silhouette, sub-processes, and scripts.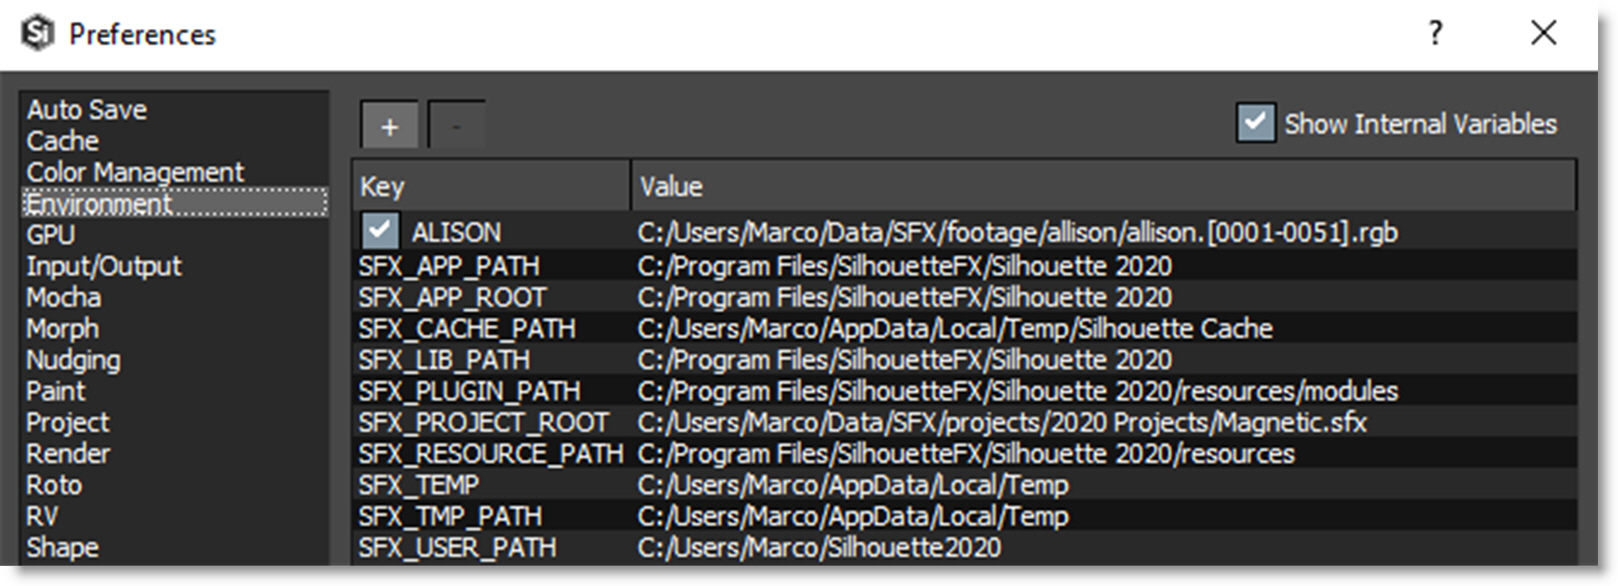
+
Adds a new variable
-
Remove the selected variable.
Show Internal Variables
Display the internal variables used by Silhouette. These cannot be changed.
Note: Variables can contain references to other variables.
Note: Variables are changed when Apply is pressed. Reset has no effect for this page.
GPU
The GPU preference determines whether or not GPU acceleration is enabled.
% Total Physical GPU Memory
At a value of 0, GPU images are not cached. This means the GPU images will flow through from the first GPU image to the last without going through RAM, but it means every GPU node in the chain will render in sequence any time something changes. Increasing the value allows GPU images to be stored in the cache like RAM images, making editing faster.
Cache GPU Images
Controls whether GPU results go in the cache.
Mode
Auto
Automatically chooses either GPU or CPU acceleration based on your graphics card.
GPU
Forces GPU acceleration on. If your graphics card is not capable of GPU acceleration, this setting will have no effect.
CPU
Forces CPU acceleration on.
Note: The GPU preference doesn’t actually change until there is a frame or processing update.
Pipeline GPU Images
Controls whether GPU results are passed on to the next node or downloaded to RAM.
Input/Output
Silhouette Shapes
The Silhouette Shapes export format was changed in 5.0 so that settings normally stored in the Silhouette node can be accessed.
Export Format
5.0+
Exports Silhouette shapes in the 5.0 format.
4.5-
Exports Silhouette shapes in the 4.5 and below format.
Nuke 6.2+ Shapes
Connect Nodes When Embedding Layers Into Nodes
Connects layers together in Nuke using Merge nodes. However, if you set a layer in Silhouette to Subtract for example, you will have to manually adjust the corresponding Merge node in Nuke to Minus.
Note: Connecting of nodes with Merge nodes in Nuke is only supported in the layer based export modes: “Embed each layer in its own node” and “Embed each layer in its own node fully baked”.
Convert Opacity to Lifetime Preference
If checked, a Nuke lifetime is enabled ending at either the work range end or the first transition to zero Opacity. The start of the lifetime is either the work range start, if the starting value was 100% opacity, or the frame on which it went from zero to 100% opacity.
Note: 1) Only the first on to off Opacity range is converted to lifetime. 2) If the opacity is ever a fractional value other than 0 or 100 before the lifetime end, the lifetime feature is disabled. 3) At least one keyframe is required, otherwise Nuke sets zero Opacity.
Node Handling
Embed All Shapes In One Node
All selected shapes are exported into one Nuke Roto node.
Embed Each Shape In Its Own Node
Selected shapes are exported into separate, unconnected Nuke Roto nodes.
Embed Each Layer In Its Own Node
Shapes are exported into their respective layers as separate, unconnected Nuke Roto nodes. Shapes not located in a layer will be combined into a Nuke node called Roto. If a layer has blur or invert settings applied to it, blur and invert nodes will be created in Nuke and connected to the layer’s node.
Silhouette may break shapes in a single layer into more than one Nuke Roto node if these shapes are interrupted by a Silhouette sub-layer. This is intentional so that the correct depth order can be maintained. For example, if the Silhouette Roto node contained Shape 1, Shape 2, Layer 1, Shape 3: The “Embed each layer in its own node” mode will break Shape 3 into its own Nuke Roto node so that the user has the option of ordering the contents of Layer 1 in between Shape 1, Shape 2 and Shape 3.
Embed Each Layer In Its Own Node Fully Baked
Shape control points are fully baked on every frame of the work range. While this creates larger files, it works around a known Nuke motion blur problem.
Nuke 9+ Shapes
Convert Opacity to Lifetime Preference
If checked, a Nuke lifetime is enabled ending at either the work range end or the first transition to zero Opacity. The start of the lifetime is either the work range start, if the starting value was 100% opacity, or the frame on which it went from zero to 100% opacity.
Copy Alpha to RGBA
Copies the alpha channel into the RGBA channels in the exported file.
Export Project Name
The Silhouette project name is exported and displayed in the Nuke node name.
File Size
Smaller (Hexadecimal)
Writes the export out in hexadecimal format resulting in a smaller file size.
Larger (Human Readable)
Writes the export out in human readable format resulting in a larger file size.
Fully Baked
Shape and transform data are baked together.
Outline Width Multiplier
Nuke does not accurately import the width of open shapes, but we automatically account for this. If needed, use this multiplier to fine tune the width of open shapes when exported.
License
Enable Floating Licenses
Enabled
Searches for floating licenses only.
Disabled
Searches for nodelocked licenses only.
License Server
Displays the currently entered floating license server port@host.
Machine Learning
Stability API Key
A Stability API Key is required to run Stability. To obtain a key, sign up for a DreamStudio account, copy your API key and paste it here.
Markup
Arrow Size
Sets the default size of the arrow head.
Stroke Detail
Controls how accurate the final stroke is to the drawn stroke. Larger values are more accurate.
Morph
Correspondence Lines
Sets the number of phantom lines between correspondence points. This is useful for visualizing how the various parts of the shapes are warping.
Correspondence Lines Color
Sets the correspondence lines’ color.
Correspondence Point Color
Sets the correspondence points’ color.
Correspondence Point Size
Sets the size of correspondence points.
Default Target Color
Sets the default color of target shapes.
Nudging
Distance (pixels)
Sets how many pixels an object moves when the Arrow keys are used.
Extended (Shift) Distance (pixels)
Sets how many pixels an object moves when the Arrow keys are used in conjunction with the Shift key.
Precise (Ctrl/Cmd) Distance (pixels)
Sets how many fractional pixels an object moves when the Arrow keys are used in conjunction with the Ctrl/Cmd key.
Paint
Brush Outline Color
Sets the color of the brush outline.
Crosshair Cursor
Controls the display of the cursor crosshair while painting.
Off
The cursor crosshair is not displayed.
On
The cursor crosshair is always displayed.
On/Off
The cursor crosshair disappears while painting a stroke, but is visible otherwise.
Hide Brush Outline While Painting
Hides the brush outline while painting.
Paint > Lock Presets After Importing
Automatically locks imported Paint presets.
Output Unpainted Frames
Normally, when using the Paint Only output, only painted frames are rendered. This preference renders the blank, unpainted frames as well, so there is a complete sequence.
Pressure Threshold
Controls how hard the pen has to be pressed before opacity kicks in. The preference is from 0-1. When the threshold has been reached, the calculated pressure is scaled into the new range from threshold to 1.
Use Tablet Pressure
Turn tablet pressure sensitivity on or off.
Clone
Absolute Frame Numbers
When activated (the default), displays the actual frame number in the Clone > Frame field. When turned off, it uses the old Silhouette v2.3 behavior where an offset in relation to the current frame was shown instead of the actual frame.
Alignment Type
Black
When in Align mode, the Viewer appears black when the Clone source and destination are perfectly aligned.
Gray
When in Align mode, the Viewer appears gray when the Clone source and destination are perfectly aligned.
Allow Adjustments to Auto Grade
Allows the other grade controls to be used in conjunction with Auto Grade. With this preference off, turning on Auto Grade will reset the other grade controls to their defaults and disable them.
Default Filter
Sets the default filter for new paint nodes.
Default Source
Sets the default clone source.
Default Subpixel State
Sets whether Clone > Subpixel is enabled or disabled by default.
Incremental Offset
Controls whether the Clone offset starts at last offset or at click location.
Overlay Color
Sets the color of the Clone transform on-screen controls.
Reset Frame Number With Transform
Resets the Clone > Frame Offset when Clone > Reset is used.
Show Offset
Forces the Clone Offset connecting line to always be displayed.
Source Outline Color
Sets the color of the Clone brush outline.
Source Outline Color (Secondary)
Sets the color of the secondary Clone brush outline. This is the color of the second Clone source activated by using Dual in the Clone presets.
Use Legacy Overlay Controls
Enables the Silhouette v6 and below Clone transform on-screen controls.
Use Stereo Offset When Painting R > L
Uses the Stereo Offset when painting from right to the left view.
History
Lock Selection
If paint strokes are selected in the Paint History, they become un-selected when you change frames. If you enable Lock Selection, the strokes stay selected when changing frames.
Plugins
Enable Continuum
By default, Continuum OFX plug-ins are disabled except for Particle Illusion as they have not been officially qualified to run in Silhouette. This preference exposes all Continuum plug-ins.
Load From Public OFX Location
Silhouette includes Mocha Pro, Particle Illusion, and Sapphire plug-ins. These plug-ins are installed and loaded from the Silhouette installation folder by default. Optionally, you can load these plug-ins from the public OFX location.
Load Mocha From Public OFX Location
Loads Mocha Pro from the public OFX location.
Load Particle Illusion From Public OFX Location
Loads Particle Illusion from the public OFX location.
Load Sapphire From Public OFX Location
Loads Sapphire from the public OFX location.
Project
Compress Project Data
Compress project data to save space.
Save Usage Analytics With Project
Saves a limited set of data analytics in the project file.
• All users who saved the project and how long they had it open.
• Creation date and usage time for each project, session, and node.
Render
Filename
Sets the default suffixes that are appended to the Filename in the Render Options menu.
Alpha Suffix
Sets the default alpha suffix to _alpha.
Depth Suffix
Sets the default depth suffix to _depth.
Format
You can now override the output filename structure. The format for the output name is now defined by the Format preference.
The default is: $(NAME)$(SUFFIX)$(VIEW)$(PREFIX)$(FRAME).$(EXT) which matches the previous format.
• NAME substitutes the Filename field in Render Options
• SUFFIX substitutes the _alpha, _depth, or _paint suffix when saving External Alpha, or Depth
• VIEW substitutes the _L/_R suffix when saving a left/right view
• PREFIX substitutes the Prefix field in Render Options
• FRAME substitutes the frame number with padding
• EXT substitutes the output module default extension
Note: This Format preference is currently system wide and cannot be used on a per session basis.
Left View Suffix
Sets the default Left View suffix to _L.
Paint Suffix
Sets the default Paint suffix to _paint.
Right View Suffix
Sets the default Right View suffix to _R.
Roto
Composite Color
Sets the default color background when viewing Color Comp in the Roto node.
RV
Command
Enter the path to Tweak Software RV’s “rvpush” command. For instance, depending on your OS and the RV version number, you would enter:
• Macintosh: /Applications/RV64.app/Contents/MacOS/rvpush
• Windows: C:\Program Files\Tweak\RV-4.0.12-64\bin\rvpush.exe
• Linux: /opt/rv/rv.bin/rvpush
Note: On Linux, rv can be installed anywhere. The above example is based on rv being installed in /opt/rv.
When a path is entered, a “Send to RV” option appears at the bottom right of the Render window. If that is enabled, after rendering, the rendered clip will be sent to the RV playback software--if installed.
Scripting
Enable External Scripts
Enable the loading of external scripts.
Note: Disabling external scripts will also have the scripting system ignore $SFX_SCRIPT_PATH and $SFX_USER_PATH/scripts.
External Package Path
Aids installing external Python packages (such as numpy, torch, scipy, cv, PIL, etc.). This defaults to $(SFX_PYTHON_PACKAGES) which can also be set with an environment variable. When using the tools.installer script, it will first check for this preference and attempts to install packages there instead of in the built-in Python library which only works if there is write access.
External Script Paths
Add one or more paths where your scripts are stored.
Startup Script
Add user-defined code to run during startup. Note that the changes take effect immediately after dismissing the Preferences window. This is good for testing custom keyboard shortcuts.
Shape
Auto Switch to Reshape Tool
After closing a new shape, you will switch to the Reshape tool automatically.
Blur Type
Sets the default blur type: Center, Inner, Outer.
Control Handle Size
Sets the size of control point handles.
Default Interpolation
Sets the default keyframe interpolation type.
Hold
There is no interpolation and abrupt switches in value occur at keyframes.
Linear
When values change, a straight line with sharp, abrupt angles from one keyframe to the next is drawn.
Ease In
Eases in to the selected keyframe.
Ease Out
Eases out of the selected keyframe.
Ease In/Out
Eases in and out of a selected keyframe.
Smooth (Catmull-Rom)
Smooth (Catmull-Rom) creates a smooth curve between keyframes.
Default Reshape Tool
Sets the default mode for the Reshape tool.
Normal
Selected points all move the same amount.
Magnetic
Points near the cursor move more than points farther away.
Brush
Uses a circular brush to automatically select and then move points when you click and drag them using the Magnetic Reshape behavior.
Enable Legacy Feathering
Enables the Silhouette v5 and below Feather tool. Once enabled, the Feather tool appears in the user interface.
Go to Appendix E - Legacy Feather to see how it works.
Fade Outline with Opacity
Draws unselected/inactive shape outlines using the shape opacity value. Alternatively, the V key toggles the Fade Outline with Opacity behavior.
Freehand Point Selection
When enabled, point selection is done by freehand selection. Press Ctrl while dragging for rectangular selection.
When disabled, point selection is done by rectangular selection. Press Ctrl while dragging for freehand selection.
Hide Hulls During Edit
When activated, tangents/hulls hide when editing.
Hide Outlines During Edit
When activated, the shape outline is hidden when editing.
Interpolation Engine
Temporal
Enables all interpolation types except for Smooth (Catmull-Rom).
Spatial (Nuke-compatible)
Interpolation types are limited to Smooth (Catmull-Rom), Hold and Extrapolate. This ensures that shapes using Smooth (Catmull-Rom) interpolation in Silhouette exactly match the result in Nuke when exported.
Number Points
None
Control points are not numbered.
Tagged
Only control points that have been tagged using the Reshape tool > control point pop-up menu are numbered.
All
All control points are numbered.
Primitive Type
Sets what shape type is used when circles and squares are created.
Bézier
Bézier shapes are used for circle and square creation.
B-Spline
B-Splines are used for circle and square creation.
X-Spline
X-Splines are used for circle and square creation.
Recursive Subdivide
Drastically improves the curvature of shapes and reduces artifacts when using feathering. You can return to the previous behavior of v4.0.4 and below which used a fixed-step iterator by turning this preference off, if for some reason it causes shape artifacts.
Rotate from Center of Selection Bounding Box
Controls whether the automatic anchor point is set to the center of the collective bounding box or to the opposite handle.
Show Feather Handles
Displays feather handles on shape points. Shift-F toggles this setting.
Show Shape Name
Displays the shape name in the center of the shape.
Show Tangent Vectors
Turns Bézier tangents on or off. Turns B-Spline and X-Spline hull drawing on or off.
Transform from Center of Selection Bounding Box
Controls whether the automatic anchor point is set to the center of the collective bounding box or to the opposite handle.
X-Spline Point Type
Controls the default weighting of X-Spline points when they are created.
B-Spline
X-Spline points have B-Spline weighting.
Cardinal
X-Spline points have Cardinal weighting.
Corner
X-Spline points have Corner weighting.
X-Spline Tension Factor
This is a weight from -10 to 10 that is multiplied by the mouse delta when manipulating the X-Spline point tension. You can reverse the sense of the weight by making this value negative. Also, you can boost the amount the tension is adjusted based on mouse movement by making the value larger, for example closer to -10 or 10.
Stereo
Enable NVIDIA 3D Vision Preview Support
When enabled, the 3D Preview window supports NVIDIA 3D Vision glasses. After enabling this preference, the 3D Preview window will open full screen.
Note: This works even on non-Quadro cards as long as the 3D Preview window is full screen.
Tracker
Create Point Trackers in Root
When enabled, point trackers are placed in the root of the Object list, rather than the selected layer.
Default Path Color
Sets the default color of the tracker path.
Default Point Track Tolerance
Sets the default tracker tolerance. Describes the level of accuracy between the Match Area that the Tracker is searching for and the area it actually finds when searching from frame to frame.
Point Tracking Behavior
Sets the default tracker behavior. Behavior decides what frame should be used as the reference to check the accuracy of the Match Area.
Show Path Points
Displays tracker points along the path of the track.
Mocha
Drift Compensation
Enables mocha’s Drift Compensation feature where surrounding frames are used to decrease tracker drift.
Use GPU If Available
Enables GPU acceleration if a compatible graphics card is found.
Planar Tracker
Drift Compensation
Enables Silhouette’s Drift Compensation feature where surrounding frames are used to decrease tracker drift.
Trees
Background Color
Sets the Trees window’s default color.
Connection Color
Sets the node connection’s default color.
Connections
Curved
Displays node connections as curved lines.
Straight
Displays node connections as straight lines.
Default Group Color
Sets the group’s default background color.
Default Node Color
Sets the default node color.
Highlight Nodes During Playback
During playback, tree render status is provided by highlighting each node as it processes using a blue outline.
Input Order
BG, FG
The input order of composite nodes is background and then foreground.
FG, BG
The input order of composite nodes is foreground and then background.
Note: If there are existing nodes in the Trees window, you will need to reload the session for this to take effect.
Layout
Horizontal
The node input and output are configured on the sides of the node to accommodate horizontal trees.
Vertical
The node input and output are configured on the top and bottom of the node to accommodate vertical trees.
Show Cache State
Displays colored dot indicators on the output of nodes that cache. Blue dots are cached in RAM while green dots are cached on the GPU.
Show Expression References
Displays a dashed, yellow line to indicate which nodes are connected via expressions.
Undo
Max Undo Events
Sets the maximum number of undos.
User Interface
Allow Nested Docks
Allows all nested docks to be moved at the same time. Disabling this preference moves individual docks only.
Automatically Raise Dock Preference
Added a User Interface > Automatically Raise Dock Views On Selection Change preference. For instance, when the Paint node is selected, relevant tabs like the Paint History automatically appear.
Check for New Versions
Checks for new versions and displays an alert on startup.
Colored Timeline Tracks
Colors the timeline tracks the same as the Roto node’s shape colors.
Enable Crash Reports
Enables Sentry crash report generation.
Font Size
Change the user interface’s font size.
Invert Mouse Wheel in Editors
Inverts the numerical direction when adjusting sliders with the mouse wheel.
Save Project Automatically On Exit
Automatically saves the plug-in project on exit of Silhouette. This removes the need to prompt you to save when you close the window or select File > Exit.
Show Sliders In Parameter Views
Displays full size sliders in the Parameter views.
Show Sources Last in Node List
When enabled (the default), Source nodes are displayed last in the Node List.
Show Object Properties on Selection
When you select an item in the Object List, the controls for that item are automatically shown in the Parameters window. If you select an item in the Node List, the controls for that item are automatically shown in the Node window. This behavior can be disabled with this preference.
Show What’s New After Installing A New Version
On startup, if this is the first time launching a new version of Silhouette, it will open the What's New. It will only do this once.
Timebar Field Dragging Lock
Enables the Timebar lock that prevents field dragging.
Use Native File Dialog For Importing Media
When enabled, the OS’s native file dialog is used for importing files.
Viewer
Anaglyph Mode
Sets the anaglyph mode when using the Anaglyph Preview in the Viewer. Anaglyphs do not portray saturated colors very well and due to color leaking between left and right images results in discomfort caused by retinal-rivalry. Four anaglyph modes are provided to choose from with Optimized set as the default.
Color
Preserves most of the color but causes retinal rivalry.
Gray
Creates a lighter image than a true anaglyph but results in more ghosting. No color is preserved.
Half-Color
Preserves less of the color but reduces the retinal rivalry
Optimized
Discards all of the red component from the original images and replaces it with a manufactured red channel derived from the green and blue components. The advantages are almost no retinal rivalry.
Apply Gain/Gamma When Viewing Alpha
When enabled, the Viewer Gain and Gamma affect the alpha.
Anti-Alias Overlay Controls
Anti-aliases lines and overlay controls.
Auto-Show Overlay
If Overlay is turned off, Auto-Show Overlay automatically turns Overlay back on when clicking in the Viewer.
Display ROI Outline
Displays the ROI outline.
Handle Mode
Controls how handles are drawn.
Blend
Uses a normal blend mode to display layer and shape handles.
XOR
Uses an XOR blend mode to display layer and shape handles.
Line Width
Sets the thickness of overlay lines.
Picking Tolerance
Sets the radius of the threshold for picking points.
Restore Focus After Editing preference
Restores focus to the viewer after editing parameters. This ensures that the arrow keys, for instance, continue to work for nudging objects.
Stereo Alignment Type
Selects either Gray or Black for the Stereo Alignment.
Synchronize Viewers
Synchronizes the zoom and pan of multiple viewers from the same node. Synchronization is one way from the main viewer to the additional viewers.
Zoom Factor
Controls the I/O zoom factor keyboard shortcuts. Default is 2. Range is 1.05 > 2.0.
Zoom Filter
Linear
Interpolates pixels when zoomed into the image. This results in a smoother, but softer image.
Nearest
Replicates pixels when zoomed into the image. This results in a sharper, but chunkier image.