Tracker
Description
Tracking is a technique that involves analyzing the motion of an image over time. Images can be tracked using an automatic image tracking system called planar tracking using either Silhouette’s Planar Tracker or the Mocha Planar Tracker. In addition, you can use a Point Tracker which utilizes either one, two or four track points. One point tracking obtains horizontal and vertical movement. Two point tracking analyzes scaling and rotation in addition to horizontal and vertical movement. Lastly, four point tracking evaluates and applies perspective movement using a corner-pin transformation.
However the tracking data is obtained, it can then be applied in one of two ways: match moving or stabilization. Match moving applies the motion of the trackers to an object so that it follows the motion of the clip. Stabilization inverts the tracking data so that the clip appears to be stable.
Selecting the Tracker (Shift-T) displays various tracking features and controls.
When the Tracker is selected, various non-animateable controls appear in a Tracker window located at the bottom portion of the screen. You have the choice of using either the Point Tracker, Planar Tracker or Mocha Tracker.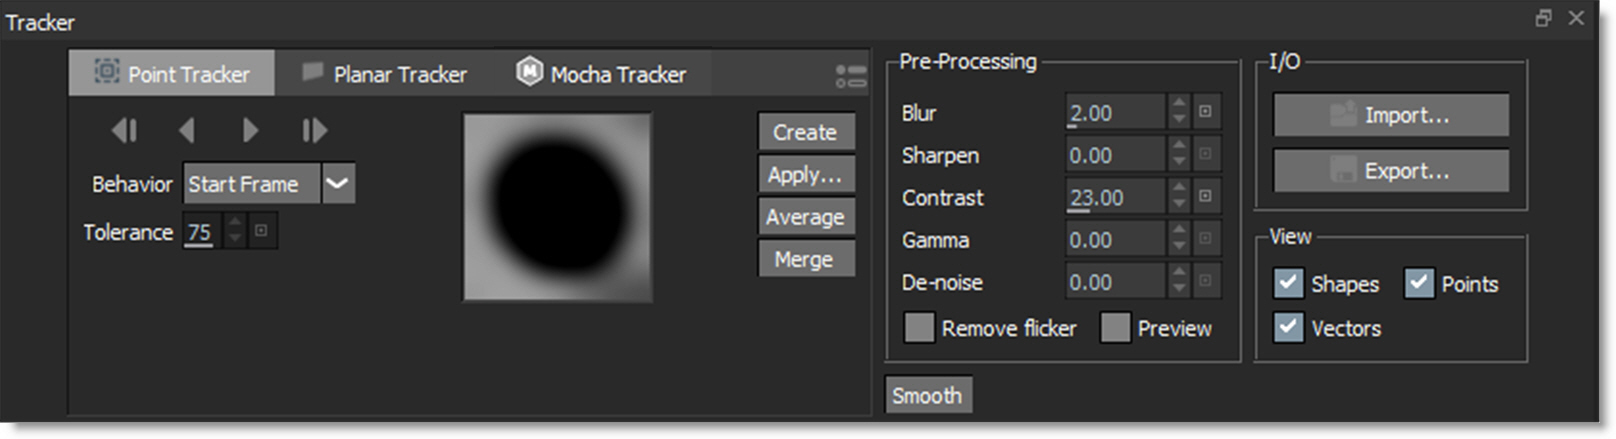
Node Group
Transform.
Note: The Tracker is available as a separate node, but is also built into the Depth, Morph and Roto nodes. When the Data output of these nodes is plugged into another node’s Data input, the Tracker’s point trackers and transformed layers are available for use by selecting one of them in the input node’s Transform pop-up menu.
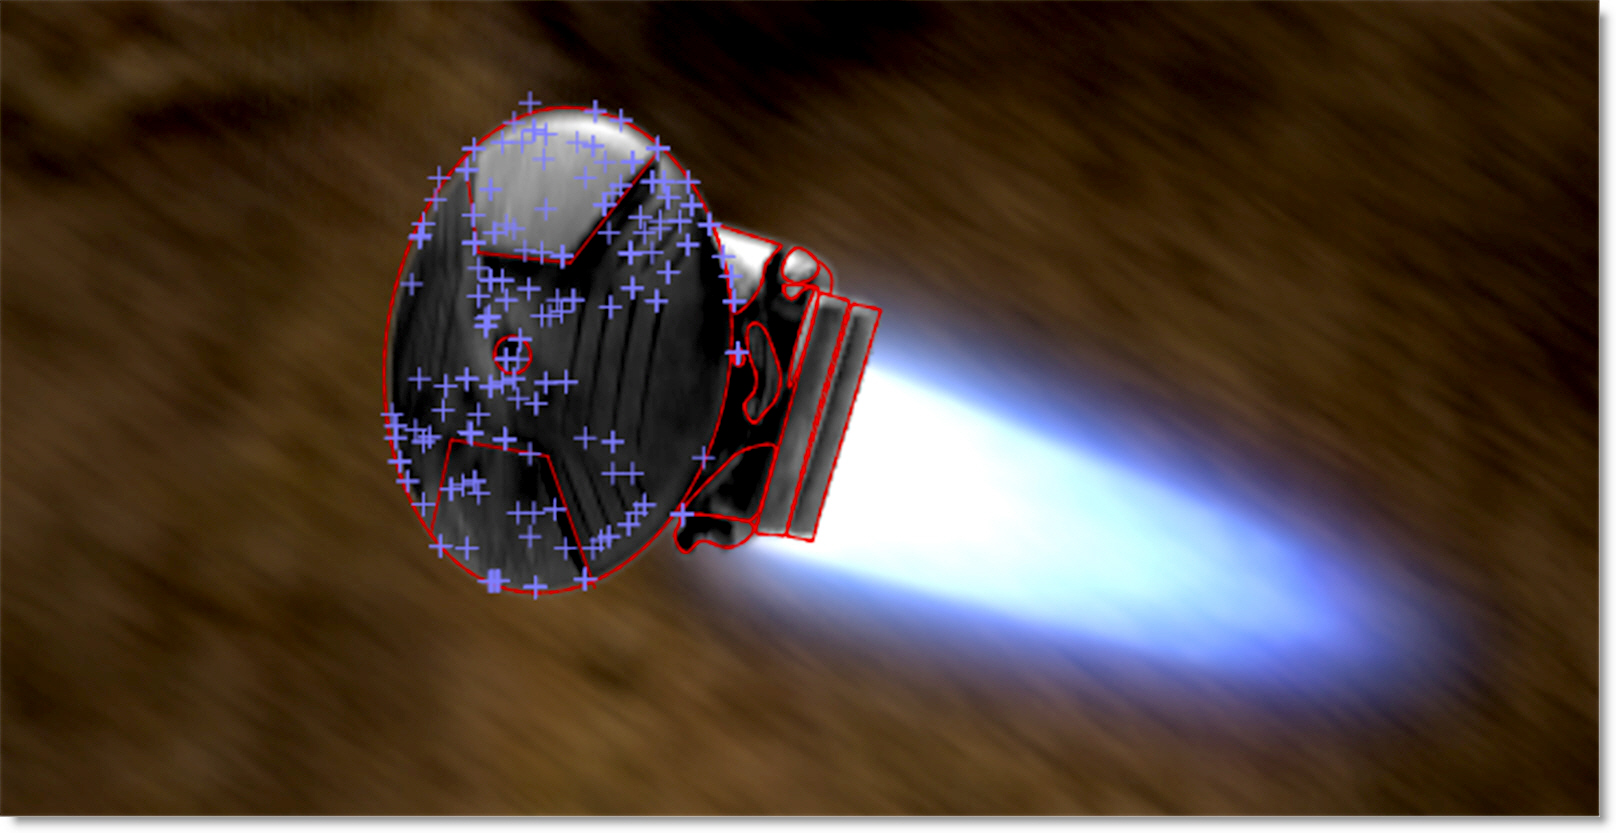
Planar Tracker
Silhouette’s Planar Tracker tracks several points (corners, edges and ridges) on the image while automatically handling partial occlusions of the tracked object, producing excellent results even with textureless objects.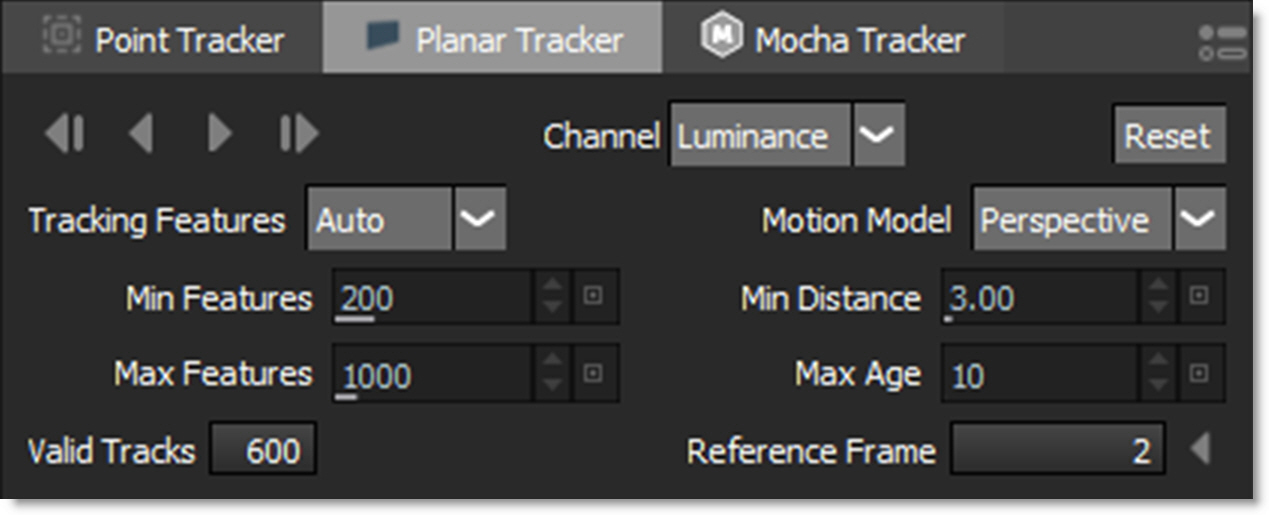
Using the Planar Trackers
The key to getting the most out of the Planar and Mocha trackers is to learn to find planes of movement in your shot which coincide with the object that you want to track. Sometimes it will be obvious--other times you may have to break your object into different planes of movement. For instance, if you were tracking a tabletop, you would want to draw the spline to avoid a flower arrangement in the center of the table, since it is not on the same plane and will make your track less accurate.
Planar Trackers Setup
Both the Planar and Mocha trackers require a selected layer with at least one shape in it to drive the tracker.
Note: If shapes are selected and not in a layer, clicking the Track Forward/Backward buttons will create a new layer, make it active and begin tracking.
If shapes are selected in an unselected layer, clicking the Track Forward/Backward buttons will make the layer active and begin tracking.
The shape should surround the object you are tracking, but it does not have to be exact and it is best to leave a little extra room around it. In addition, you can use more than one shape as long as they are on the same geometric plane.
Handling Occlusions
In some cases, there are parts of an image that can interfere with the effectiveness of the Planar and Mocha trackers. To handle this, you can create an exclusion zone in the area you are tracking. For instance, a computer screen with strong reflections could cause the track to jump. To exclude an area while tracking, create a subtractive shape above the primary tracking shape. Then, select both the shapes prior to tracking.
Go to the Planar Trackers tutorial to see how it works.
Tracker Direction
The Tracker Direction buttons are used to track backwards and forwards and are enabled when a layer has been selected.
Note: In a Stereo project, the Tracker Direction buttons are grayed out in the Left/Right View. You must be in either the Left or Right View to track. In the Morph node, the Tracker Direction buttons are grayed out in View Output. You must be in either View A or View B to track.
Track Backward One Frame
Tracks backward one frame at a time.
Track Backward
Tracks backward to the beginning of the Timebar.
Track Forward
Tracks forward to the end of the Timebar.
Track Forward One Frame
Tracks forward one frame at a time.
As you track, the tracker’s transform data is automatically applied to the selected layer.
Note: When a layer is selected prior to tracking, the per-shape blend mode, invert state, on/off state and opacity are all obeyed. This allows you to use multiple shapes while tracking.
Channel
Determines which image channel the tracker uses to analyze the image.
Luminance
The tracker analyzes the luminance or brightness of the image.
Red
The tracker analyzes the image’s red channel.
Green
The tracker analyzes the image’s green channel.
Blue
The tracker analyzes the image’s blue channel.
Reset
Resets the tracking points.
Tracking Features
Auto
Tracks corners, edges and ridges and automatically selects the best result.
Corners
Tracks corners, crosses or points.
Edges
Tracks edges of a solid object.
Ridges
Tracks lines appearing as a strips or bands.
Motion Model
Perspective
Tracks perspective changes. Good for large shapes.
Affine
Tracks translation, rotation, scale, and skew. Good for medium shapes.
Translation
Tracks the XY offset. Good for small shapes.
Min Features
The minimum number of trackers to generate.
Max Features
The maximum number of trackers to generate.
Min Dist
The minimum distance between trackers.
Max Age
The maximum number of frames a specific tracker will live until it is removed and a new tracker is generated.
Note: If you have really good tracks, you can increase the Max Age to cover the entire sequence and the trackers will live for the entire time and will result in a smoother transform. However, this value has to remain low to handle automatic occlusion handling.
Valid Tracks
The number next to Valid Tracks is a running total of the number of trackers that are viable as the tracker progresses.
Reference Frame
Displays the reference frame number. The reference frame is the frame you first started tracking on and it locks in the picked set of track points at that frame.
Jump to Reference Frame
When clicked, the Timebar is positioned at the reference frame.
Group Tracking
Multiple layers containing non-overlapping shapes are tracked as separate planar surfaces.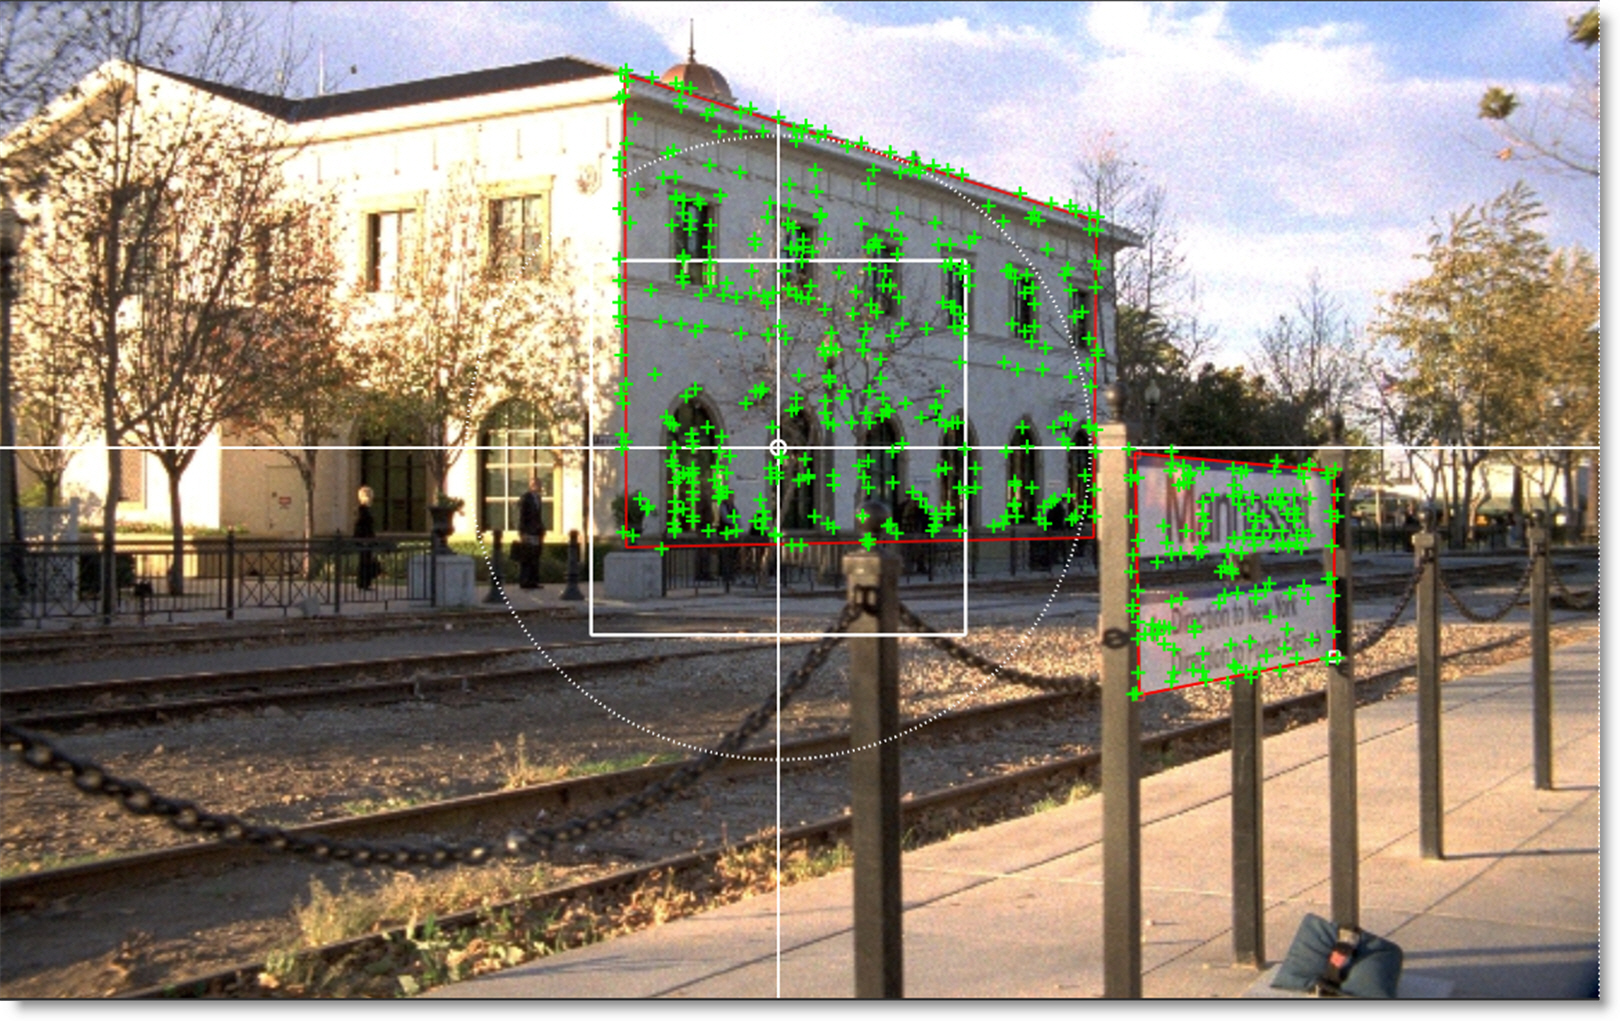
Part Tracking
With multiple layers containing overlapping shapes, there is an interaction between them whereby they share coarse motion, but have individual motion at the fine scale. This is helpful when tracking non-planar surfaces.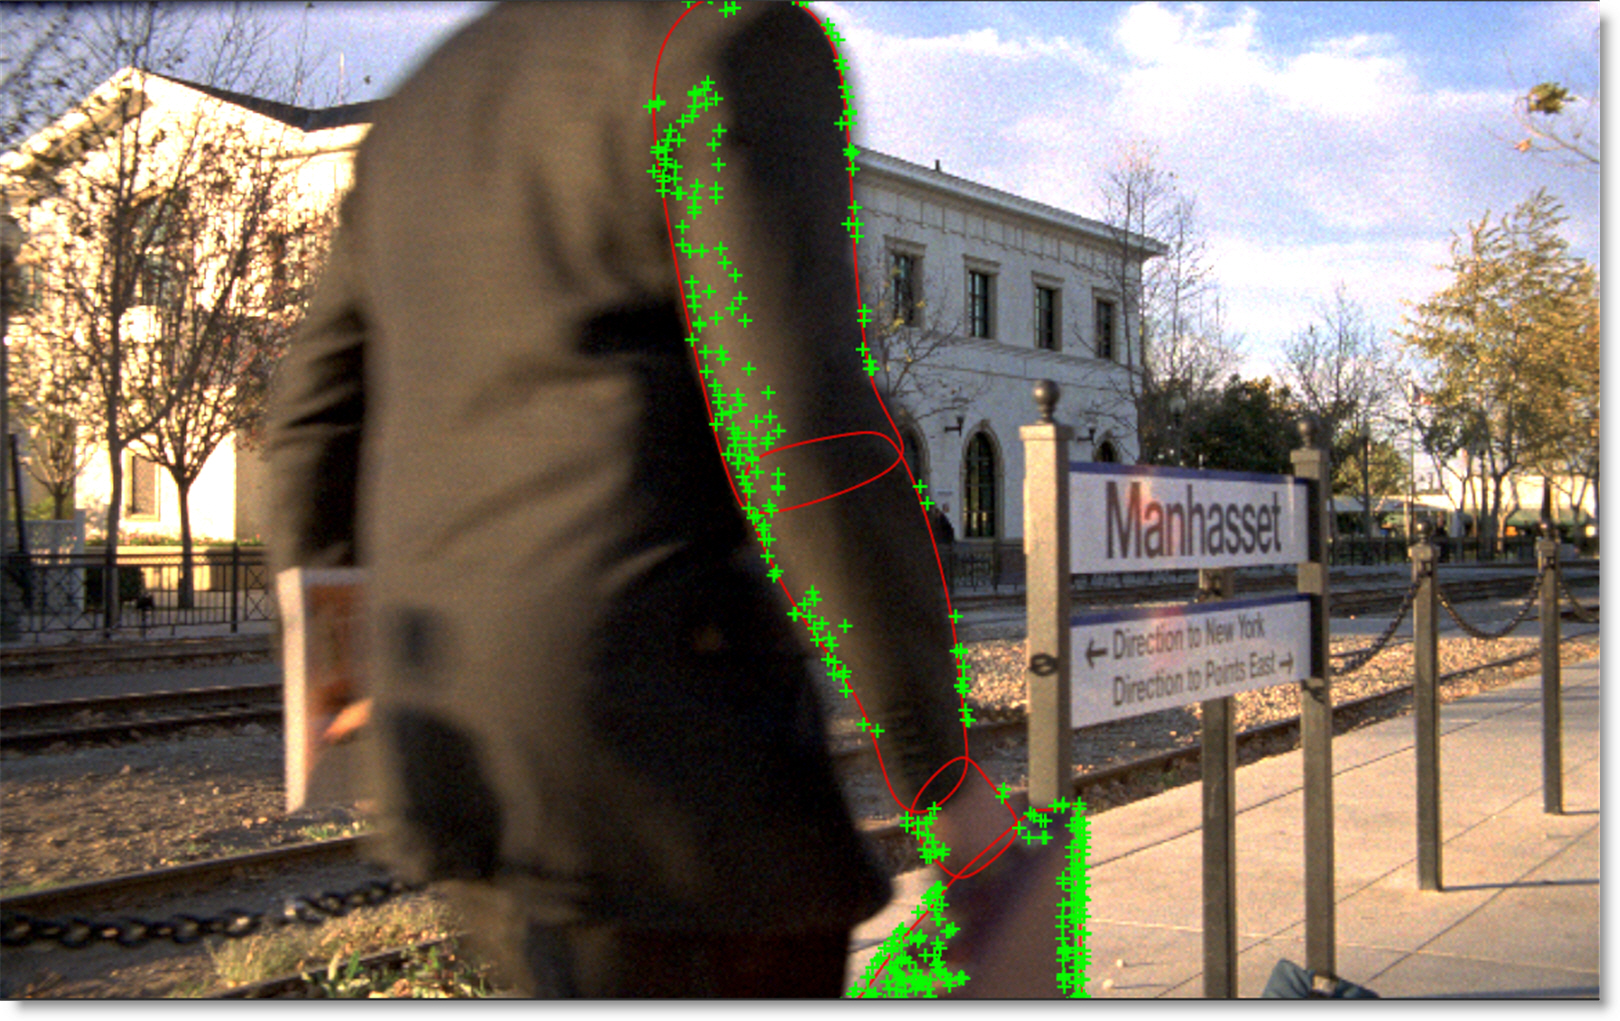
Mocha Planar Tracker
The Mocha Planar Tracker provides 2D transformation data by tracking planes rather than points.
Go to the Planar Trackers tutorial to see how it works.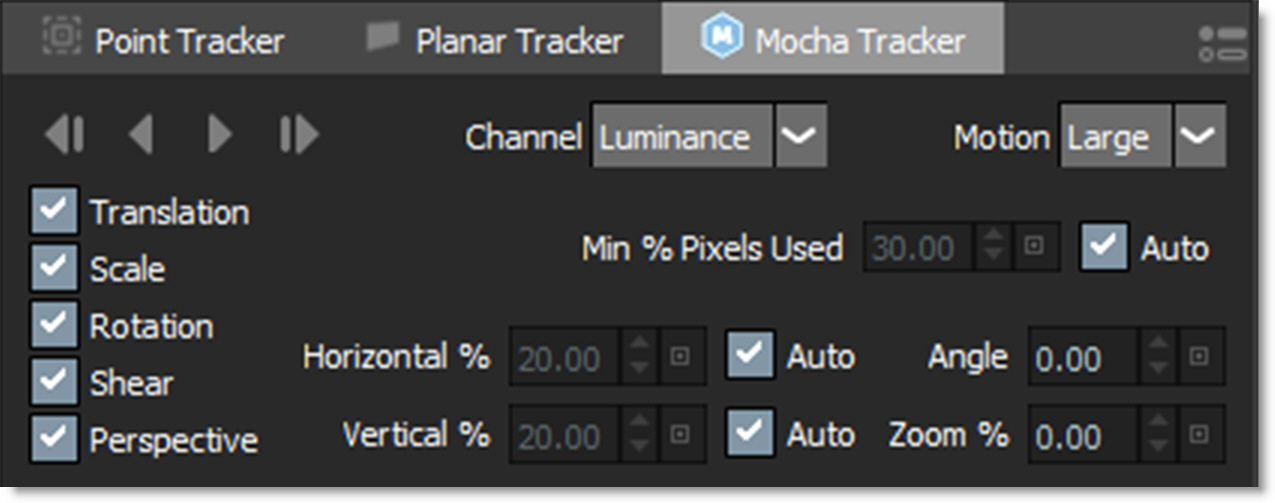
As with Silhouette’s Planar Tracker, the Mocha Planar Tracker requires that you create a layer in the Object List and have at least one shape within it to drive the tracker. The shape should surround the object you are tracking, but it does not have to be exact and it is best to leave a little extra room around it. In addition, you can use more than one shape as long as they are on the same geometric plane.
Tracker Direction
The Tracker Direction buttons are used to track backwards and forwards and are enabled when a layer has been selected.
Note: In a Stereo project, the Tracker Direction buttons are grayed out in the Left/Right View. You must be in either the Left or Right View to track. In the Morph node, the Tracker Direction buttons are grayed out in View Output. You must be in either View A or View B to track.
Track Backward One Frame
Tracks backward one frame at a time.
Track Backward
Tracks backward to the beginning of the Timebar.
Track Forward
Tracks forward to the end of the Timebar.
Track Forward One Frame
Tracks forward one frame at a time.
As you track, the tracker’s transform data is automatically applied to the selected layer.
Note: When a layer is selected prior to tracking, the per-shape blend mode, invert state, on/off state and opacity are all obeyed. This allows you to use multiple shapes while tracking.
Channel
Determines which image channel the tracker uses to analyze the image.
Luminance
The tracker analyzes the luminance or brightness of the image.
Red
The tracker analyzes the image’s red channel.
Green
The tracker analyzes the image’s green channel.
Blue
The tracker analyzes the image’s blue channel.
Min % Pixels Used
Min % is one of the most important parameters to look at for tracking. By default, the minimum percentage of pixels used is dynamic. When you draw a shape, the Mocha Planar Tracker tries to determine the optimal amount of pixels to look for in order to speed up tracking. If you draw a very large shape, the percentage will be low. If you draw a small shape, the percentage will be high.
In many cases, the cause of a drifting or slipping track is a low percentage of pixels. If you want a more solid and accurate track, try setting the Min % Pixels Used value to a higher amount. Keep in mind, however, that a larger percentage of pixels can mean a slower track.
Min % Pixels Used is set to Auto by default.
Motion
These Motion parameters control what motion you are looking for when you track.
Translation
The position of the object.
Scale
Whether the object gets larger or smaller.
Rotation
The angle of rotation of the object.
Shear
How the object is skewing relative to the camera.
Perspective
How the object is moving in perspective relative to the camera.
The main difference between shear and perspective is the relative motion. Shear is defined as the object warping in only two corners, whereas perspective is most often needed where the object is rotating away from the viewer significantly in space.
As an example, if someone is walking towards you, their torso would be showing shear as it rotates slightly back and forth from your point of view.
The front of a truck turning a corner in front of you would be showing significant perspective change.
Large Motion
This is the default. It searches for motion and optimizes the track as it goes. Small Motion is also applied when you choose Large Motion.
Small Motion
Small Motion only optimizes. You would use Small Motion if there were very subtle changes in the movement of the object you are tracking.
Search Area
The Search Area defines ranges for the tracker to search within.
Horizontal/Vertical
Determines the distance in pixels within the footage to search for the next object position. This is set to Auto by default.
Angle
If you have a fast rotating object, like a wheel, you can set an angle of rotation to help the tracker to lock onto the detail correctly. The tracker will handle a small amount of rotation, less than 10º per frame, with Angle set to zero.
Zoom %
If you have a fast zoom, you can add a percentage value here to help the tracker. Again, the tracker will still handle a small amount of zoom with this set to zero.
Point Tracker
The Point Tracker uses trackers which are placed on distinguishable image features.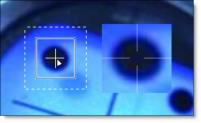
Go to the Point Tracker tutorial to see how it works.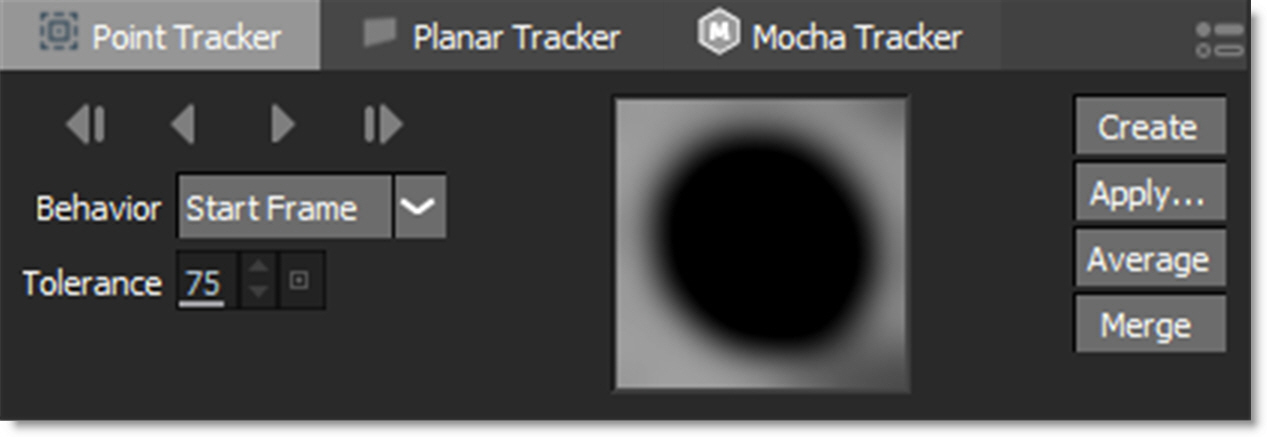
Tracker Components
Each tracker has a Match Area, Search Region, and Track Point.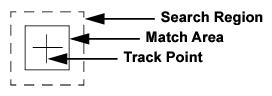
Match Area
The inner box is the Match Area. It defines a pattern that will be searched for from frame to frame. It's a good idea to choose a region with good contrast and detail. Corners with sharp contrast are usually good areas to track as movement can easily be detected in any direction. The Match Area can be scaled to the desired size.
Search Region
The outer, dashed box is the Search Region, which should be the maximum amount your tracking point will move between frames. The larger the size, the slower the processing. The trick is to make the Search Region as small as possible, yet still large enough to cover the area the tracker will move from frame to frame. The Search Region can be sized in the same fashion as the Match Area.
Track Point
The center cross is the track point. It represents the position of the motion track. Normally, the Track Point is at the center of the tracker, but can be offset if the Match Area becomes obscured.
Tracker Direction
The tracker can track both forward and backward one frame at a time or for the entire duration. The controls are enabled once a tracker has been selected.
Note: In a Stereo project, the Tracker Direction buttons are grayed out in the Left/Right View. You must be in either the Left or Right View to track. In the Morph node, the Tracker Direction buttons are grayed out in View Output. You must be in either View A or View B to track.
Track Backward One Frame
Tracks backward one frame at a time.
Track Backward
Tracks backward to the beginning of the Timebar.
Track Forward
Tracks forward to the end of the Timebar.
Track Forward One Frame
Tracks forward one frame at a time.
Behavior
Behavior decides what frame should be used as the reference to check the accuracy of the Match Area. By default, the reference is the first frame at which you started the track.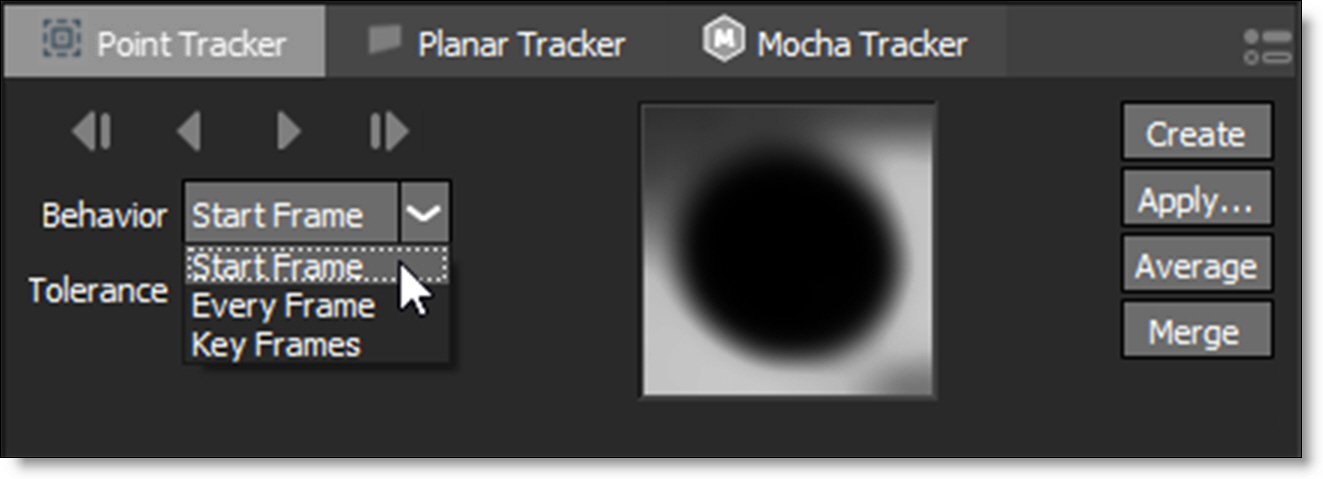
Start Frame
At each frame, the Match Area is compared to the first frame at which you started tracking. If you stop tracking halfway through your clip, and start up again at a later frame, the later frame will be used as the reference.
Every Frame
The Match Area is compared to the previous frame. This method will cause inherent drift in your track, but is useful for clips that have drastic changes in perspective and scale.
Key Frames
For difficult shots, it is helpful to pre-set keyframes for the tracker at various points in the clip. The Match Area will use these keyframes as a reference while tracking.
Tolerance
Describes the level of accuracy between the Match Area that the Tracker is searching for and the area it actually finds when searching from frame to frame. A prefect match would be a value of 100. If the error that is calculated is below the Tolerance value, no keyframe will be set on that particular frame. The Tolerance is preset to a value of 75.
Create
Clicking on the Create button places a new tracker in the center of the screen. You can also add a new tracker at any time by Alt-clicking the image when the Tracker is activated.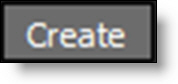
Apply
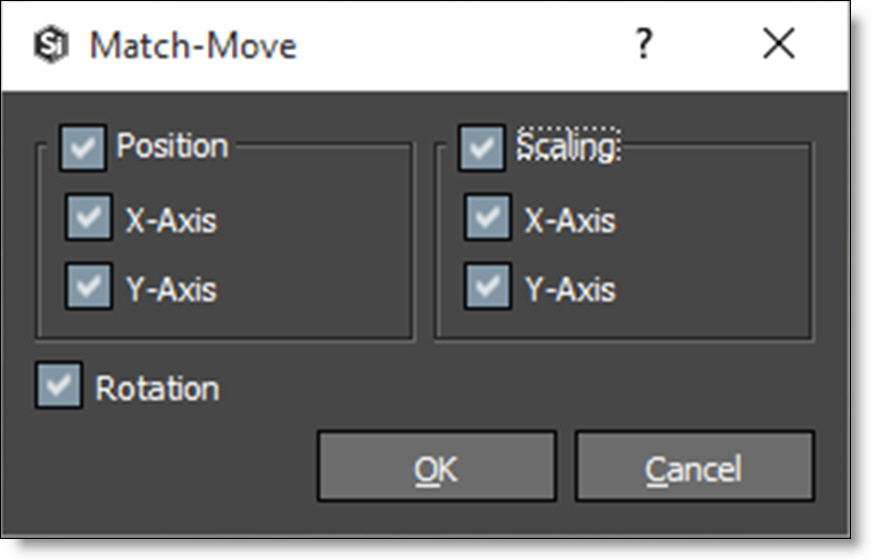
Selecting the Apply button opens the Match Move window where you determine how the tracking data will be applied.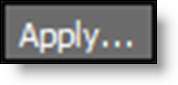
When OK is clicked, the tracking data is transferred to the Layer’s > Transform > Matrix parameter.
Note: With only trackers selected, clicking Apply creates a new layer and the tracking data is applied to that layer.
If a layer is selected along with the trackers, the tracking data will be applied to the selected layer.
Go to the Applying Trackers tutorial to see how it works.
Position
Applies X/Y position data to the layer.
Scaling
Applies X/Y scaling data to the layer. Requires two trackers.
Rotation
Applies rotation data to the layer. Requires two trackers.
Average
Averages multiple tracks into a new destination track. A common technique is to track forwards from the first frame to the last, and then create a second track, tracking backwards from the last frame to the first. These two trackers are then averaged together to derive a more accurate track.
To average trackers, select more than one tracker and click the Average button. A new averaged tracker is created.
Go to the Averaging Trackers tutorial to see how it works.
Merge
If you have multiple trackers that cover different frame ranges, they can be merged into one tracker, automatically compensating for the different offsets.
Ideally, the trackers should overlap in time by at least one keyframe.
Go to the Merging Trackers tutorial to see how it works.
Tracker Parameters
Most tracker parameters are interactively set while moving the tracker in the Viewer. When a point tracker is selected, its parameters are displayed in the Object Parameters.
Magnify Window
A magnified version of the Match Area is displayed to aid in the placement of a tracker. It is activated when you click the Create button or when you move an existing tracker. The magnified area is displayed in the color space selected from the Mode pop-up menu.
Position
Sets the position of the Track Point. This parameter is automatically set when using the on-screen tracker controls.
Nudging Trackers
Trackers can be nudged using the Arrow keys. One press of the Arrow key moves the tracker 1 pixel. Using the Shift key in conjunction with the Arrow keys moves the tracker 10 pixels. Ctrl plus the Arrow keys moves the tracker one tenth of a pixel. These nudge values can be changed in the Preferences menu located in File > Preferences > Nudging on Windows and Linux or Silhouette > Preferences > Nudging on Mac. Holding the Arrow keys down slides the tracker.
Tracker Nudging Keyboard Shortcuts
Shortcut | Action |
|---|---|
Arrow keys | Moves the tracker by 1 pixel |
Shift-Arrow keys | Moves the tracker by 10 pixels |
Ctrl/Cmd-Arrow keys | Moves the tracker by one tenth of a pixel |
Hold down Arrow keys | Moves the tracker continuously |
Channel
Determines which image channel the tracker uses to analyze the image.
RGB
The tracker analyzes the red, green and blue channels of the image.
Luminance
The tracker analyzes the luminance or brightness of the image.
Red
The tracker analyzes the image’s red channel.
Green
The tracker analyzes the image’s green channel.
Blue
The tracker analyzes the image’s blue channel.
Match Offset
Offsets the Match Area from the tracker. This parameter is automatically set when using the on-screen tracker controls.
Search Offset
Offsets the Search Region from the tracker. This parameter is automatically set when using the on-screen tracker controls.
Match Size
Sets the size of the Match Area. This parameter is automatically set when using the on-screen tracker controls.
Search Size
Sets the size of the Search Region. This parameter is automatically set when using the on-screen tracker controls.
Path Color
Sets the color of the tracker’s path. Left-clicking the color pot opens a standard color picker while right-clicking on the color pot opens a pop-up color menu with 16 primaries.
Tracker Pop-Up Menu
Point Tracker
With the Point Tracker tab selected, right-click over a shape or a selected control point to open the Tracker pop-up menu.
Create Corner Trackers from Shape Bounds
Creates four trackers around the four corners of the selected shape’s bounding box.
Create Tracker from Shape Center
Creates one tracker in the center of the selected shape.
Create Tracker from Points
Creates trackers from selected points.
Note: Trackers created from shapes are a concatenation of the shape and layer transformation data. So, why do this? Because, it is a handy way of creating trackers with all of this combined data for use in other programs.
Create Corner Trackers from Layer Surface
Creates four trackers around the four corners of the layer surface.
Create Tracker from Surface Center
Creates one tracker in the center of the surface.
Pre-Processing
Images that contain film grain or video noise, lack contrast or sharpness as well as images that have flicker can be tracked more accurately by applying certain filters during the tracking process. Filters such as Blur, Sharpen, Contrast, Gamma, De-Noise and Remove Flicker will increase tracker accuracy for problematic images.
Blur
Applies a blur to the image features.
Sharpen
Sharpens image features.
Contrast
Increases contrast.
Gamma
Increases brightness by leaving the white and black points the same and only modifies the values in-between.
De-Noise
Applies a de-noise algorithm to smooth out noise while retaining detail.
Remove Flicker
Corrects image flicker or brightness variation over time, which has a habit of interfering with tracker accuracy.
Preview
Shows the effect of the Pre-Processing parameters on the entire image in the Viewer.
Smooth
Smooths out inaccuracies in the tracking data.
To smooth, select a point tracker or planar tracked layer and click the Smooth button. Adjust the slider when it pops-up and adjust it to the desired level of smoothing.
Go to the Smoothing Point Trackers or the Smoothing Planar Tracked Layers tutorials to see how it works.
I/0
Importing and exporting tracking data takes place in the I/0 section of the Tracker tab.
Import
After Effects Corner-Pin, Nuke, Shake or Simple Format formatted trackers can be imported into Silhouette. If you would like to import trackers from non-supported applications, simply export a Silhouette tracker in Simple Format to see how it should be formatted.
Go to the Importing Tracking Data tutorial to see how it works.
Export
Trackers can be exported to the After Effects, Autodesk, Nuke and Shake tracker formats. In addition, the tracking data applied to a layer, either by the Point Tracker or Planar Tracker, can be exported as a four point corner-pin track.
To create trackers for export that are a concatenation of the shape and layer transformation data, see the Tracker Pop-Up Menu section for more information.
Go to the Exporting Tracking Data tutorial to see how it works.
View
Shapes, points or tracker vectors can be toggled on or off.
Shapes
Toggles the display of shapes in the Viewer.
Points
Toggles the display of Planar Tracker track points in the Viewer.
Vectors
Toggles the display of tracking vectors in the Viewer. This option is not available for use with the Planar Tracker.
Preferences
Seldom adjusted tracker controls can be accessed by clicking the Tracker Preferences icon.
See the Tracker Preferences for information on their use.
Using the Tracker’s Transform Data
However the tracking data is obtained, it ultimately needs to be applied to a layer. The Tracker node then outputs the point trackers and tracked layers for use in other nodes. For instance, the Transform node has a Data input as do other nodes that contain point controls. When the output of a Tracker node is plugged into another node’s Data input, the Tracker’s point trackers and transformed layers are available for use by selecting one of them in the node’s Transform pop-up menu.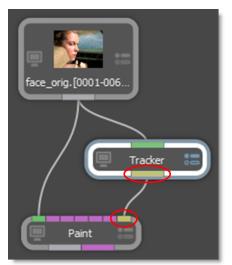
Note: Other nodes that contain trackers, like Depth, Morph and Roto, have a Data output that can be plugged into another node’s Data input.
Go to the Stabilize and Match Move Workflow tutorial to see how it works.