


Boris Red 4.3 Release Notes
Hardware and Software Requirements Supported Host Applications
Notes on Using Boris Red Using OpenGL
Configuring Dual Monitor Systems Displaying Frames on your External Monitor Exporting to Flash
Creating Time Effects Using Motion Filters
Getting Started with the KeyFrame Library Keyboard Shortcuts
New Modifier Keys for Dial controls
Avid Liquid Premiere Pro Sony Vegas Final Cut Pro
Known Limitations General Limitations Keyboard Shortcuts
The Spline Object Media Type Text Features
Hardware and Software Requirements
The following section describes the Red 4 hardware and software requirements.
Boris Red 4 supports the following operating systems:
Windows XP® SP2
Windows Vista
Apple Macintosh OS 10.4.X
System Requirements
A minimum 1 GB of RAM is required, and 2 GB is recommended when using Boris Red with a host application.
512 MB of memory is required when using Boris Red standalone.
QuickTime version 6.5 or later installed
For the best performance possible, Boris Red 4 supports dual processors and Hyper Threading. To download the standalone version of QuickTime from the Apple Web site go to www.apple.com .
Supported Graphics Cards and Drivers
In order to take advantage of the OpenGL hardware-dependent features and effects in Boris Red, you need a supported OpenGL graphics card and drivers. For detailed information on the OpenGL feature in Red 4, see the section on Using OpenGL later in this document and the Understanding OpenGL pdf on your Red CD.
Supported Host Applications
Red 4.3 adds support for latest Avid Media Composer and Symphony editing suites.
Red 4 supports the following host applications.
Macintosh Windows
Boris Red Engine
Adobe® After Effects® CS 3
Apple® Final Cut Pro® 6.0 or later
Apple® Final Cut Pro HD® 5.0 or later
Boris Red Engine
Adobe® After Effects® CS 3
Adobe® Premiere Pro® 1.5, 2.0, and CS 3
Avid Liquid® 7.0
Avid AVX 1.5 API: Avid AVX 1.0 API:
Avid® Media Composer®, Avid Symphony® Avid|DS 6.0 through 7.6 4.7, 4.8, Avid AVX 1.5 API:
Avid XpressMac®, Avid Xpress DV® 3.5.4, Avid® Media Composer®, Avid Symphony®,
Avid Xpress Pro® 4.0 or later Avid Xpress Pro® 4.0 or later, Avid Xpress Studio, Avid AVX 2.0 API: Avid AVX 2.0 API:
Avid Xpress Pro® 5.5 or later, Avid Xpress Pro® 5.5 or later,
Media Composer 2.5 or later, Media Composer 2.5 or later,
Avid Media Composer 3 Avid Symphony Nitris 1.5.x
Avid Symphony 3 Avid Adrenaline Newscutter 6.5.x Avid Media Composer 3
Avid Symphony 3
Canopus® Edius 3 and 4.X
Harris Velocity
Media 100 i® 8.2.3a, Media 100 HD 11.x and Media 100 Producer 11.x
Media 100® iFinish 4.6 Media 100 844/x
Sony® Vegas® 7.0
Sony® Vegas® 8.0
Notes on Using Boris Red
Using OpenGL
Due to the fast rate at which OpenGL card manufacturers release drivers, Boris Red may disqualify your OpenGL hardware erroneously. If this happens, you should try to enable OpenGL to see if you benefit from OpenGL acceleration. If you have troubles with slowness, or render inconsistencies, please disable OpenGL.
While OpenGL may work in the Boris Red standalone, that does not necessarily mean it will work inside your host application.
Boris Red is continually qualifying OpenGL cards and driver versions. However, it is important to note that it is impossible to qualify all combinations of OpenGL cards, operating system, drivers and host applications. In general you should run the latest supported driver available for your OpenGL card.
Configuring Dual Monitor Systems
On dual monitor systems, use the following instructions to correctly configure your video display board. Otherwise, system instability may result.
Right-click on the Desktop and choose Properties from the menu that appears. The Display Properties window opens.
Click the Settings tab.
In the Settings tab, click the Advanced button.
Click the tab with the name of your card on it.
The nView window appears.
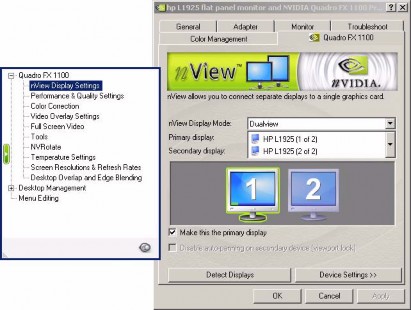
On the left side of the window, select nView Display Settings.
On the right side of the window, choose Dualview from the nView Display Mode menu.
Next, on the left side of the window, select Performance & Quality Settings.
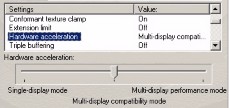
On the right side of the window, select Hardware acceleration from the Settings list.
Set the Hardware acceleration slider to Multi- display compatibility mode, the middle setting.
Click the OK button.
Click OK in the Display Properties window.
Dual Monitor Limitations with OpenGL
Due to an issue with the NVidia card, Boris Red crashes if you are running the application on a dual monitor system with OpenGL. If you plan on using your Boris Red plug-in on a dual monitor system, you need to do one of the following:
With OpenGL enabled, you must display the Composite window on the left-hand monitor.
If you want to display the Composite window on the right-hand monitor, you must disable OpenGL.
With OpenGL enabled:
The system default displays the Composite window on the left-hand monitor. If it’s on the right-hand monitor, click and drag the Composite window to the left-hand monitor.
To disable Open GL from the Preferences dialog box:
From Boris Red, select Edit > Preferences.
Click the Render tab.
From the OpenGL Acceleration menu, select Off.
You can then display the Composite window on the right-hand monitor.
To disable Open GL from the Preview menu:
From the Composite window, select Preview > OpenGL Mode > Off.
This disables OpenGL. You can then display the Composite window on the right-hand monitor.
Checking your OpenGL Hardware, Software, Drivers and Settings
The first time you launch Boris Red, an internal test is run on your system to determine whether your hardware meets the minimum requirements necessary for OpenGL Hardware acceleration. If your hardware does not meet the minimum requirements, OpenGL is disabled by default on your system.
To perform the OpenGL Hardware test manually, click the Test OpenGL Hardware button in the Preferences window’s Render tab.
Depending on the amount of memory your graphics card has, this test may take a few minutes to run.
After the test is run, a window displays specifics of the hardware and drivers installed on your system which are necessary to run OpenGL. If any test results show your system may have problems running OpenGL, the errors are detailed in this window.
If you want, click the Copy to Clipboard button to copy this information to your system clipboard. This allows you to print or e-mail this information.
When you finish, click OK to close this window.
Depending on your system, the test may take a few seconds to complete. The test stresses your OpenGL hardware, so you should run the test with a typical workload on your system. Before you run the OpenGL hardware test, open any graphics applications that you usually run while you edit (any graphics intensive applications you are running at the time may affect the results).
Boris Red uses the following guidelines for optimal OpenGL performance. Some of this information does not affect Boris Red’s hardware testing but is useful for technical support if you are having OpenGL problems:
OpenGL version - Should be 1.2 and higher.
Texture Rectangle - This is an advanced OpenGL image sizing feature. If you are having OpenGL problems, this provides useful information for technical support.
Texture Memory - Texture Memory displays the amount of memory on the video card available for Boris Red to use for textures (layer images).To use Boris Red without display or performance problems, Texture Memory must be at least 32MB. Texture Memory available is not the absolute of memory on your card, but rather the amount available to Boris Red.
Texture Dimension displays the maximum texture size that can be used with the video card.
Macintosh OS Version displays the installed version of the Macintosh OS (if you are running on a Macintosh system.) Macintosh users must have at least Macintosh OS
10.2.6 installed to support OpenGL.
OpenGL Errors
When the OpenGL Hardware Test is run, error messages may display if your system fails. These errors display as Hardware Status errors or Critical Testing errors.
Hardware Status errors report the status of your current system setup against Boris Red’s recommended card manufacturer, model and driver. These errors do not prevent you from using OpenGL, they just warn that your specific system and setup may cause problems with OpenGL. Hardware Status errors can include messages such as insufficient available texture memory or reports that your card was not recognized by Boris Red’s internal hardware testing. When you receive a Hardware Status error, OpenGL is automatically disabled when you launch Boris Red. However, you can manually enable OpenGL in the Boris Red Preferences window.
Critical Testing errors report errors that will not allow you to use OpenGL in Red. When you receive a Critical Testing error, OpenGL is automatically disabled when you launch Red. If you receive a Critical Testing error, you should not enable OpenGL or you may crash. Certain errors are influenced by the display properties set on your video card. The display property
settings are card-driver specific. As a general rule, the display properties should be set to 32 bits of color, with the depth buffer set to at least 16 bits. On many cards the OpenGL capabilities are reduced when higher display resolution and refresh rates are set.
Enabling OpenGL
You can enable OpenGL in the Preview menu or in the Preferences window.
To enable OpenGL in the Boris Red Preference window, choose Edit > Preferences (Windows) or Boris Red > Preferences (Macintosh). Click the Render Tab and select the Accelerated Draft Preview checkbox. Choose the appropriate choice from the OGL Acceleration menu. On, Max. texture caching provides the best performance and is the recommended setting.
To enable OpenGL in the Preview menu, choose Preview > Open GL Mode. Choose the appropriate choice from the submenu. On, Max. texture caching provides the best performance and is the recommended setting.
Troubleshooting OpenGL Issues
To toggle OpenGL off, use the keyboard shortcut Command or Control-[. To turn it back on, the keyboard shortcut Command-] (Macintosh) or Control-] (Windows). Menu choices also appear in the Preview menu and in the Preferences window. You can still use Boris Red without OpenGL or with an older card, you just won’t gain as much acceleration.
Display problems such as white, rainbow or garbage images in the Composite window may be related to OpenGL. If this occurs, open the Preference window. In the Render tab, change the OpenGL Acceleration menu to use less texture caching. Texture caching is used for textures (layer images) and is related to the amount of Texture memory on the video card. Display problems related to OpenGL will not affect your rendered effects.
NOTE: If you experience OpenGL problems, setting the OpenGL Acceleration menu to use less texture caching improves OpenGL reliability, although it lessens OpenGL performance.
Displaying Frames on your External Monitor
Commands in the Preview menu allow you to set the video display.
When Connect to External Monitor is chosen in the Preview menu, Preview to Monitor is enabled and the following three options in the menu become available:
When you choose Auto-Update Monitor from the Preview menu, every frame of your effect previews to the external video monitor. This allows you to drag the CTI in the timeline and view updating frames. The image displays on the external monitor, using the Resolution and Quality settings specified in the Composite window.
NOTE: Enabling Auto-Update Monitor slows Boris Red since every frame updates in the external monitor. Also, OpenGL Acceleration is disabled in the Composite window when you enable Auto-Update.
When you choose Display Frame on Monitor from the Preview menu or click the Display Frame to Monitor button in the upper-right corner of the Composite window, the current frame displays on the external monitor, using the Resolution and Quality settings specified in the Composite window.
When you choose Display HQ Frame to Monitor from the Preview menu, the image displays on the external monitor, using Full Resolution and High Quality settings, regardless of the Resolution and Quality settings in the Composite window.
Disconnecting Preview to Monitor (Standalone)
When you relaunch Boris Red, the external monitor is not connected until you choose Connect to External Monitor in the Preview menu.
Tips for Using the Preview to Monitor Feature (Standalone)
Preview to Monitor automatically disconnects when you exit Boris Red. This means each time you launch Boris Red, you need to choose Preview > Connect to External Monitor in order to reconnect and see your image on the external monitor.
Displaying images on an external monitor requires compressing and resizing the images. Boris Red may run slower if you have Auto Update enabled. Deselect Auto-Update Monitor in the Preview menu to remain connected to the external monitor but not automatically update frames.
Manually update frames to your external monitor by choosing Preview > Display Frame to Monitor, or Preview > Display HQ Frame to Monitor, or by pressing the Display Frame to Monitor button on the upper-right corner of the Composite window.
Exporting to Flash
Boris Red exports Flash .swf files that are compliant with the Flash 5 architecture. If you are using QuickTime to preview your exported .swf files, you need a version of QuickTime that supports the Flash 5 format. The following effects are supported for exporting to Flash.
Text
Spline media
2D Charts (which consist of text and spline shapes)
Other bitmap elements such as video or still graphics can be included in the exported Flash file and will be JPEG-compressed. In the Export preferences you can set the quality of the JPEG compression.
NOTE: When you export text to Flash, any texture that was applied to the text is ignored. Also, when you export text with a gradient fill to Flash, the resulting
.swf file is blank.
Exporting as Flash
Boris Red allows you to export files in the Macromedia Flash (SWF) format. This feature allows you to export compositions as compact, vector-based files optimized for web viewing. For example, you could export a Type On effect to include on a web page.
The SWF format was designed primarily for animated 3D Line Art objects, so it works well when exporting settings that contain spline and text animations. Settings that contain video or animated bitmaps, however, generate rather large files. You might want to consider exporting such animations as a QuickTime or AVI file.
There are some limitations with the Flash export feature. You cannot export 3D Extrusion tracks as Flash. Settings that contain the 3D Extrusion tracks export as a blank track. The Flash export feature does not support shadows or gradients used as Texture tracks. However, you can export a static gradient as a bitmap background.
NOTE: To prepare to export to Flash, you should change any shape track containing EPS files, text, or Spline media to 3D Line Art shape. Because you cannot use the 3D Line Art shape with the Brush tool, you cannot export brush strokes as Flash.
To export a track as a Flash file:
Select the appropriate track in the timeline.
Choose File > Export > Flash.
A dialog box appears that allows you to name and save the file.
Name the track and click Save.
The composition is exported using the Flash Export settings, which are controlled by the Preferences window’s Export tab. For more information, see the Help.
Creating Time Effects
The following important notes pertain to Time filters, including Optical Flow.
NOTE: Exporting an effect containing a Time filter (including Optical Flow) with host media is NOT recommended. If you want to export from Boris Red with Optical Flow (or any Time filter) in the timeline, you should use imported media in the source track. This is because Boris Red does not receive both fields at set-up (preview), and it is important for the motion estimator to have access to both fields in order to see an accurate preview of the rendered result.
Using Motion Filters
You should use the Snap CTI to KeyFrame option (Track > Snap CTI to KeyFrame) when working with the Motion filters to avoid confusion. For example, this option is not selected and you move the CTI off a selected keyframe. Then you adjust the Search and Target parameters using on-screen controls. A new keyframe is not created. Instead, the selected keyframe is adjusted. This could cause your media to track incorrectly. If you want to create a new keyframe, you must deselect all keyframes before adjusting parameters on-screen.
While Interpolation Fields appear next to the Search/Target tab parameters, you should not adjust the Interpolation. Leave the Interpolation set to Hold. Adjusting the Interpolation will not affect the tracking but may cause on-screen parameters to display incorrectly.
You can work at Half or Quarter Resolution to achieve a preview of a motion filter. But if the motion tracker fails repeatedly, you may have to work at Full Resolution.
You can only adjust the Search and Target regions in the Motion filter track's Preview window. The Source track does not display the region controls; the Composite window does not display the region controls.
The field order of the media must match the field order setting in the Media tab. You can set this in the Import tab in the Preferences window. See the Help for more information.
Getting Started with the KeyFrame Library
The first time you browse the KeyFrame Library effects within the Library Browser you must generate thumbnail images for the effects.
Open the Boris Red Library Browser, by choosing Window > Library Browser, clicking the Open Library Browser button in the timeline or pressing Control-9.
Select an effect or effect folder and click the Generate Thumbnails button. For more information on using the KeyFrame Library, see the Help.
NOTE: We recommend that when you build thumbnail previews for the KeyFrame Library, you do this in the Boris Red standalone application. Because building previews actually renders your effect, this process can take as much as 25- 30% longer in the plug-in than in the Boris Red standalone application.
Keyboard Shortcuts
The Keyboard Shortcuts is available from the Help or on the Online Library DVD.
New Modifier Keys for Dial controls
When using the mouse on dial controls, you can now use the following modifiers:
Press the Shift key to round the marks on the dial controls to the nearest 45 degrees.
Press Control to round the marks on the dial controls to the nearest 10 degrees.
Press Shift-Control to round the marks on the dial controls to the nearest 5 degrees.
Press Shift-Control and use the mouse wheel to round the marks on the dial controls to the nearest 45 degrees.
When tracking with a mouse wheel on dial controls, you can use the following modifiers:
Use the mouse wheel with no modifier keys to move the dial controls in 1 degree increments.
Press the Shift key and use the mouse wheel to round the marks on the dial controls to the nearest 10 degrees.
Press Control and use the mouse wheel to round the marks on the dial controls to the nearest .1 degrees.
Host Application Notes
This section includes special notes on using Boris Red with host applications.
Edius
Due to limitations in the Edius architecture, you need to be aware of the following limitations when using Red inside Edius.
Launching Boris Red within Edius
To launch the Red user interface after applying a Boris effect to a clip, the Edius timeline cursor must be placed over the effect and the track containing the effect must be selected.
Editing Previously Rendered Effects
In Edius, when a clip is rendered, that clip is locked down. Any further changes to a Red effect will not display in the Edius Preview window until Edius is closed and reopened. To work around this limitation, complete the following steps:
In the Edius settings, click the Render tab.
In the Delete invalid rendering files section, choose When the Rendered File is Invalid.
Unrender the clip by making a change, such as toggling the checkbox to disable/reenable the effect in the Edius Information Palette.
If changes to the effect still are not applied, toggle the effect off and then back on again in the Edius Information Palette.
Crashes in Edius When OpenGL Is Enabled
If Edius crashes when trying to apply Red it may be because OpenGL is enabled; disable OpenGL.
Applying Multiple Boris Red Filters to a Clip in Edius
There are some issues you should be aware of when applying multiple Red filters to a clip.
Stacking Multiple Overlapping Boris Effects We do not recommend adding multiple Red effects to an Edius clip or stacking clips containing Boris effects on multiple layers in the Edius timeline. This may work, but depending on your system specifics, multiple Boris effects (>2) on a clip or stacked on top of each other may not render properly. Instead, apply a single Red effect to an Edius clip and add multiple filters to the clip within Red.
NOTE: This limitation applies only to effects that overlap exactly. For example, a track containing both an in and an out transition would not fall under this suggestion (since they can not overlap).
Applying more than one Boris Effect to a Clip If there is more than one effect applied to the Timeline, the effect of preceding filters will not display in the subsequent filters in the Red interface. For example, if first a blur filter and then a ripple filter are applied to the same Edius clip, the blur filter effect will not show in the effected track when the ripple effect is launched. However, all effects will display during render in the Edius Preview window.
Playing Boris Red Effects
Edius timeline playback stops when trying to play through a Boris effect. To fix this, in the Edius settings deselect the Stop Playback at Frame Drop in the Playback tab.
Working in Boris Red when Edius is Running
When Red is launched Edius is unable to perform other actions (such as close, etc). It is possible to get Edius into a state where it thinks Red is launched, but the Red User Interface does not appear. This will functionally lock Edius.
To resolve this, delete the Red .ini file in the root:\\WINDOWS folder, and launch Red again. If this doesn't work, save the Edius project, force a manual close of Edius (Control + Alt + Delete), delete the Red .ini file, then launch Edius again.
Applying Boris Filters within Native Edius Filters
At this time Boris products do not support being launched from inside other Edius filters (for example, the Combine or Region Edius filters).
Using Boris Red as a Transition in Edius
Edius includes three types of transitions; In, Out and Single Track. The incoming clip does not always show in Boris Red, but it does render in Edius.
Creating Time Effects within Boris Red
Due to a limitation in the Edius architecture, Boris Red Time filters do not work when applied to host video in Edius; Boris Red cannot obtain the alternative host video frames needed for rendering. To work around this limitation, import the video directly into the Boris Red effect as Movie media (rather than referencing it as V1 host video) or create the time remapping effect in the standalone Boris Red Engine rather than in the Boris Red plug-in.
Applying Large Effects
Some hosts have a limit to the size of the plugin effect they can save. When working with a large Boris projects such as a multi-stroke Paint effect you may be prompted to save the current project from the Boris UI if it has become too large for the host to save. Once saved to disk you can apply that effect to your footage using either the Boris Engine or Plugin by opening the project in the Boris UI and exporting it as an .avi or .mov file.
Avid Liquid
Issue with Project Size
In most host applications, when you use Boris Red as a plug-in, the effect size is taken from the host application. However, due to changes made in the Liquid Edition 6.1 plug-in architecture, you must manually set the size to match your Liquid project. To do this:
Choose Edit > Project Settings (Windows), or Boris Red >Project Settings. (Macintosh). This opens the Preferences window.
In the General tab use the Project Size menu to set the width and height for your project.
Limitation with Transitions
When you apply Red as a transition, Red’s Composite window incorrectly displays the outgoing clip as an incoming clip. This is a cosmetic problem; the transition will render correctly in Liquid. Use one of the following methods to work around this limitation:
Create the transition in Red as if your clips are correct. Then, apply back to Liquid and render your transition. The final render will be correct.
Press the Media icon in each track to swap Video 1 and Video 2. When you create your transition it will appear correctly in Red. Remember to swap them back before applying to Liquid.
Premiere Pro
Due to limitations in Premiere Pro 1.5, when you apply Red’s Time filters directly to host media in the Premiere Pro timeline, you will experience the following problems.
The filter appears to have no affect when you scrub in the timeline. You need to render in order to see the effect.
Rendered effects may appear to jitter.
To work around these issues, apply Time filters within Red by importing the media as a movie file and assigning the movie file to a track in the Red timeline. Do not apply Time filters directly to host media in the Premiere timeline.
Sony Vegas
When you create an effect in Red that will output an alpha channel to Vegas (for example a title which does not include the background video), when you apply the effect back to the vegas timeline you will notice the edges appear rough and contain white fringes. You need to reenter Red on the effect and in the Red Preferences set the Local Preferences’ Alpha Type menu to Premultiplied with Black . The effect will display correctly when you apply back to Vegas. You will need to do this every time you create an effect that outputs alpha.
Due to a limitation in the Sony Vegas architecture, Boris Red Time filters do not work when applied to host video in Sony Vegas; Boris Red cannot obtain the alternative host video frames needed for rendering. To work around this limitation, import the video directly into the Boris Red effect as Movie media (rather than referencing it as V1 host video) or create the time remapping effect in the standalone Boris Red Engine rather than in the Boris Red plug-in.
Some hosts have a limit to the size of the plugin effect they can save. When working with a large Boris projects such as a multi-stroke Paint effect you may be prompted to save the current project from the Boris UI if it has become too large for the host to save. Once saved to disk you can apply that effect to your footage using either the Boris Engine or Plugin by opening the project in the Boris UI and exporting it as an .avi or .mov file.
Due to limitations in the Sony Vegas API, you must manually set both the project settings
and duration in the Boris Red interface.
Final Cut Pro 5.1
The first time you launch FCP 5.1 after installing your Boris software, you must turn on Caps Lock while you do so; then, quit FCP and relaunch it with Caps Lock turned off. Otherwise, the filter windows will not appear. If you have already launched FCP 5.1 for the first time with the Caps Lock key up, follow the instructions in the next section, “Deleting the FCP Object Cache.”
If you apply a filter with the Filters tab open, you must have Caps Lock down and place the CTI over the clip; otherwise the custom controls will be missing and Final Cut Pro may crash.
If you apply an effect using the Final Cut Pro Effects menu, then delete the effect and apply it to the same clip again, FCP crashes. Once you have deleted a Red effect, put the Caps Lock key down, and then reapply the effect; then resume work with the Caps Lock key up.
(Caps Lock key Down) When you double click a clip with a filter applied to it, FCP may crash if the Filters tab is open in the FCP Viewer. Keep the Caps Lock key up to prevent this problem.
(Caps Lock key Up) If you double click a clip with a filter applied, and the clip is not under the CTI and the Filters tab is open in the FCP Viewer, the custom controls may be black. To resolve this problem, quit and relaunch FCP. To prevent the problem, move the CTI over the clip before double clicking.
If you apply a filter, and the FCP Playhead is not on the clip that the filter is applied to, the custom controls will be blank. To avoid this problem, first move the Playhead to the clip. Quitting FCP and relaunching will also resolve this problem. Note that once a particular effect is missing custom controls, further instances of that effect in a session will also be missing the custom controls.
If the Final Cut Pro Obj Cache and Final Cut Pro Prof Cache files are deleted or cleared, when a filter is added to a clip, its user interface will not appear. To resolve this problem, follow steps 3 and 4 in the next section, Deleting the FCP Caches.
If you experience unexplained crashes, follow the instructions in the next section for Deleting the Final Cut Pro Obj Cache and Final Cut Pro Prof Cache files. Be sure to restart FCP twice, once with the Caps Lock key down, and then again with it up, as described in steps 3 and 4.
Deleting the Final Cut Pro Caches
To resolve a few of the known limitations described above, you need to delete the FCP caches, and restart the application. Please follow these steps, being sure to restart the application twice, once with the Caps Lock key down, and once with it up.
Quit Final Cut Pro.
Delete the Final Cut Pro Obj Cache and Final Cut Pro Prof Cache files, located in:
Users/UserName/Library/Preferences/Final Cut Pro User Data/
where UserName is your account user name on the Macintosh system.
Launch Final Cut Pro with the Caps Lock key down.
NOTE: If you do not launch Final Cut Pro with the Caps Lock key down during this step, and then apply a filter, the filter will not have a user interface. See “Known Limitations” below for more information.
Immediately quit Final Cut Pro and launch with the Caps Lock key up. The software is updated.
NOTE: In order to prevent system instability, keep the Caps Lock key up while working with your Boris product and FCP 5.1.
The following limitations have been fixed since the last release of Boris Red.
Preview to RAM on external monitor fixed.
Preview to Monitor over Firewire fixed on Mac Intel based systems.
Fixed Bugs
Subtitle files are now recognized by the Mac file browser with A Readable Files selected.
Files saved with Save Selected Tracks have the correct file extension and icon.
New media elements respect current track selection and ordering when added to the timeline.
Library Browser previews entire effect when applied to clips longer than 5 seconds.
Text remains visible when selecting Rename Composition in the Project window.
You can now render through Queue if destination has symbol characters in the path.
Spline styles now apply to Spline Primitive media.
Fixed bug where the subtitle export saved the XML file to the root of the boot drive with the chosen path as the file name.
Render logs are generated.
Snap to grid and guide fixed in OpenGL mode.
Red cursor marks show up in Ruler area in Composite Window..
Fixed crash in Premiere Pro when applying to back after importing subtitle into new RED Composition.
Start Timecode field in Subtitle Import Settings window fixed.
Fixed bug where the first title of an exported XML file from Red comes up blank when imported in to FCP.
Home and End keys work for track name fields.
Fixed output to monitor via Kona LHe card.
Fixed bug where Autorecovery file message keeps coming up even after the project is opened/saved or just canceled out.
Ctrl+Double clicking a horizontal guide in the preview window now gives the correct coordinates.
Boris Red 4.2 Release Notes
Boris Red 4 includes the following known limitations.
You need to deselect the Shape control in the Composite window’s Controls menu to directly manipulate an object’s Crop controls.
- The text window will only update the text with changes made to the control window (such as Margin, Wrap, or Font) when you press the update button in the text generator window or close the text generator window.
- Default interpolation is set in the keyframe options palette, not the preferences window
- The Motion Blur button is a global preference. That means that, when you render, all settings respect the last setting of this checkbox in the UI. This is not a bug, but can be confusing when you render multiple effects in the Render Queue.
- If you tumble an object that has an image bump map (such as a movie or still image file), you may see a moire pattern as it tumbles.
- Paint strokes will not be removed by the Eraser brush when working over a transparent background and Eraser Mode is set to Strokes Only.
- When you save a style to the Materials tab in the Style Palette, it does not correctly save the Source type that was used in the Bump Map tab
- The V key in the new Color Preview feature does not work to commit to a color. You can use the C key to dynamically preview colors, but you cannot use the V key to commit to them. Click the mouse instead.
- If you import files into Boris Red that were created in Adobe Illustrator version 9, they display as transparent. Save the file in Illustrator version 8 instead.
- When you search for a missing media file using the Search button in the Media Files window, it may not find files that were moved to another local drive. Manually browse to the new location of the file and press the Replace button.
- Files exported to Flash from Boris Red cannot be used in Macromedia Flash authoring applications such as Flash MX.
- If you use the Keyframe Time field in the timeline to move keyframes, all keyframes that a moving keyframe passes are merged to it. Instead, move keyframes past one another by dragging the mouse.
- Photoshop (.psd) files with adjustment layers display incorrectly in Boris Red if you convert their track to a container. Turn off any adjustment layers in Photoshop before importing .psd files if you plan to use the Convert to Container command.
Known Limitations
- Resuming a partial render of an exported QuickTime file may have some undesirable side- effects. In particular, video compressed with codecs that use frame-differencing and data-rate-limiting (such as Sorenson or Cinepak) may exhibit some of the following behavior during playback.
- Some frames following the resume point may be corrupted. The data rate may be slightly larger than expected. Also, if the file includes an audio track, a slight blip may be heard at the resume point. This may occur with any codec.
- If you use Frame-Differenced movies in Boris Red (including movies compressed with Apple’s QuickTime Animation codec, and some movies compressed with Sorenson), you will see reduced performance. The use of Frame-Differenced movies is not recommended within Boris Red.
- When field media is exported or previewed as frames, only the first field is used.
- Using non-square pixel aspect ratios (i.e. 720x480) can distort the EPS media type when used with the 3D Plane Shape. Use the 3D Line Art shape instead.
- Any effect that uses a filter involving edge detection (for example, RGB Edges) should be rendered with the Better Quality Field Rendering checkbox selected. Otherwise, the rendered effect will jitter.
- Balance and Volume controls have no effect on audio tracks containing AVI files or MP3 files.
- Boris Red exports Flash.swf files that are compliant with the Flash 5 architecture. If you are using QuickTime to preview your exported.swf files, your QuickTime version must support the Flash 5 format. Older versions of QuickTime display the background as a solid color.
- Parameter level keyframes draw incorrectly on MacIntel
- When Red is launched as a generator through FCP it opens with two proxy media tracks.
- Renaming Extrusion Style categories that you’ve created will result in an error dialog
- Window that will not close and you will be forced to exit the application without saving.
Keyboard Shortcuts
The shortcut for hiding marks is listed as (CTRL+ALT+’), however the shortcut does not work. Use the menu choice in the Preview menu, or create your own shortcut in the Keyboard Shortcuts window instead. See the Help, for more information on creating shortcuts.
After creating new keyboard shortcuts, certain items in the Windows menu may show duplicate keyboard shortcuts (for example, the Filter Palette and Media Files window display the same keyboard shortcut). You can assign new shortcuts in the Shortcuts window. See the Help, for more information on creating shortcuts.
The Spline Object Media Type
The Reverse Keyframes command (Track > Reverse Keyframes) does not work in Spline effects.
Text Features
When using Kanji text, the underline option overlaps certain characters, depending on their size.
Tracking controls the global horizontal spacing of the characters in an effect. Tracking behaves differently depending on whether the text was created with the Text tool or in the Text window. When you create text with the Text tool, the tracking honors the justification that is set in the Transform tab. When you create text in the Text window, the tracking is applied with center justification. To track to the right or left using text that was created in the Text window, select the text with the Text tool and move it slightly. Then set the justification in the Transform tab. The Tracking now uses the justification. For information, see the Help.
Importing RTF documents using the Insert Text feature in the timeline’s contextual menu will cause all tab delimited text to appear on the first line in Boris Red, rather than in multiple lines. You will need to manually insert line breaks.
If you Flip an image vertically and then render it through the host, the rendered video appears jittery. Enable the “Better Quality Field Rendering” checkbox to render correctly.
Known Limitations
Chart Features
Accented letters such as é are not passed from the Chart Editor to the Chart Container correctly. Therefore, a Chart Legend or Grid label that uses accented characters must be entered directly into the text track, using the Text tool or Text window. If this is necessary, it must be done as a final step when building the chart. This is because editing the chart data or enabling/disabling the Legend or Grid updates this text using Chart Editor text; as a result, the accented characters will be lost.
On certain systems, extruded pie charts pieces may incorrectly display their corners. Reduce the Bevel to 0 to fix this.
If you have long names for the X axis (defaults: South, East, West, and North), and you are animating the chart the names will not line up with the actual chart.
Selecting the “Apply Current Spline Style” checkbox can create unintended changes if the setting is modified after another spline style is selected. For example, you create a static Line chart setting with the “Apply Current Spline Style” checkbox selected. You apply another spline style from the Style Palette to a different track. If you then animate the chart, the chart will update with the latest spline style, rather than the style originally applied. The workaround is to reapply the original spline style from the Style Palette.
Filters
The Fire filter renders with the fields reversed unless you render it with Better Quality Field Rendering enabled.
In the Fire filter, when using text as a Map layer, the size of the text is ignored and will frequently display garbage. Map text to a Shape, then nest the shape layer inside the Fire filter to correct this problem.
Some filters create effects that evolve over time based on parameter settings. The output of these filters (for example Velocity Remap, Particle System, Comet) depends on the parameter values for the entire effect; changing a parameter value on any frame changes the output for all subsequent frames. If the animation jumps after changing a parameter, the jump is probably because Boris Red did not invalidate frames that were affected by the change. You can fix this by choosing Edit > Purge Frame Cache, and previewing again. Your rendered output does not use the cached frames, so even if you forget to purge the frame cache, your final render appears correctly.
Time filters always use the first field of fielded media when frame rendering or previewing.
The Motion Tracker Filter’s Analyze button won’t analyze the total length of the effect if a movie’s length is shorter than the duration of the effect and the movie is set to Loop.
The BCC grain filter presets do not store the grain sample, only the filter settings. If you load a Match Grain preset and want to use a stored grain signature, you have to load that as well. If you load a DeGrain preset with the “Lock Sample” checkbox enabled, Boris Red will not acquire the sample.
24
The BCC DeGrain and Match Grain filters can only be used when the Boris Red Composite window is set to Full Resolution. If you are not in Full Resolution, an error message warns you to set the Composite window to Full resolution. If you do not set the Composite window to Full Resolution, a red “X” will display in the sample box.