


Phase issues can be present in your songs and go unnoticed. They can be hard to identify and fix when you don’t know where to look; in a song, you'll usually have several tracks playing at the same time, and if you have phase cancellation issues, that can cause your songs to sound weak, flat, or dull, and your drums to lack the punch that no amount of EQ can compensate for.
Phase cancellation can occur at different stages of production, most commonly during the recording process but occasionally during mixing too. In today’s article, we’ll discuss phase cancellation, a problem that can affect your tracks that any audio engineer must learn to detect. You’ll learn what it is, how to identify it in your mix, a few methods for fixing it, and its main causes, so you can prevent it.
Let’s dive in!
What is Phase Cancellation?

Phase cancellation is an audio phenomenon where sound waves of the same or similar frequency overlap, but their peaks and troughs are out of sync (180 degrees apart), causing them to cancel each other out. This destructive interference results in reduced volume, weak bass, thin-sounding audio, or total silence of certain frequencies, often caused by multi-mic setups, improper speaker wiring, or digital sample misalignment.
Let’s remember the cycle of the audio waveform. A basic sine wave starts at 0° and starts to go up. When it reaches the peak and returns to the starting point, it's at 180° (halfway). Then it decreases until it reaches its lowest point (the valley), returns to the starting point, completes the cycle at 360°, and then starts again. That’s the cycle of a waveform from rest to its maximum amplitude, down to its lowest amplitude, and to rest before going up again.
The audio waveform phase is a point in time within the audio waveform cycle. It becomes relevant when we look at multiple sound waves and their phase differences. We say two waveforms of the same frequency are “in phase” when they are aligned with no phase difference. Both start and end at the same point in time. These two tracks in phase will produce a sound louder because it’s the sum of the amplitudes of the two waves.
We call tracks “out of phase” when two waves of the same frequency are slightly shifted, delayed, or completely opposite (one wave is at its maximum peak, while the other is at its lowest). It results in a thin sound and phase cancellation, meaning the frequencies are completely canceled, producing no sound.
There’s an easy exercise to see this. In your DAW, add a basic sample. Duplicate it and invert it until you have an opposite waveform. If you play the two tracks simultaneously, they will cancel each other out. This is the process behind your favorite noise-canceling headphones.
Phase issues range from silent to thin sound. They degrade audio quality, clarity, and impact, which is why they’re considered problematic.
How to Identify Phase Cancellation
The first question after learning about phase cancellation is: “How would I know if my song has it?” Learning how to identify phase cancellation in your mix is a critical skill for any audio engineer to maintain professional audio quality in audio projects. Here are the steps to spot it using your ears and your tools.
Step 1: Listen Carefully
The first step is to listen for the red flags that signal a phase problem.
A thin or hollow sound signals a loss of low-end. This happens when instruments like kick or bass cancel each other in the mix, but sound fine solo.
You hear a whoosh sound like a flanger or phaser pedal. This means your tracks are slightly out of phase.
A vague stereo image or unclear instrument placement can signal phase problems, making mixes uncomfortable to listen to.
Step 2: Mono Test
To confirm phase cancellation, use the mono feature in your digital audio workstation (DAW) or audio software. This will force all the output to mono, and phase issues will become more noticeable. Most DAWs have a Mono button in the master bus. Click it and listen to the mix again to see if a specific instrument drops significantly in volume, changes its tone, or disappears.
Step 3: Look at the Waveforms
To confirm that what you hear is due to phase cancellation, the next step is to examine the waveform. Zoom in on the waveforms. If there is misalignment between the two waveforms, that’s your confirmation.
Step 4: Use Phase Meters
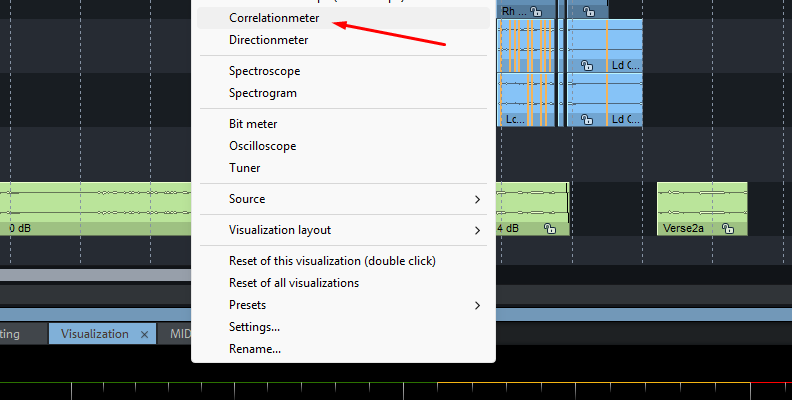
Use phase meter plugins to visually identify potential phase cancellation issues. Tools like Samplitude’s Correlation Meter and iZotope’s Insight 2 are helpful.
How to Fix Phase Cancellation
It's always best to avoid the problem, but sadly, you often discover it when you start editing or mixing the tracks. Here are several methods to fix phase cancellation at this stage in audio production.
Method 1: Invert Polarity with Samplitude

If you suspect phase cancellation issues, Samplitude has a great tool to verify and confirm these issues, and a few tools to fix them.
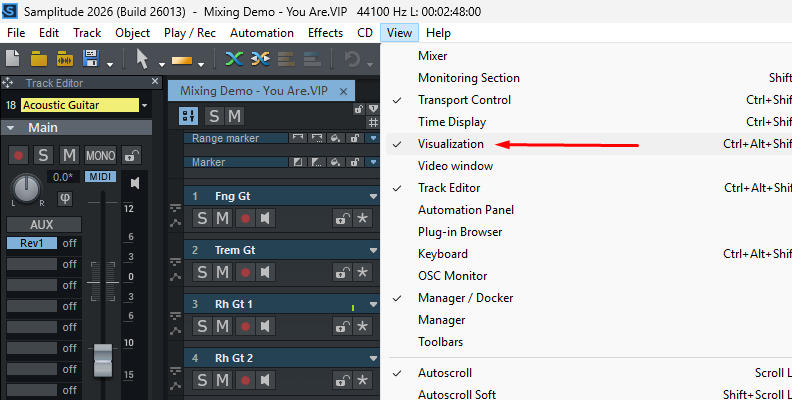
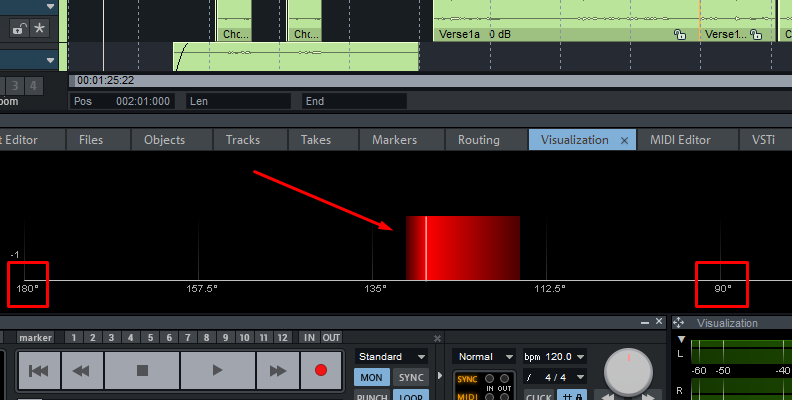
First, use the visualizer and select the Correlation Meter to read phase shifts between the two stereo channels and the degree of mutual cancellation.
If the signal indicator is in the left area between 90° and 180°, the signal shows phase issues and won’t play properly in mono.
The quickest way to fix two signals that are roughly 180° out of phase is to invert one to convert the troughs into peaks so they align. You can do these in several ways:
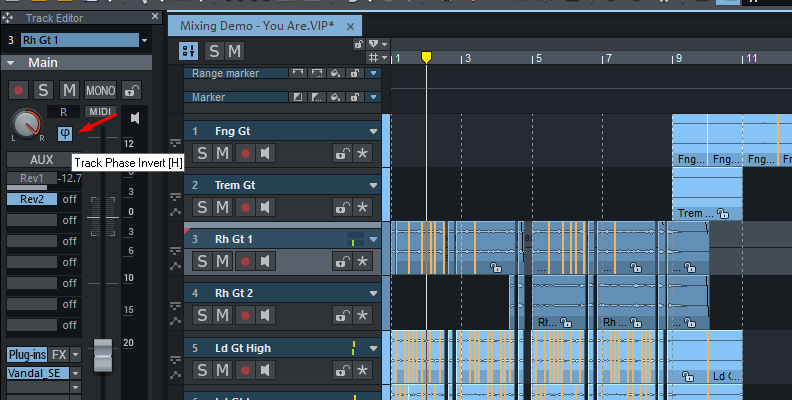
From the Track Header: Select a track and press the Phase Invert button or press the H key.
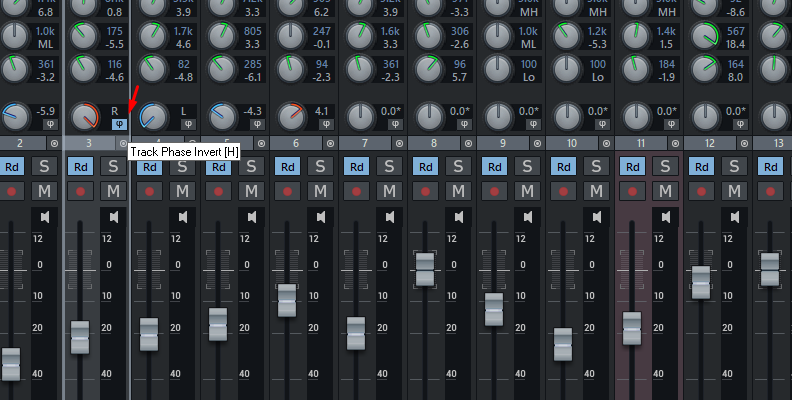
From the Mixer: Display the mixer (press M), select the channel strip, and press the Phase Invert button or the H key.
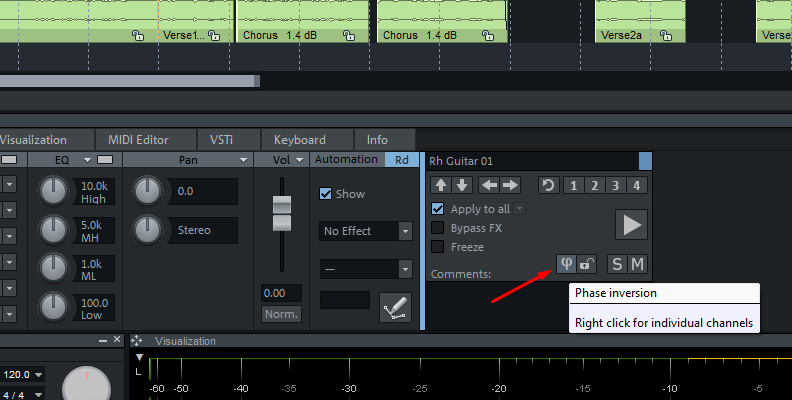
From the Object Editor: If you only want to invert the phase for a specific section or object, rather than the entire track, double-click the object to display the Object Editor. On the right panel, click the Phase Inversion icon.
Method 2: Manual Alignment
This method is useful when the cancellation is partial, caused by a delay between microphones capturing the same source, and when a polarity inversion is not sufficient. It consists of manually nudging the waveform to align both problematic waveforms that are canceling each other.
- Zoom in until you can clearly see the cycles of the sound waves. Preferably, place them one on top of the other (or below) for easy comparison.
- Nudge the track by clicking and dragging the clip left or right until the peaks on both waveforms align vertically.
- Listen in mono until it sounds good to you. Trust your ears; if it sounds good, then it’s good.
Method 3. Add Delay Effects
Another trick is to add a delay effect plugin to shift the timing by milliseconds if you prefer not to move the audio objects manually. Delay effects can help compensate for phase issues caused by recording with two microphones. This usually happens when one of the microphones is farther away and receives the signal with a delay. However, only use this method when you can get away with a bit of delta on your track without affecting the sound of your song.
How to Avoid Phase Cancellation
Now, let’s see a few things you can do to avoid phase cancellation in the first place and ensure your mixing sessions have no surprises.
Mic Placement
The most common cause of phase cancellation during recordings is mic placement, especially when recording a single source, such as an instrument, with two or more microphones. This is common when miking a drum kit or recording an instrument directly from the audio interface and an amp.
When using two microphones, keep them at equal distance from the source but facing different directions, as in the XY stereo recording technique. It works for overhead mics, acoustic instruments, and live recordings.
Keep microphones away from walls and floors, and make sure to cover reflective surfaces with blankets or record in an acoustically treated room to avoid reflections that can cause phase cancellation issues.
Reverse Polarity
Some microphones, preamps, and audio interfaces feature a polarity switch that lets you flip the signal to ensure phase coherence in your recordings. If you're recording a drum kit, this feature can ensure the mics you're using for toms, overheads, or kick drum do not cancel each other.
Discard Cable Issues
If this is a recurring problem, you may want to double-check your cables. It’s rare, but your cables may not have consistent wiring. You can test your cables with a cable tester to ensure that cables are not the culprit.
Mix in Mono
Sometimes phase cancellation occurs during the mixing process due to latency issues with plugins, blending tracks, or overusing stereo widening tools. Enabling mono on the master track can help you catch phase issues before you render your master. Make it a habit to test mono compatibility in your audio workflow.
Final Words
Learning to identify phase cancellation in your mix is critical if you want to get professional sound recordings. If you can identify them, know their causes, how to avoid them, and how to fix them in post-production, you have the knowledge that puts you on the path to professional audio engineering. Remember that different scenarios require different solutions, so try different options, and sometimes leaving a bit of phase cancellation can add texture to your audio, creating unique sounds.
Good luck!
FAQ
Is phase cancellation always bad?
Phase cancellation can also be a good opportunity to create unique sounds with rich effects, textures, and depth. A trashy tone can become an interesting effect when played with EQ, modulation, and other technical effects. Don’t be afraid to explore. It can be used to create a cappella tracks from an instrumental and the original track, removing the instrumentation from the original.


