


After Effects is one of the most well-known post-production workstations in the video editing industry.
Due to its ability to create various effects from scratch, video editors often rely on it to enrich their work in the post-production phase, with some even doing the core editing in it.
In this tutorial, we'll go in-depth about the camera shake effect, what it is, when and how to properly use it in your work, and most importantly, how to add it to a video clip while using Adobe After Effects.
Without further ado, let's get right into it.
Why Would You Add Shake Effect?
If you are wondering why would you add a shake effect on one of your clips while editing, well, the answer is that there are multiple reasons to do so.

Sometimes, editors rely on the camera shake effect for so-called "functional" reasons, which is when the effect is required to make a specific shot work. For example, if we want to simulate a building collapsing, it would be very difficult to make the viewer feel immersed without making the camera shake due to the building's mass creating an earthquake.
It would take a lot more budget and planning to simulate a real earthquake, so why not take advantage of features offered by modern editing software and add it for free in just a few clicks.

Other times, the camera shake effect is used simply for a better visual "wow factor" rather than functionality. For example, when an NBA player slam dunks, that doesn't create such force that makes the field or the camera shake, but adding the effect artificially in post-production can make the entire thing look much more impressive.

Combined with a few other effects, like a screen flash or maybe some slow motion before the action, followed by a beat drop or a peak within a song, you can really make an impressive edit and keep the viewer's attention at all times.
The camera shake effect is regularly used in gaming edits, as well as comic, meme content which is really popular on social media.
All in all, it's a very helpful tool for every aspiring video editor, so it's worth learning how to properly add it to your clips.
How To Add Camera Shake To Video In After Effects

To add a camera shake in After Effects, or a "wiggle" expression, follow these steps:
Step 1: Import Video(s) In After Effects
We suggest creating a new After Effects file (project) so that you don't accidentally change something to an already-existing one that you work on while testing things out.
Open After Effects, create a new project, and import the videos you wish to add the camera shake effect to.
Step 2: Apply The Transform Effect
On your timeline, click on the layer you wish to add the effect to. Then, open the "Effects and Presets" panel and add the "Transform" effect to your clip.
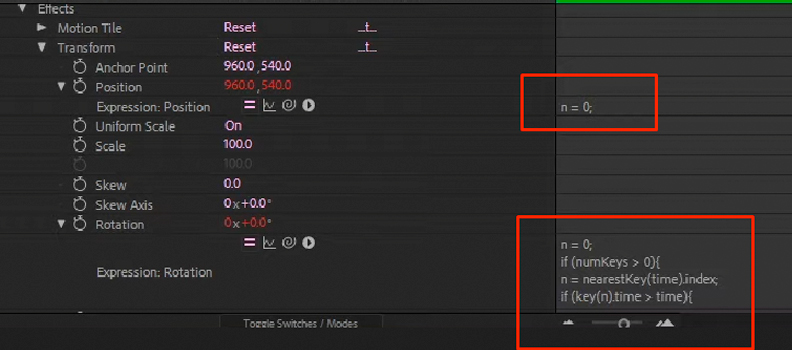
Now, hold down the ALT key on your keyboard and click on the stopwatch icon next to both the "Position" and "Rotation" properties. This will enable expressions for both of those properties.
Step 3: Apply The Expression(s)
All you need to do now is delete the expressions in both the "Expression Position" and "Expression Rotation" fields, then replace them with these values.
![]()
This may seem a bit daunting at first as it uses a programming language to control how the camera shake behaves, but it's really nothing complicated.
Step 4: Move The Keyframes
Now that you've pasted the expressions in both properties, click on the stopwatch icon next to both the "Position" and "Rotation" properties and then press "U" on your keyboard so that After Effects only shows those on your timeline.
You'll now see only two keyframes, for the "Position" and "Rotation" properties. Select them both and drag them a few frames forward. Two or three works fine.
![]()
Move the playhead to the beginning of your clip and input any values you want into both the "Position" and "Rotation" properties, which will create two new keyframes.
For a more subtle motion, you can add lower values, like around "550" for "Position" and "-3" for the "Rotation" property. For a more impactful effect, increase the values.
Feel free to experiment until you find whatever works best for your video footage. Moving the second two keyframes closer or further away from the first ones will also change how the camera shake looks. Moving them closer means a more aggressive shake, moving them further results in the opposite, a more subtle motion.
Some editors add a static frame right after the camera shake occurs within the shot to "pause" on a character's face for a more dramatic look or on the action moment within a gaming clip (if it's that type of edit), but that may look disruptive for other content types.
You can now copy these keyframes and add them to the start of each of your clips. This will result in each clip on your timeline starting with a camera shake.
The wiggle expression is now successfully created.

Camera Shake Effect In After Effects Using Sapphire - Boris FX
The "S_Shake" effect found in Boris FX's Sapphire is already one of the most widely-used camera shakes and is a much simpler and easier method of adding such an effect to your videos. You can use it to apply complex motion to your clips or add camera shake visuals with the simplest and most basic settings.
If you downloaded and installed the free trial version, all you have to do to get an amazing, customizable camera shake for your clips within After Effects is follow these steps:
Step 1: Import Clip(s)
Like in the previous method, the first thing you should do is create a new After Effects file (project) and import the clips.
Add one or more clips to your timeline and position them in the order you want so that you can preview the effect better. It can also be only one clip if you are not using this effect for a transition. What you use this effect for depends on your composition settings.
Step 2: Create An Adjustment Layer And Add The Camera Shake
Create an adjustment layer by using the "Ctrl + Alt + Y" shortcut on your keyboard. You can name it "layer shake" for better organization.
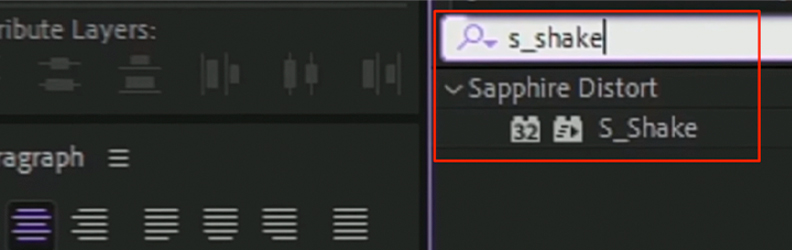
Now, go into the "Effects and Presets" panel and search for the "S_Shake" effect, then add it to the "layer shake" adjustment layer you just created.
![]()
Step 3: Modify The Effect Values
Move the playhead to the first frame of your adjustment layer, right where it starts. Click on the Stopwatch icon next to the "Amplitude" property and change its value to "6" for a start.
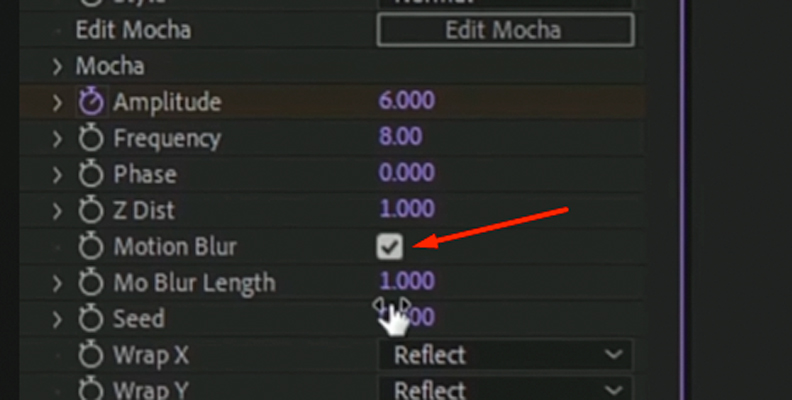
Move the playhead about twenty frames forward, change "Amplitude" to "0" and enable the "Motion Blur" feature by ticking the box next to it.
![]()
Set the "Frequency" property to "15". Expand the "X Shake" property and set "X Rand Amp" to "100", then expand "Y Shake" and set "Y Rand Amp" to "150", and finally, expand "Tilt Shake" and set "Tilt Rand Amp" to "5".
Click on your adjustment layer and press the "U" button on your keyboard so you can see the keyframes you just created.
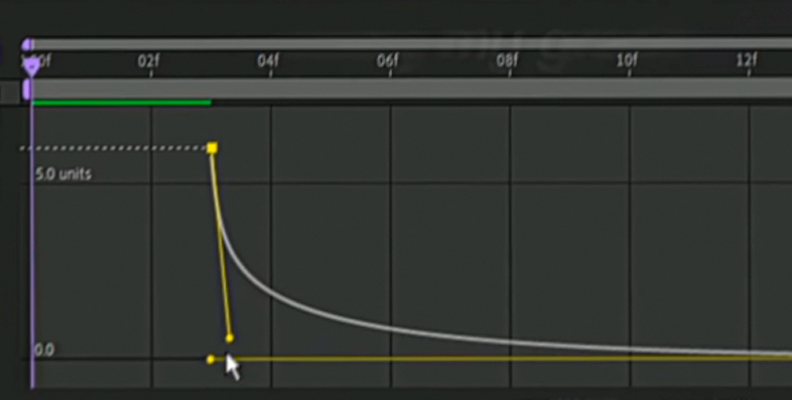
Click on the "Shake" amplitude (property) and use your mouse cursor to hover over "Keyframe Assistant", then choose the "Easy Ease" option.
Finally, select both keyframes and open the graph editor window. Create a graph that looks something like this, and you're done!
![]()
If you don't like the visuals of this camera shake, feel free to readjust the settings and find what works best for your content.
You can also combine this effect with the "Exposure" effect for a better visual "wow" factor, or just leave it as it is if you prefer a more subtle motion.
Final Words
Now you know how to add shake to your entire composition within After Effects, create a wiggling object through this effect, and more, using both a free method and a renowned plug-in.
This should help you enhance the quality of your YouTube videos, create better visual effects, and even become a bit familiar with the coding language adapted from JavaScript used for the expressions in the first method.


