


Audio bounce is a term that you may come across in many tutorials and manuals. The term is relatively old, and these days there may be more intuitive ways to refer to the same thing. Today, we’ll explore the basics of audio bouncing, its relevance in music production, and how to do it in Samplitude.
Let’s dive in!
What is Bouncing in Music Production?

In music production, bouncing means rendering multiple tracks — such as MIDI instruments, harmonies, or an entire project — into a single, finalized audio file, such as WAV, AIFF, or MP3. Also called "exporting," "rendering," or "mixing down," this process reduces CPU load by converting resource-intensive virtual instruments to audio, commits effects to a track, or exports the final mix for distribution.
Essentially, it involves exporting your project's tracks into a single playable file. Alternatively, you can export individual tracks, such as drum kits, effects, or backing vocals, to a group track, resulting in stem files that consolidate related instruments.
The term "bounce" originated in the early days of tape recording to free up space on a 4-track recorder. Artists would record four tracks and merge them into a single track. Next, they would transfer the track back to the recorder and layer in additional instruments or vocal harmonies. "Bounce" was used because the audio shifted between different tracks, like a bouncing ball.
In digital music production, many digital audio workstations (DAWs) like Pro Tools have retained analog-era terminology to refer to the same process of consolidating tracks into a single track.
Many modern DAWs use terms like "Render," "Export," "Printing," "Flattening," and "Mixdown" for the bouncing process; all mostly refer to the same thing.
Why Do We Need to Bounce Tracks?

Today, we don’t have the track limitations of 4-track and 8-track recorders, but we still use the same principles with digital tools for different purposes. We evolved from necessity to free up track space to management and creative needs.
Save CPU Resources: We're bouncing audio to conserve CPU. Since most DAWs no longer limit the number of tracks, our main constraint is CPU power. Bouncing audio tracks relieves the load from resource-intensive virtual instruments and effects.
Sound Design: Bouncing lets you transform audio for creative effects, such as reversing tracks or applying additional processing to experiment with sound.
Printing Effects: You can commit effects such as reverb, delay, compression, or virtual instruments as permanent parts of your audio tracks. For example, if you’re working on a MIDI track in Serum, bounce it once it’s finished to continue working seamlessly on your project, and then edit or slice the audio file.
Project Management: Managing stems makes it easier to send files to your mixing and mastering engineer or share them with collaborators.
Types of Audio Bouncing
Depending on your DAW, these types of bouncing may use different names.
Stem Bouncing
To bounce audio from multiple tracks — such as all drums, vocal harmonies, or synth layers — into a single audio file. The output contains all sounds and effects in the signal chain. Many producers archive stems for remixing or creating alternate versions of a song.
Mixdown
In modern digital audio production, mixdown is the primary method of audio bouncing. It consolidates all project tracks, including the master channel, into a single file. This file, known as the master, is distributed to streaming platforms or printed on CD.
Bounce in Place (Freeze)
It consolidates all audio tracks, effects, and processing into a new track, replacing the source. This is primarily done to conserve CPU for MIDI tracks, virtual instruments, vocal tuning, or sound design.
Bounce to New Track/File
This approach is similar to bouncing in place, but it lets you move clips or time sections to a new track or file. It’s useful for moving different clips or particular segments for creative edits or overdubs.
How to Bounce Audio in Samplitude: Step by Step

Now, let’s learn how to bounce audio in Samplitude. I’ll cover the most common bouncing options.
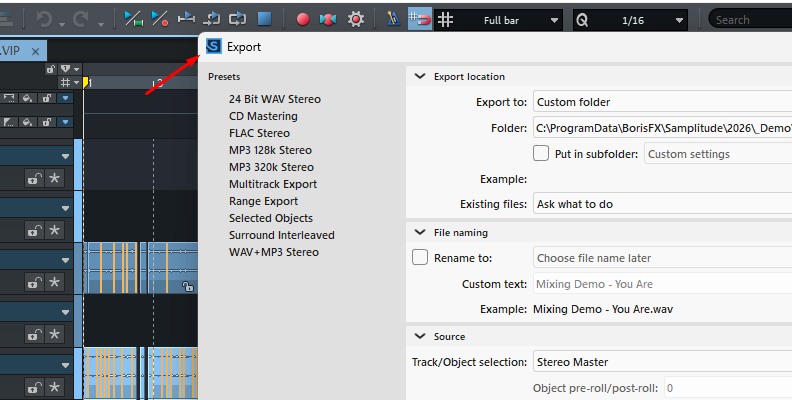
Step 1: Open the Export Dialog Window
In Samplitude, the bounce process is called export. Start by opening the Export Dialog Window from the File menu or by pressing CTRL + E. Here, you select your bounce type and export settings.
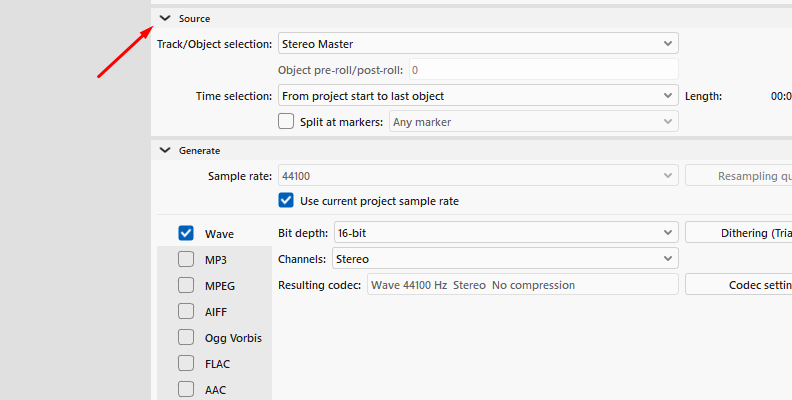
Step 2: Mixdown Bouncing
For a Mixdown, set your export location and file name, then under Source, select Stereo Master. Choose your sample rate, bit depth, and audio type, then click Export.
Step 3: Stem Bouncing
There are two main ways to create Stems with multi-track export. In the Source section, select:
All audible tracks (Multi-track export)

This option renders all audible tracks with the full effects chain, sub-mix busses, and master effects, ignoring any muted tracks.
All selected tracks individually (Multi-track export)
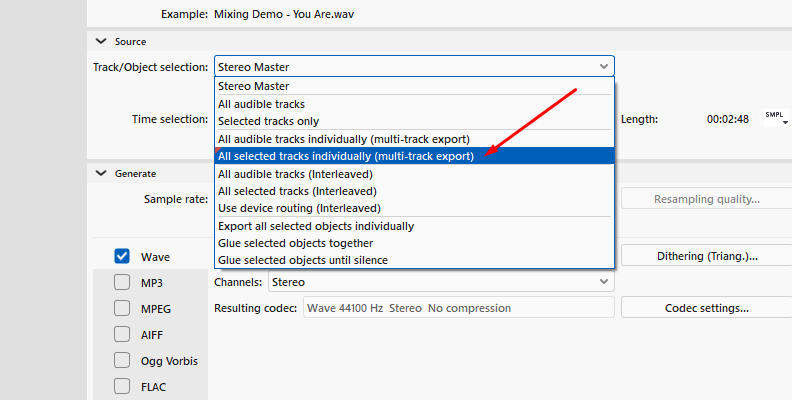
Limits export to only the selected audio tracks.
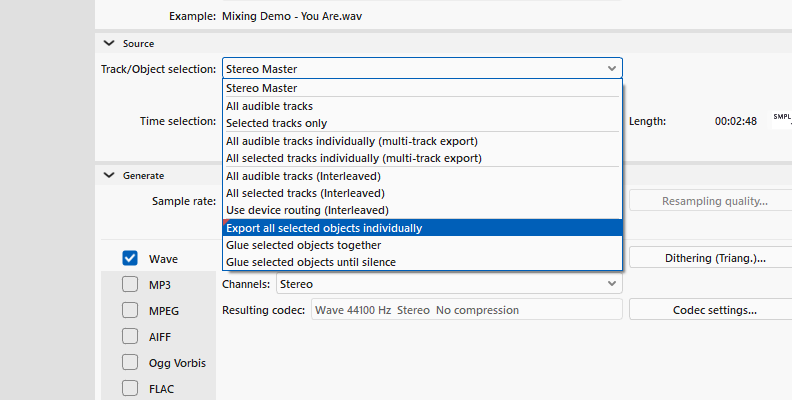
Step 4: Object Bouncing
You can also bounce individual objects. Open the Track/Object selection menu and choose “Export all selected objects individually” to create separate files for each object.
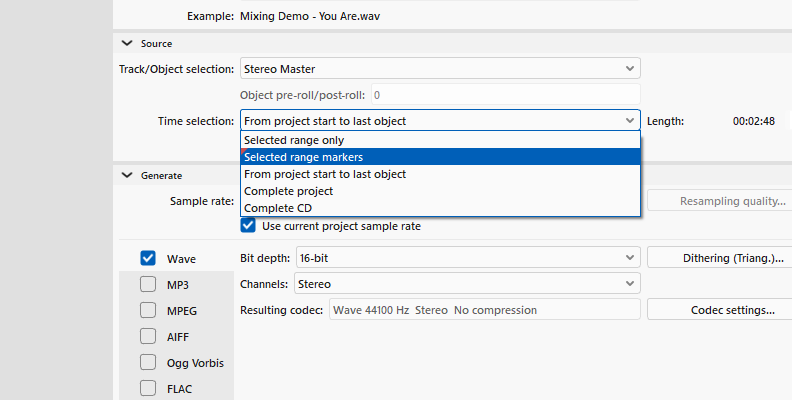
Step 5: Range Bouncing
By default, the Time Selection in the Source section covers the entire project. However, you can export specific regions or markers rather than the entire project.
“Select range only” exports the specified range, including all tracks and effects.

“Select range markers” allows you to add markers and export only the range of the markers.
Step 6: Bounce to a New Track (Internal Mixdown)
You can bounce a chosen range into a single audio file on a different track.
Highlight the region you want to bounce.
Create and select a new track.
Go to File > Advanced Export > Range Mixdown (internal mixdown).
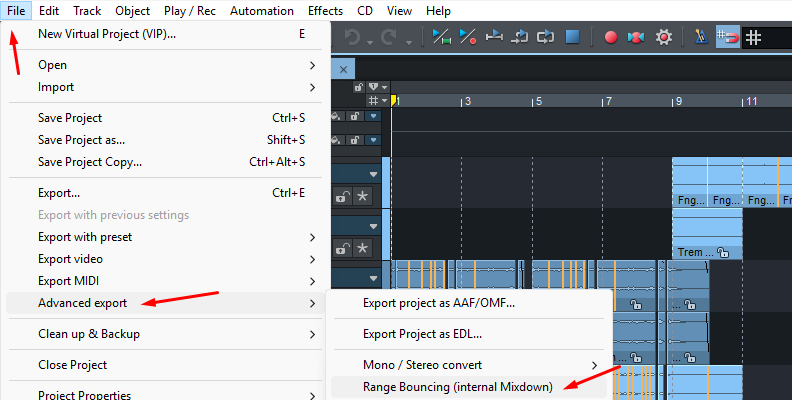
If objects have bit depth above 16 bits, you'll be prompted to convert to 16-bit or save as 32-bit float. Save the new file.
The mixdown appears in the selected track, and the original objects are removed from their tracks.
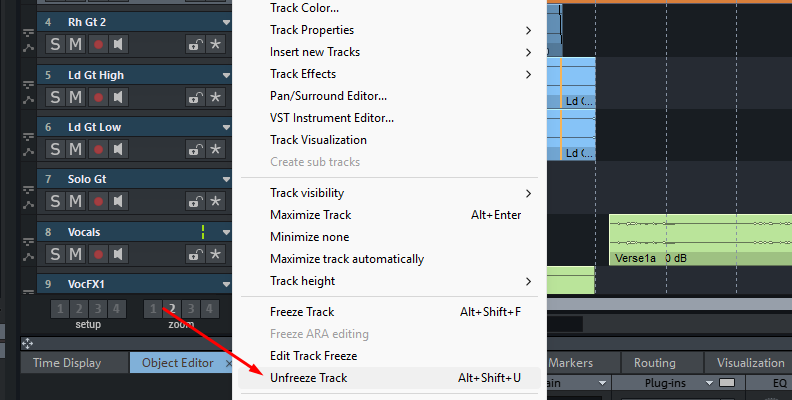
Step 7: Bounce in Place (Freeze Tracks)
Bouncing in place is called Freezing in Samplitude. To do this, right-click the track you want to freeze, select Freeze Track, or press Alt + Shift + F. When freezing tracks, the drop-down menu provides options to edit or unfreeze them.
Final Words
Bouncing audio is a critical part of the everyday mixing process. It’s common to confuse the terminology when every DAW uses a different word for the same process. Now you know what other audio mixers and engineers mean when they say bounce, render, or export. Most importantly, you know how to do it yourself.
Good luck!
FAQ

Does bouncing audio lower its quality?
In the analog era, bouncing audio with tape recorders degraded the quality with each generation. Today, the quality depends on the audio format you select.
To avoid loss of audio quality, bounce audio to lossless files such as WAV or AIFF for editing and mixing, and FLAC for storing, and avoid lossy audio such as MP3 unless it is for the final mixdown and required by the distributor. You also need to consider sample rate and bit depth. Use 16-bit/44.1kHz for CD quality or 24-bit/48kHz for streaming.


