













 Marco Sebastiano Alessi |
May 29, 2026
Marco Sebastiano Alessi |
May 29, 2026


One of the main issues when recording vocals and bright instruments is sibilance: harsh, piercing sounds can make a good song tiring to listen to. The good news is that there are tools to fix the issue in post-production, and I’m sure many of your favorite songs used one or several de-essing tools in their vocal mix.
In this article, we’ll discuss what a de-esser is, what it does, and how to de-ess in Samplitude so you can mix with a professional sound.
Let’s dive in!
What is a De-esser?
A de-esser is a specialized audio processing tool used to reduce harsh high-frequency sibilances. It's essentially a focused compressor in the higher-frequency range where sibilance lives, typically operating between 4 kHz and 10 kHz. The de-esser attenuates harsh sounds only when they exceed a set threshold, ensuring a smooth, professional sound without dulling your audio.
One could argue that you can use any multiband compressor and EQ to de-ess, but a de-esser is a better tool for reducing sibilance because it’s designed to address it. Unlike a standard compressor, a de-esser does not affect the entire signal. It only reduces harsh sibilance in the high frequencies. However, multiband compression and manually reducing volume are good alternatives, and are actually used in conjunction with a de-esser.
These sibilances are characteristic of the “esses” sounds, such as S, Sh, Ch, Z, and T. They are more common in vocal recordings, but can also appear in bright instruments such as electric guitars and drum cymbals.
If you are mixing and these sibilant sounds become unbearable, a de-esser should always be in your toolkit. Luckily, almost every major DAW includes a de-esser tool, and many third-party plugins are available.
What Does a De-Esser Do?
A de-esser is essentially a compressor that targets the 4-10 kHz range, where most sibilance occurs. It is used to reduce the harshness of certain consonants in vocals and instruments. De-esser plugins and tools are designed to address sibilance and harshness in vocal tracks and have become a staple in any vocal chain.
However, harshness can extend beyond that range, depending on the instrument, the singer's vocal performance, language, and accent. No two vocalists sing the same way, but other variables can also produce sibilance, such as microphone combinations and EQ settings having sibilances as low as 1000 kHz.
Many de-essers let you adjust the target frequency range manually, so you can tailor the gain reduction to the song you are mixing. The de-esser detects harsh, piercing sounds within the specified frequency range and reduces gain to soften them once they exceed a given threshold.
A de-esser's main goal is to reduce harshness while preserving vocal clarity, naturalness, and intelligibility. If the de-esser makes your audio unintelligible, then you are pushing the de-esser too much. It should almost be undetectable.
If you have used compressors before, you won’t be surprised to find that the controls in a de-esser can be similar to those in a compressor. The parameters in the de-esser plugin may vary depending on each manufacturer, but in general, they have the following settings:
Frequency
The frequency range determines the sibilance you want to reduce. You can usually manually adjust this with a knob or slider to fine-tune your range. Some may have a limited range, between 2 and 12 kHz, while others may have the entire spectrum available to target.
Listen/Audition/Solo
Some de-essers may have a feature that lets you hear only the selected frequency range. Isolating the frequency range lets you listen only to the sibilance you want to remove so you can target the correct frequency with the de-esser.
Threshold
The limit that, once crossed, the de-esser will start to compress or reduce volume in the frequency range to tame sibilance. A low threshold makes the de-esser oversensitive to sibilance, but it can remove brightness, making the sound dull or affecting the diction or the performer. On the other hand, a higher threshold will only attenuate the most piercing esses, but it may let some annoying sibilance slip through.
Gain Reduction
The gain reduction determines how much volume the de-esser reduces for sibilant sounds when the de-esser exceeds its threshold. A 3-6 dB reduction is a good place to start, and adjust as needed.
Attack and Release
Some de-esser tools may have additional attack and release controls to fine-tune the de-essing process. These parameters control the timing of the gain reduction.
The attack determines how fast the de-esser starts reducing gain. If a sibilance happens too quickly, you can set a fast attack.
Release determines how fast the volume returns to normal. A slow release may muffle the rest of the sound after the sibilance. However, if it is too fast, the audio may sound distorted. The aim is to find a good balance between attack and release to keep a natural sound.
Lookahead
Like a compressor, some de-esser plugins feature lookahead to peek ahead by a few milliseconds and preview incoming harsh sounds. This helps make the attenuation smoother.
Wideband vs. Split-Band Modes
Some de-essers allow you to choose between wideband and slip-band modes to determine how to apply the gain reduction.
The Wideband mode reduces gain from the track when harsh sibilance is detected, but it can create an unwanted pumping effect if set too aggressively. The split-band mode reduces only the specific sibilant frequencies, leaving the rest unaffected, resulting in a more natural sound.
These settings are simple and straightforward, but achieving the best de-essing for each track takes some experimentation, especially since every instrument and vocal performance can be very different. The best way to learn is to practice and trust your ears.
Today, many de-esser plugins use AI-powered technology to speed up de-essing and other vocal enhancement processes. In the future, we may have more options to quickly reduce sibilances naturally.
De-esser Workflow
The de-esser general workflow goes as follows:
Play or loop the section of the track with the annoying sibilance.
Add the de-esser plugin and listen to the audio to find the exact range of the problematic frequency. Use the listen or solo feature if your de-esser has it.
Fine-tune the frequency range.
Set the threshold and gain reduction. Fine-tune with attack and release if they are available.
Listen to the track in both solo and full mix.
Step-by-Step Guide on How to Use De-Esser in Samplitude:
For this tutorial, we’re using Samplitude. You can download the free trial to follow this de-essing guide. Samplitude lets you work at the track or object level for de-essing the entire signal or just a part of a track. It also features several tools to address problematic, harsh sibilant frequencies.

Step 1: Set Up Your Samplitude Project
Import your audio track into a new Samplitude project or open an existing one where you want to attenuate esses. With Samplitude, you have a few options to de-ess your audio. I’ll show you how to work with a few of them.
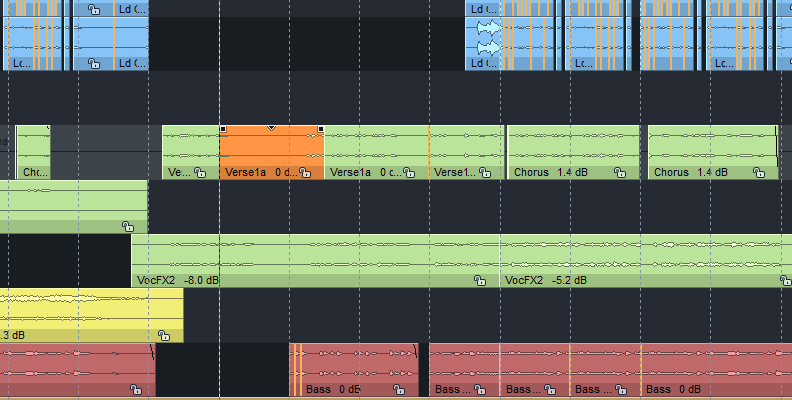
If you want to work at the object level, find the section of the audio track with sibilance and use the T key to split the track into objects.
Step 2: Add Plugins to a Track or Object
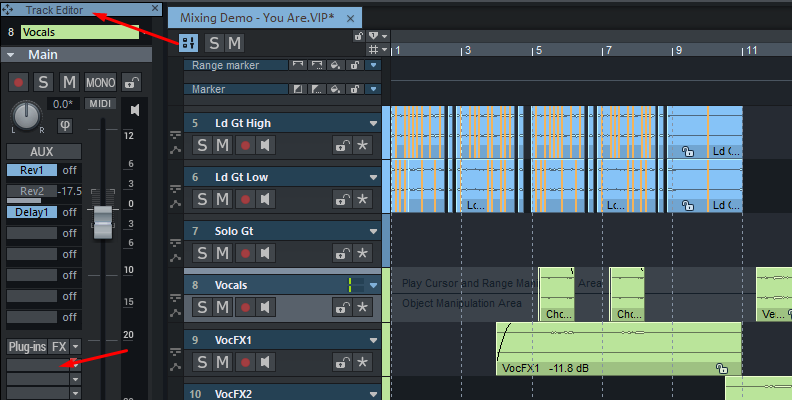
Add a plugin from the Track Editor panel, below the Plug-ins FX section, or from the Track Header in the timeline below the Vol and Pan settings. Simply click the empty slot to launch the plugin browser.
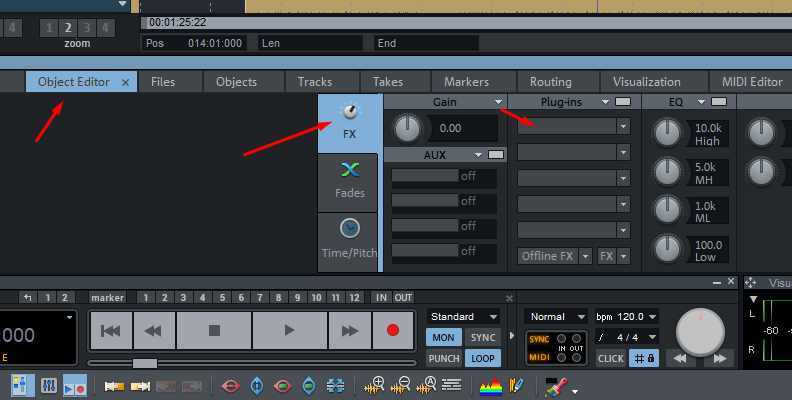
Suppose you want to add a plugin to an individual Object. Double-click on the object to display the Object Editor. Next, click the FX button, and then click on an empty slot in the Plug-in column to launch the plugin browser.
Step 3: De-Essing with eFX DeEsser
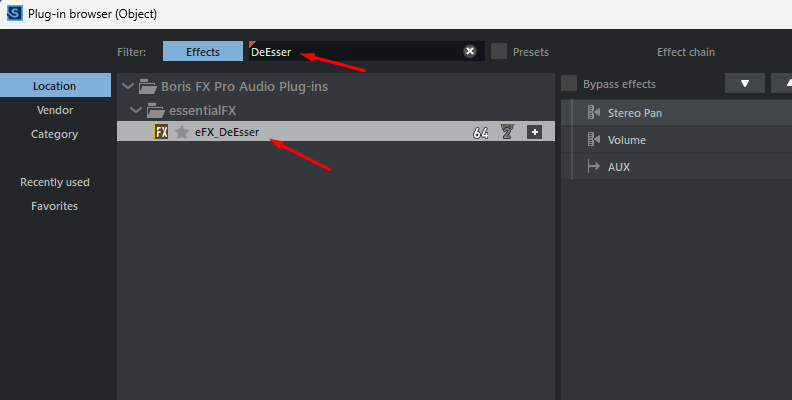
We’ll start with the EssentialFX De-Esser, included in Samplitude, a dynamic plugin for reducing unwanted sibilance in speech and vocal recordings. Use the search box in the plugin browser and type DeEsser. Double-click the eFX_DeEsser plugin to apply it to the track or object.
eFX DeEsser is quite a simple yet effective de-esser. It works without an adjustable threshold because the plugin continuously analyzes the input signal and identifies signal peaks that exceed the average level within the specified frequency range. So you only have a few parameters to configure the de-esser.
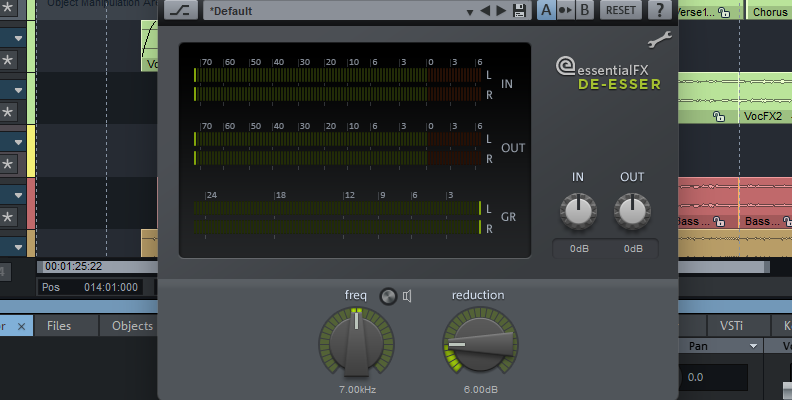
Use the “freq” knob to set the filter's detection frequency. The problematic sibilants are typically in speech and singing in the 6-8 kHz range.
Click the speaker symbol to enable “solo” mode and filter the frequency to locate sibilance more quickly and easily.
Adjust the “reduction” knob to set the filter attenuation in the signal route.
Listen to the section in a loop to ensure the sibilances are gone.
The eFX DeEsser comes with two presets: Female Vox and Male Vox to use as a starting point with your singers or podcast hosts. You can also save custom presets by clicking the disk next to the preset selector. A handy option in every plugin when you work regularly with the same singers.
Step 4: De-Essing with Multiband Dynamics
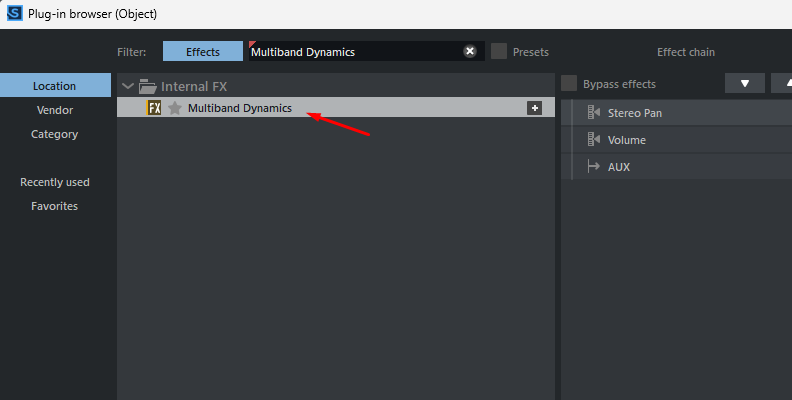
Multiband Dynamics is a built-in multi-band compressor plugin in Samplitude that lets you edit dynamics across four independent frequency bands. It splits the entire signal into individual frequency bands that can be edited separately. In this case, I’ll use it to work with a specific, critical frequency range with the harsh sounds.
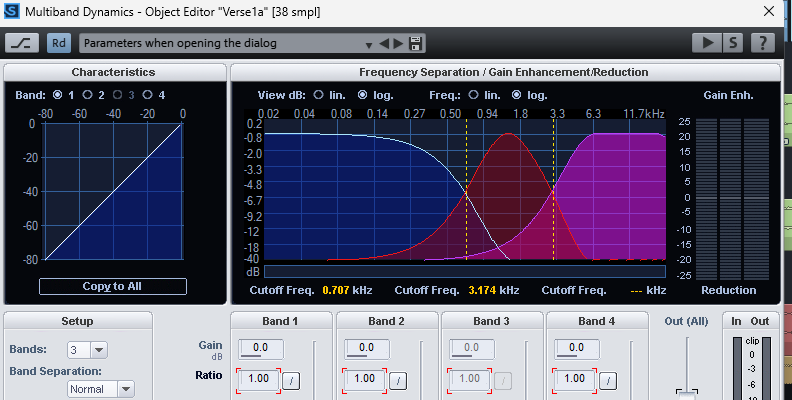
Turn off Link Bands.
Activate Solo mode in the band that contains the sibilant frequencies. Start within the 4-10 kHz.
Select the Compressor mode at the bottom of the dynamic section.
Listen and turn Bypass dyn on and off to compare the result.
Pro Tip: Multiband Dynamics comes with a de-esser preset for vocals that you can use as a starting point.
Step 5: De-Essing with CrumplePop
Another, quicker alternative to enhance your vocal tracks is to use AI-powered tools. CrumplePop’s Voice Enhance is an easy method to clean and improve your vocals. Keep in mind that CrumplePop is only available in Samplitude Suite, but you can get CrumplePop as an independent plugin.

Launch the plugins browser and search for Voice Enhance.
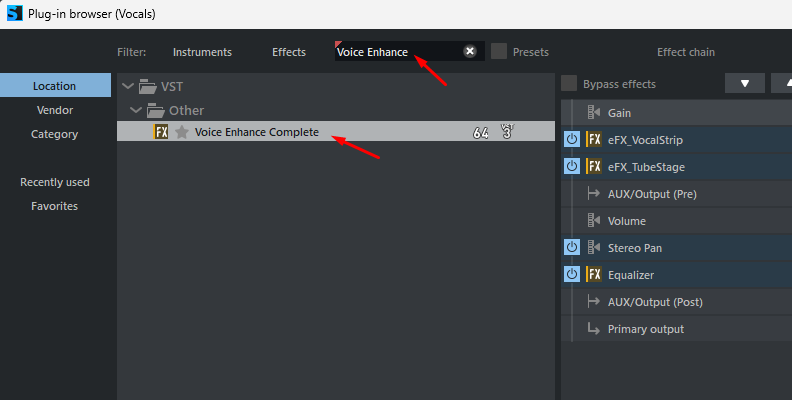
Double-click Voice Enhance Complete to apply it to the track or object.
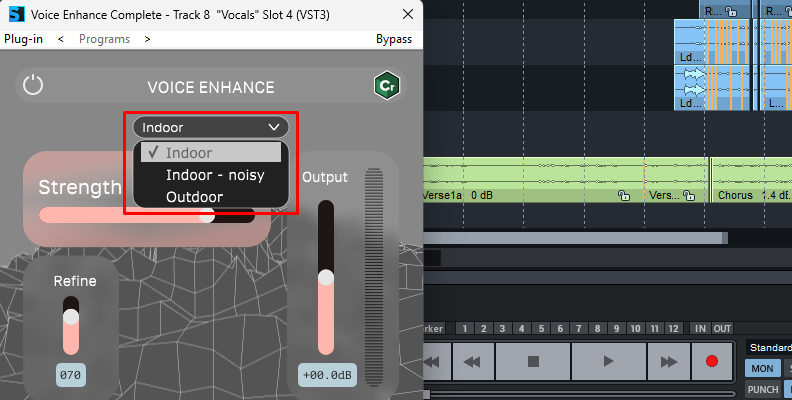
Select one of the three modes: Indoor, Indoor-noisy, or Outdoor. The AI will usually automatically detect background noise, sibilance, and other issues.
Adjust the Strength slider. The AI handles all the analysis and frequency targeting.
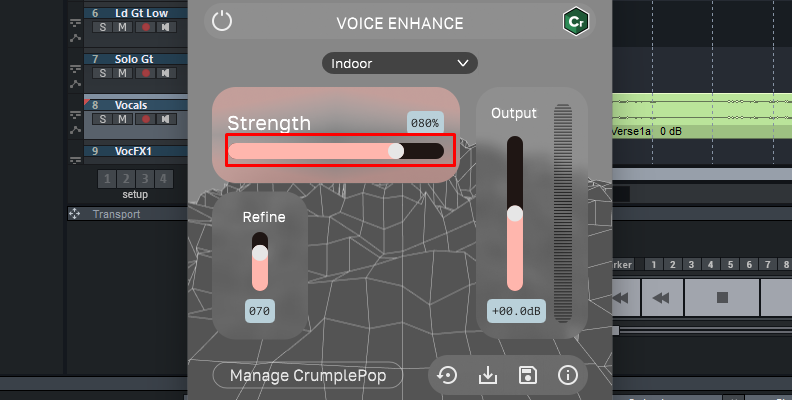
Playback the audio and make adjustments as needed.
Different Types of De-Essers
Different de-esser tools use different mechanisms to achieve de-essing. Here are the tools and techniques to fix bothersome sibilance.
Manual De-Esser
It’s the most basic form of de-essing, manually handling harsh sibilance. No need for plugins or a complex compressor. Simply listen to the audio and look at the waveform to spot sibiliances. Then, split the region with the affected harshness and reduce the gain only in that region.
In Samplitude, this is easy to do from the Object Editor. Choose the FX tab and use the Gain knob to reduce volume. You can later add fades to smooth the in and out of the object. It may take longer to do this for every affected object, but it’ll work best for vocal recordings and voice-overs without introducing artifacts or altering the tone.
Wideband De-Esser
This is a quick and straightforward approach. The wideband de-esser identifies a sibilant frequency and reduces the whole signal. The advantages of a wideband de-esser are that it is simple to set up and achieve a cohesive sound, but it can cause an unwanted pumping effect due to changes in the entire track's volume.
Split-Band De-Esser
If a wideband de-esser isn't working for you, a split-band de-esser may be the solution, as it reduces sibilance in a specific frequency band rather than the entire signal. This is a better approach because it doesn’t affect the other frequencies. However, if not used carefully, the crossover point can introduce phase shifts or make the high end incoherent with the rest of the vocals.
Multi-Band De-Esser
It works similarly to a split-band de-esser, but it lets you attenuate multiple bands to target different sections with sibilance, each with its own parameters for more control over the sound. It is more precise, but it can be more complex to configure and may result in an undesired effect.
Spectral De-Esser
A more advanced de-esser with spectral editing that applies compression over multiple narrow frequency bands simultaneously to achieve a more balanced sound and smoother de-essing. The downside is that it can overload your CPU and introduce latency.
Specialized Plugins
There are now specialized plug-and-play plugins to suppress sibilance without affecting the audio. With AI technology on the rise, they are becoming more accurate at detecting sibilance and reducing it with a few clicks.
How to Make the Most of a De-esser
De-essers are tools that, when used correctly, can make your vocals sound smooth and professional. But when overdone, it can't make your vocals sound bad or low-quality. Here are a few tips and tricks to make the most of a de-esser in your vocal chain.
Use Automation and Manual De-Essing
Before trying heavy plugins, try manually reducing the section's gain, or use automation to make the gain reduction feel more natural during the loudest parts. This is more useful in speech projects such as podcasts, vlogs, or voice-overs.
Find the Hot Frequency
Because every human voice, vocal performance, and instrument is different, before compressing, you need to find the right sibilant frequency for each. If you are struggling to find the right frequency and your de-esser has the listen or solo feature, use it to find the most annoying sounds.
If you're mixing vocals, use these ranges as a guide.
Female sibilance between 5 and 8 kHz.
Male sibilance between 3 and 6 kHz.
Choose the Optimal Mode or Type
Now that you know the types of de-essers available, choose the right one for the job ahead. If you prefer a natural attenuation, a manual or wideband de-esser may do the job. If you want to be more precise with the de-essing, then a split-band or multiband compressor may be a better choice.
Balance Threshold and Range
The goal is to keep a coherent sound by attenuating sibilances. Vocals need to be bright too to keep presence, so avoid total reduction. A good starting point is to set a low threshold, just enough to see the gain reduction working with harsh frequencies, and aim for a -3 or -6 of gain reduction. Then, just listen and try to make your track sound good.
Use Multiple De-Essers
Sometimes it's better to add two or more de-essers in a row, each with -2 dB of attenuation, than to apply heavy compression with a single de-esser. You can also combine multiple types of de-essers, for example, a manual and a split-band de-esser.
Complement with EQ and Compression
Similar to combining multiple de-essers, you can work together with a compressor and EQ to achieve the optimal results. Experiment with different settings and placement order in the audio signal chain. Which leads to the last tip.
De-esser Order in the Chain
There are many discussions about the right place in the chain for the de-esser. Some say it's better to place it at the end of the chain to catch all harshness from instruments, while others prefer it before. It will depend on the type of track you're mixing: vocals (female or male, singing, rapping, accent, etc.) or instruments.
There is a general consensus to place the de-esser before the main compression to avoid overloading the compressor with the high peaks. After an EQ is used to brighten the high-end, it can tame the boosted sibilance.
Final Words
De-essing is a simple process, but with many options and types to use, it can get confusing. There is no shortcut to de-essing. You need to start practicing hands-on with your DAW and favorite de-essing tool. At the end of the day, de-essers are tools that you, as an audio engineer, mixer, or producer, use to achieve the best sound in your mix.
If you want a complete and professional DAW for any type of audio production, start your free trial of Samplitude.
Good luck!