Head Track ML
Description
Automatically generates a 3D head mesh and tracks facial shape, pose, and expressions over time. Mesh fine-tuning is achieved through trackable, keyframeable deformer anchor points, ensuring precise alignment with facial features. When combined with Paint, Roto, Unwrap, and Rewrap nodes, it enables stable, face-aware beauty effects.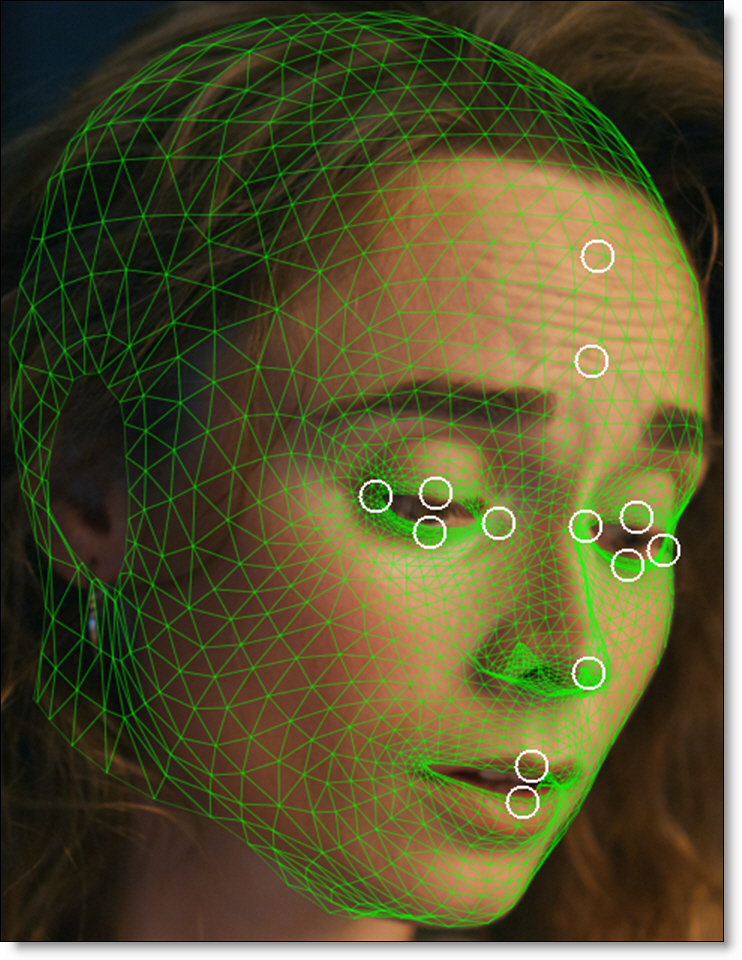
Go to the Roto/Paint/Compositing With 3D Head Meshes tutorials to see how it works.
Node Group
3D.
Workflow
1 Create and Track A 3D Head Mesh
• Add a Head Track ML node.
• Set Track to Heads.
• Enable Solid Mesh to build a fully closed head mesh, removing holes for the eyes, nostrils, mouth, and ears.
• Click Track Forward or Track Reverse, depending on the desired tracking direction and a 3D head mesh is created and tracked.
Note: Smoothing is enabled by default, as the Head Tracker may produce jittery results without it.
2 Mesh Refinement
• With a head selected in the Object List, choose Add Deformer and then click to add anchor points.
• Adjust the anchor points so the mesh aligns accurately with the facial features. Anchor points can be positioned and keyframed manually, or tracked automatically.
• Be sure to add anchor points in any areas where you’ll be doing roto, paint, or compositing to ensure those regions remain firmly locked in place.
• In the Object List, select the anchor points to be tracked and set Track to Anchors.
• Click Track Forward or Track Reverse, depending on the desired tracking direction to perform an additional refinement pass.
Tracking
Track
Tracks either head meshes or deformer anchor points.
Heads
Creates 3D head meshes and tracks facial shape, pose, and expressions over time.
Anchors
Tracks deformer anchor points. In the Object List, Tracker direction icons are enabled when one or more anchor points are selected, or when the deformer itself is selected (tracking all anchor points). To delete anchor points, click to select a point--or Shift-drag to select multiple--and press Delete. Selected anchor points can be moved together by dragging them to a new location.
Tracker Direction
The tracker can track both forward and backward one frame at a time or for the entire duration.
Track Backward One Frame
Tracks backward one frame at a time.
Track Backward
Tracks backward to the beginning of the Timebar.
Track Forward
Tracks forward to the end of the Timebar.
Track Forward One Frame
Tracks forward one frame at a time.
Smooth
Turns track smoothing on or off. Enabled by default, as the Head Tracker may produce jittery results without smoothing.
Amount
Sets the number of frames to calculate the smoothing.
Occlusion Source
Excludes an area from being tracked.
Source Alpha
Uses the source alpha.
Occlusion Matte
Uses the occlusion matte input.
Invert
Inverts the matte.
Solid Mesh
Creates a solid mesh without holes for eyes, nostrils, mouth, and ears.
Add Deformer
Adds a deformer to the selected head, allowing you to click directly on the mesh to place anchor points in areas that require manual positioning or more precise stabilization.
Note: To add anchors, the deformer or another anchor needs to be selected in the Object List.
Anchor Point Parameters
Each anchor point has an associated Offset and Weight parameter visible in the Object window.
Offset
Controls how much the mesh is offset relative to the selected anchor point.
Weight
Weights the influence of the Offset.
Accuracy
In Track > Anchors mode, Low, Medium, and High accuracy options provide a trade-off between processing speed and result quality.
Export
Exports the tracked and anchor adjusted head mesh to an Alembic file.
Toolbar
Tracker
Automatically generates a 3D head mesh and tracks facial shape, pose, and expressions over time.
Transform Controls
Transform (T)
Transform the selected object using position, scale and rotation controls.
Position (Q)
Moves the selected object along the x, y or z axis.
Scale (E)
Scales the selected object along the x, y or z axis.
Rotate (W)
Rotates the selected object along the x, y or z axis.
Point of Interest
When you’re looking through the perspective camera, it shows you the camera’s pivot point so you can see exactly where the view is rotating from. This makes it much easier to navigate the scene, since you always know the center of rotation and can orient yourself as you move around.
Controls
Transform
Position
Moves the selected object along the x, y or z axis.
Scale
Scales the selected object along the x, y or z axis.
Rotate
Rotates the selected object along the x, y or z axis.
Color
Sets the color of the selected object.
Reference Frame
The Reference Frame is used when a transform is requested from the selected object. It ensures that the transform on this frame will be the identity.
Camera
Mode
Determines the camera projection type.
Perspective
Simulates a real-world camera, where objects diminish with distance and parallel lines converge.
Orthographic
Removes perspective, keeping object scale constant regardless of depth for technical and alignment views.
Lens Squeeze Ratio
Adjusts the horizontal scaling of the image to simulate anamorphic lenses. Values other than 1.0 introduce horizontal stretch or compression, useful for matching or correcting anamorphic footage.
Near Clip
Sets the minimum distance from the camera at which geometry is rendered. Objects closer than this distance are not visible.
Far Clip
Sets the maximum distance from the camera at which geometry is rendered. Objects beyond this distance are not visible.
Sensor Fit
Specifies how the sensor is fit to the output image when their aspect ratios differ. This determines whether the horizontal or vertical field of view is preserved, or if the image is scaled to fill the frame.
Vertical Aperture
Defines half of the sensor’s vertical size and influences the vertical field of view in combination with focal length.
Horizontal Aperture
Defines half of the sensor’s horizontal size and controls the horizontal field of view.
Use Session Aspect Ratio
Uses the session’s output aspect ratio--pixel aspect ratio × width ÷ height--for the camera framing. When enabled, the camera’s Aspect Ratio value is ignored.
Aspect Ratio
Sets the camera’s width-to-height framing ratio when Use Session Aspect Ratio is disabled. It changes the camera projection, not the session’s output dimensions, and is independent of the aperture settings.
Focal Length
Controls how wide or narrow the camera’s view is.
Focus Distance
Sets the distance, in scene units, from the camera to its focus plane. It does not change the camera’s perspective or framing but can be used by depth-of-field-aware rendering.
Color
Sets the color of the camera.
Head
Color
Sets the color of the head.
Wireframe
Displays or hides the wireframe.