Sequence Editor
Silhouette can perform editing tasks such as cutting, joining, moving, copying, replacing, trimming, retiming and repeating clips in the Sequence Editor. The sequence can then be used as an element in the Trees window.
Creating a Sequence
A sequence is comprised of multiple clips edited together.
1 Select the New Sequence icon in the Sources window.
A sequence object is created in the Sources window and the Sequence Editor appears.
2 Drag and drop clips from the Sources window into the Sequence Editor.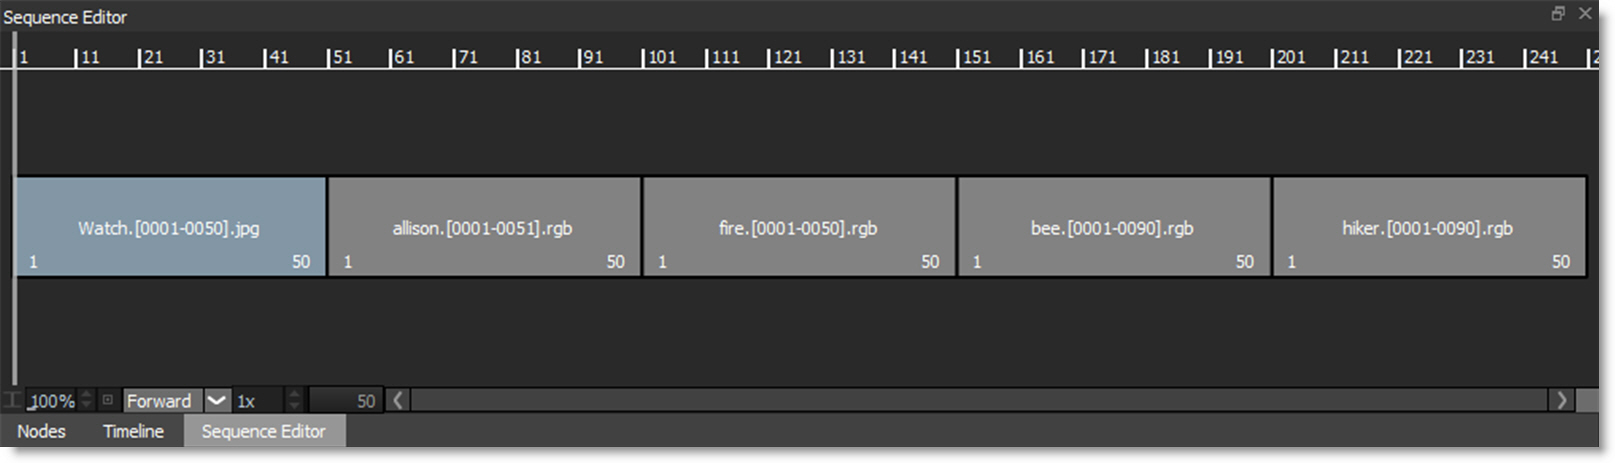
3 Drag and drop to insert clips or Alt-drag and drop to replace clips.
If you select one or more clips in the Sources window before pressing the New Sequence icon, the clips are assembled in selection order using in and out points, if they are set, into a new sequence.
4 Drag and drop the sequence from the Sources window into the Trees window.
The sequence can now be used as an element in the Trees window just like any other source.
Marking In and Out Points
Clips in the Sources window can have in and out points which are used when creating a sequence. In and out points are also useful within the sequence to define a region to be moved, copied, replaced or deleted.
1 Double-click on a clip in the Sources window.
The clip is loaded into the Viewer and Mark IN and Mark OUT icons appear.
2 Set the Timebar to the in point.
3 Click the Mark IN icon or press the I key.
4 Set the Timebar to the out point.
5 Click the Mark OUT icon or press the O key.
When setting in and out points for a clip, the clip takes over the Viewer. To return the Viewer to a sequence or a node, double-click the sequence in the Sources window or a node in the Trees window.
Moving, Copying, Replacing and Deleting
The highlighted selection can be moved, copied, replaced or deleted.
Moving
1 Click on a clip or drag select multiple clips to select them.
2 Click somewhere in the highlighted region and drag and drop to a new location.
The selection is moved.
Copying
1 Click on a clip or drag select multiple clips to select them.
2 Click somewhere in the highlighted region and Shift-drag and drop to a new location.
The selection is copied.
Replacing
1 Click on a clip or drag select multiple clips to select them.
2 Click somewhere in the highlighted region and Alt-drag and drop on either a destination clip or a marked region.
The destination clip or marked region is replaced.
Deleting
1 Click on a clip or drag select multiple clips to select them.
or
2 Mark IN and Mark OUT points in the Sequence Editor.
3 Press the Delete key.
The selection is deleted.
Trimming
The head and tail of a clip can be lengthened or shortened using the Trim controls.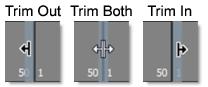
Clicking on a cut enables trimming and displays both sides of the cut in the Viewer.
1 Click and drag in the center of a cut between two clips (double-arrow cursor appears) and both sides of the cut are trimmed.
2 Click and drag to the left of the cut (left arrow cursor appears) and the outgoing clip is trimmed.
3 Click and drag to the right of the cut (right arrow cursor appears) and the incoming clip is trimmed.
Note: After selecting the left, right or center of a cut, the left and right arrow keys can be used to trim frames one at a time.
Change Speed and Direction
Modification of the speed and direction of selected clips is possible in the Sequence Editor.
Changing Speed
1 Click on a clip or drag select multiple clips to select them.
The Segment Speed field controls the speed of selected clips and displays as a percentage. A value of 50 slows down by 50%, a value of 100 does nothing, and a value of 200 is twice as fast.
2 Using the Segment Speed field, enter a value of 200 to double the speed.
3 Enter a value of 50 to slow the clip down by half.
Note how the duration field has doubled in duration.
Reversing Direction
1 Click on a clip or drag select multiple clips to select them.
2 Change the playback mode to Reverse in the Segment Direction field.
The order of the frames is reversed.
Looping A Clip
1 Click on a clip or drag select multiple clips to select them.
2 At the bottom left of the Sequence Editor, increase the Loop Count value from 1 to 3.
The clip is repeated three times.
3 Select the Segment Direction: Forward, Reverse or Bounce.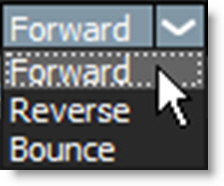
The clip is repeated three times using the selected direction.
Freeze Frame
1 Drag the Timebar to the frame you would like to freeze.
2 Use Add Edit before and after the frame so a single frame clip is created within the Sequence.
Note: The Add Edit icon is located at the bottom left of the Sequence Editor.
3 Zoom the Sequence Editor in using either Middle mouse scroll or Shift-Middle mouse scroll (10x faster) while hovering the cursor over the single frame clip.
Note: Selecting a single frame clip is difficult unless you zoom in because the trim handles will most likely be selected instead.
4 Click on the single frame clip to select it.
5 Enter the freeze frame duration in the Loop Count field, for instance, 10 for 10 frames.
6 Click OK.
The frame is frozen for the specified period.