Power Matte
Open Shape Workflow
Power Matte creates mattes by using a trimap--a pre-segmented image consisting of three regions of foreground (what you want to cut out), background (what you want to get rid of) and unknown. Partial opacity values are then computed only for pixels inside the unknown region. Three trimap methods can be used: Open Shape, Closed Single Shape and Closed Multiple Shapes. This tutorial will use the Open Shape Method.
Unlike previous approaches, our trimaps can be relatively sparse consisting of open foreground and background shapes. All pixels left unmarked will be treated as unknown.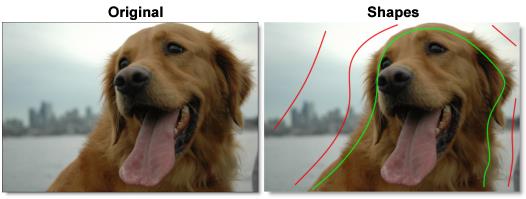
A good Open Shape technique is to draw an inner and outer outline around the object you are extracting using open shapes. Shapes should be near the boundary of the foreground or background, but not right up against the edge. Also, if the foreground or background has varying colors, the shapes should cross over these colors.
Note: The general rule is to not put foreground and background shapes too close together unless you need to.
1 Load some source footage and create a session.
2 In the Trees window, add a Power Matte node from the Nodes > Key tab and connect it to the source node.
3 Single-click in the center of the Power Matte node to view and edit it.
4 Define foreground area (what you want to cut out) by drawing an open shape around the inner edge of the object.
5 Start by selecting either Bézier, B-Spline or X-Spline from the Toolbar.
6 Click on the screen to create a control point.
A control point is created.
7 Add as many points as you like.
8 When finished adding points, press the Esc key to finish the open shape.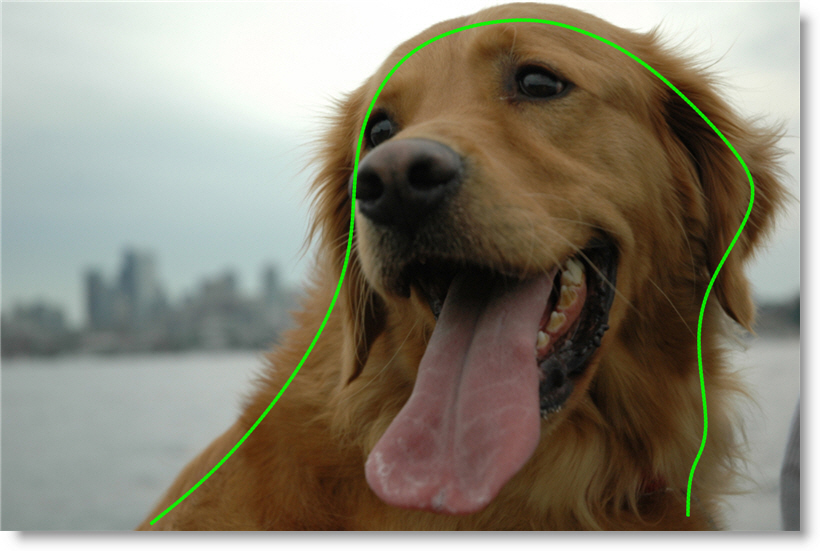
9 Now, draw shapes to define background areas (what you want to get rid of). Press the Esc key each time you want to finish an open shape.
If the background has varying colors, the shapes should cover these colors.
10 Choose the Reshape tool when you are done drawing open shapes.
Warning: If you only provide a few sparse shapes, the Open Shape Method will take longer to process with a less accurate result than the Closed Shape Method.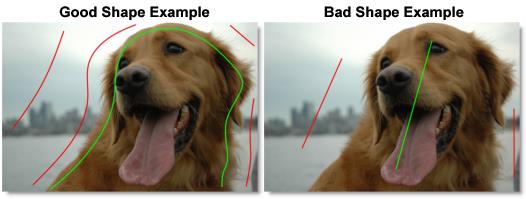
11 In the Object List, feel free to change the name and color of your shapes. In the example below, I named the inner shape Foreground and changed the color to green. Also, I named all of the outer shapes Background and left their color set to red. Although this is not a necessary step, it is helpful to identify what the shapes are being used for.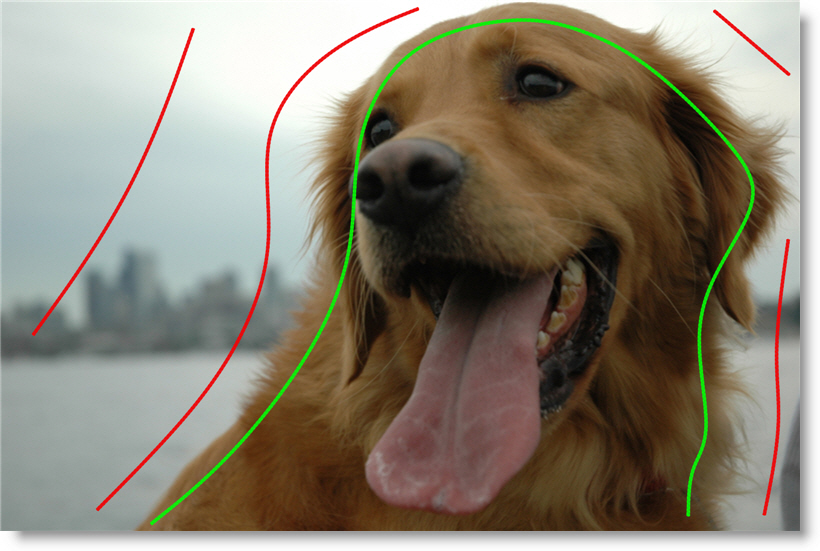
Power Matte won’t process until you assign the shapes as either foreground or background.
12 Select the inner foreground shape and set the Type to FG in the Object window.
13 Select all the outer background shapes and set the Type to BG in the Object window.
Once a foreground and background shape are assigned, Power Matte processes the matte.The Viewer displays the composite of the foreground over the background based on your shapes.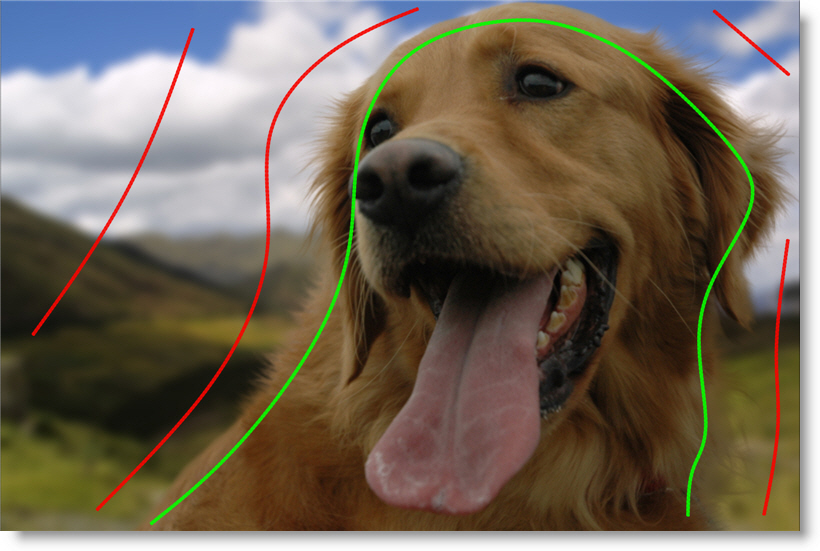
Now that you have foreground and background shapes, animate them over time so that they follow the motion of what you are cutting out. However, since you already assigned the shapes as foreground and background, Power Matte will try and update every time you adjust the shapes.
14 Set the View to Foreground. This way Power Matte is not constantly trying to update when you change a parameter.
15 Animate the foreground and background shapes over time so that they follow the motion of what you are cutting out.
It is best to use the Tracker (Shift-T) to animate the motion of your shapes as it will most likely ensure that the motion is consistent from frame to frame.
16 Play through the clip to make sure that the shapes are properly following your object.
17 Use View > Matte to display the generated matte.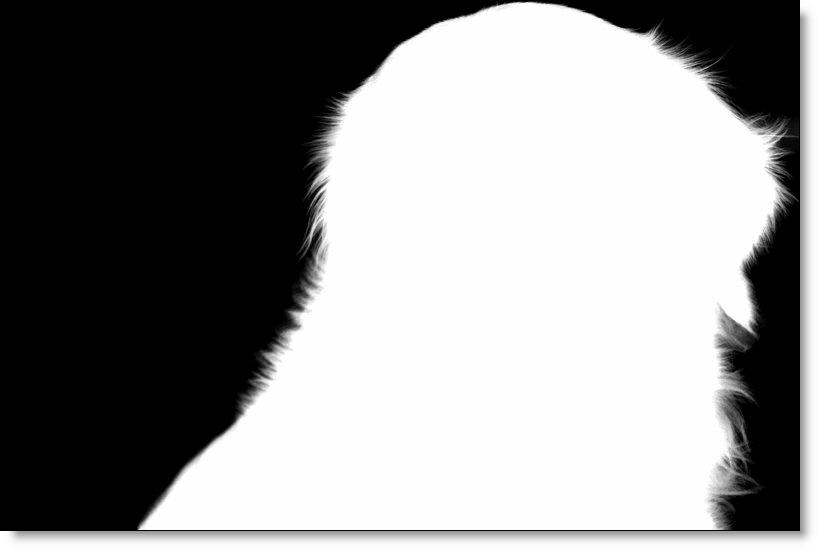
18 Hit the Play button to check your results so far. When you hit the Play button, Power Matte renders each frame.
19 If at any time you want to turn off the display of the shapes, click the Overlay icon above the Viewer or press 0 (the number zero) shortcut key.
In the generated matte, white is foreground, black is background and any gray areas in between represent a level of transparency. If the matte is not acceptable after processing, you can either adjust the shapes or add additional shapes near the region where the matte is not accurate.
20 If you see gray areas in the foreground object that should be completely white, make additional foreground shapes in those areas.
21 If you see gray areas in the background that should be completely black, make additional background shapes in those areas.
22 Gray values in Unknown areas can be reduced by increasing the Deartifact value located in the Node parameters.
If you need to adjust the shapes after they have been created and assigned in Power Matte, you can enhance performance by either:
• Set the View to Foreground while editing shapes.
• Set the Update mode to Manual and hit the Enter key when you want to process. This way Power Matte is not constantly trying to update when you change a parameter.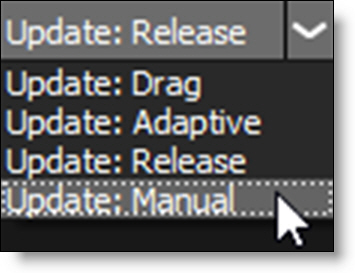
• Use a lower quality proxy image by using the Proxy pull-down menu above the Viewer.
23 Choose View > Composite to display the Composite.
If you look closely at the edges of our dog example, you will see some white fringing created by the sky from the original image. By activating Power Matte’s Color Estimation feature, the fringing can be removed by estimating the color of the foreground in unknown and semi-transparent areas.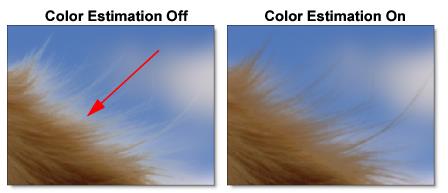
Note: Color Estimation can cause color flickering in edge areas of partial opacity if your shape position is not consistent from frame to frame or if your source footage is grainy. Disable Color Estimation if you see flickering in the edge areas.
24 To remove fringing around the object being cutout, go to the Node parameters and turn on Color Estimation.
25 When you press the Play button while viewing the Composite, you will see the result in full color.
Now that I have shown you how to generate a matte using open shapes, an alternative method is to use a mix of open and closed shapes. If you have large contiguous areas of background, surrounding the background with a closed shape and enabling Filled in the Object window will speed up Power Matte’s processing.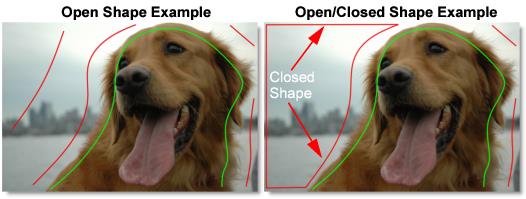
Closed Shape Workflow
The closed shape workflow uses either single or multiple shapes.
Single Shape Setup
A single closed shape with a feathered area defines the entire trimap.
1 Define foreground area (what you want to cut out) by drawing a closed shape.
2 Start by selecting either Bézier, B-Spline or X-Spline from the Toolbar.
3 Draw a shape around the inner edge of the object, in this case, the hiker.
4 To close the shape, click on the first point that you created.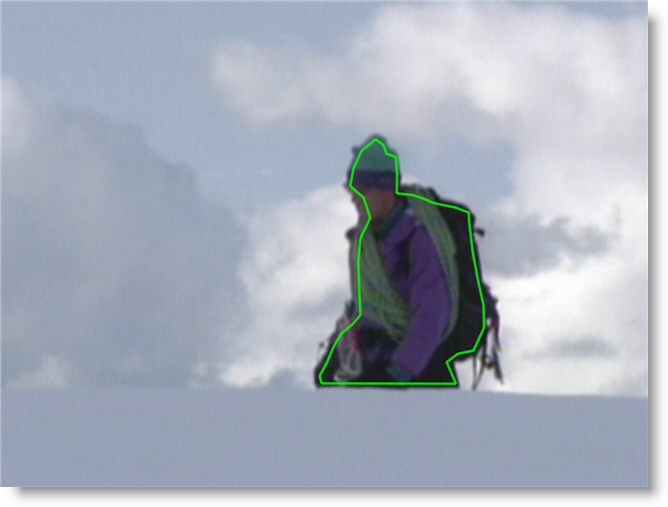
5 Select the Feather tool and drag out the point feather handles to extend beyond the edge of the foreground object.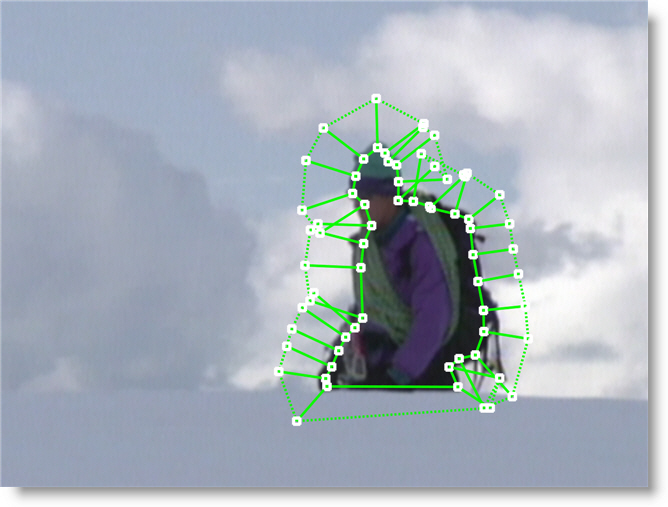
6 In the Object window, set the Type for this shape to FG+Unknown.
Since the FG+Unknown shape type assigns the closed portion of the shape as foreground, the feather region as unknown and the rest as background, Power Matte will then automatically process the matte.
Multiple Shape Setup
As an alternative to the Single Shape Setup, closed shapes can be used to mark definite foreground and background areas of the image. Any unmarked areas are considered unknown and partial opacity values are then computed for the pixels inside the unknown region. So, make sure that any hair detail, transparent or blurry portions fall within the unknown areas
Note: The Closed Shape method does not handle a foreground object with background holes. Instead, use the Open Shape method when extracting an object with holes.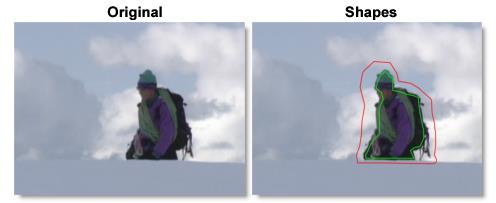
1 Define foreground area (what you want to cut out) by drawing a closed shape.
2 Start by selecting either Bézier, B-Spline or X-Spline from the Toolbar.
3 Draw a shape around the inner edge of the object, in this case, the hiker.
4 To close the shape, click on the first point that you created.
5 To tell Power Matte that you are using a closed shape, enable Filled in the Object window as well as set the Type for this shape to FG.
6 Now, draw closed shapes to define background area (what you want to get rid of). If your foreground object is completely surrounded by background, like the hiker example below, a quick way to define the background area is to first draw a closed shape around the outside of the foreground and then invert it in the Object window. The areas outside of the background shape are then considered as background.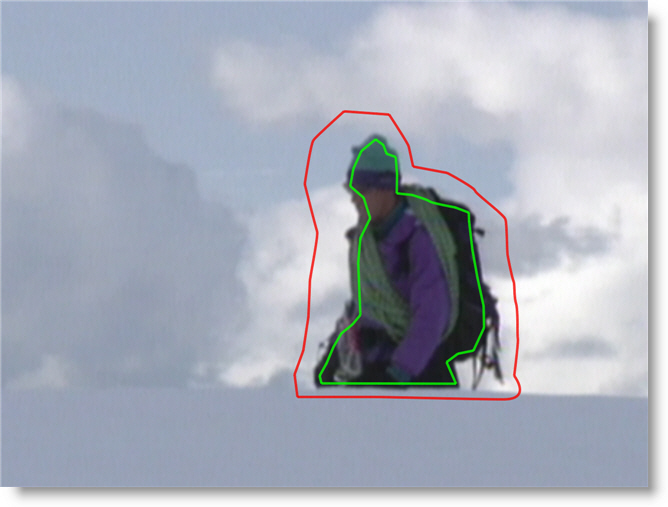
7 After drawing the background shape, enable Filled in the Object window as well as set the Type for this shape to BG. Invert the shape if you drew around the boundary of your foreground object as in the example above.
Once a foreground and background shape are assigned, Power Matte processes the matte. The Viewer displays the composite of the foreground over the background based on your shapes. In this example, I am using black as the background clip.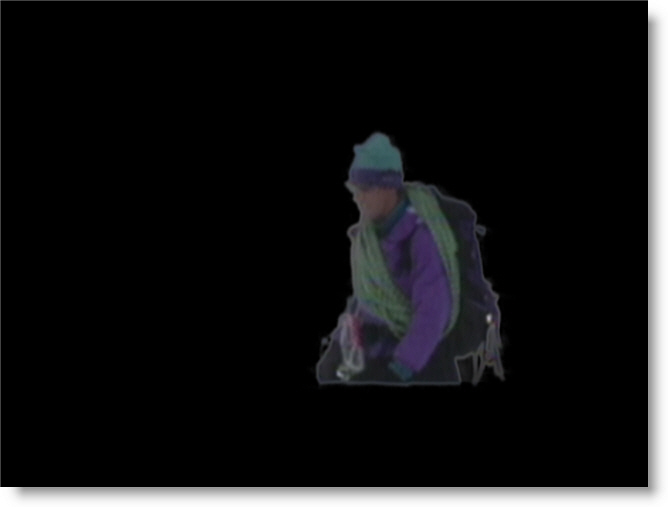
Track and Animate
Now, track and animate the shapes over time so that they follow the motion of what you are cutting out. However, since you already assigned the shapes as foreground and background, Power Matte will try and update every time you adjust the shapes.
1 Set the View to Foreground. This way Power Matte is not constantly trying to update when you change a parameter.
2 Animate the foreground and background shapes over time so that they follow the motion of what you are cutting out.
It is best to use the Tracker (Shift-T) to animate the motion of your shapes as it will most likely ensure that the motion is consistent from frame to frame.
3 Play through the clip to make sure that the shapes are properly following your object.
4 Use View > Matte to display the generated matte.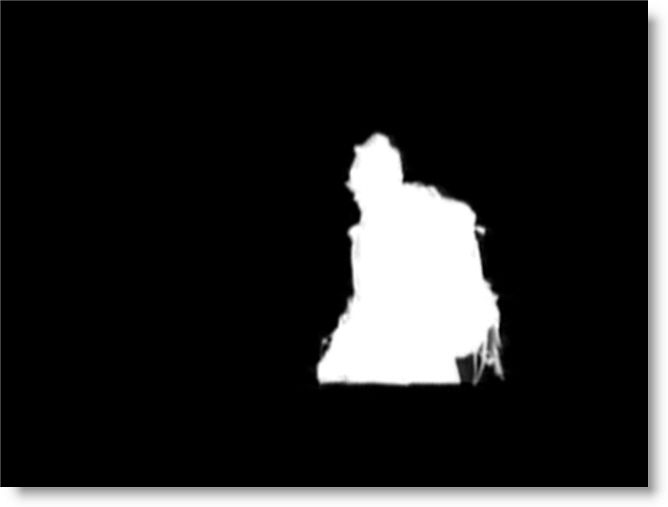
5 Hit the Play button to check your results so far. When you hit the Play button, Power Matte renders each frame.
6 If at any time you want to turn off the display of the shapes, click the Overlay icon above the Viewer or press 0 (the number zero) shortcut key.
In the generated matte, white is foreground, black is background and any gray areas in between represent a level of transparency. If the matte is not acceptable after processing, you can adjust the shapes.
7 If you see gray areas in the foreground object that should be completely white, adjust the foreground shape in those areas.
8 If you see gray areas in the background that should be completely black, adjust the background shape in those areas.
9 Gray values in Unknown areas can be reduced by increasing the Deartifact value located in the Node parameters.
If you need to adjust the shapes after they have been created and assigned in Power Matte, you can enhance performance by either:
• Set the View to Foreground while editing shapes.
• Set the Update mode to Manual and hit the Enter key when you want to process. This way Power Matte is not constantly trying to update when you change a parameter.
• Use a lower quality proxy image by using the Proxy pull-down menu above the Viewer.
10 Choose View > Composite to display the Composite.
If you look closely at the edges of our hiker example, you will see some white fringing created by the sky from the original image. By activating Power Matte’s Color Estimation feature, the fringing can be removed by estimating the color of the foreground in unknown and semi-transparent areas.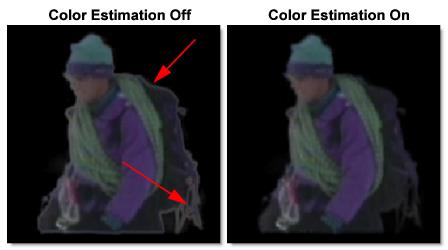
11 To remove fringing around the cutout object, go to the Node parameters and turn on Color Estimation.
Note: Color Estimation can cause color flickering in edge areas of partial opacity if your shape position is not constant from frame to frame or if your source footage is grainy. Disable Color Estimation if you see flickering in the edge areas after a preview or render.
12 When you press the Play button while viewing the Composite, you will see the result in full color.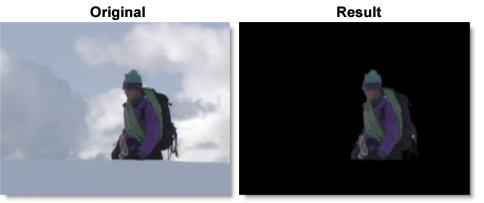
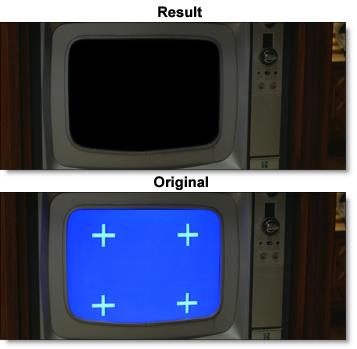
Blue/Green Screen Keying
Keying is a technique for blending two images, in which a color from one image is removed, or made transparent, revealing another image behind it. Either the Open or Closed Shape Method can be used when creating mattes for Blue or Green screen photography. Power Matte doesn’t require any specific color for the object to be photographed against, but blue and green screens will be referred to as these are the most common.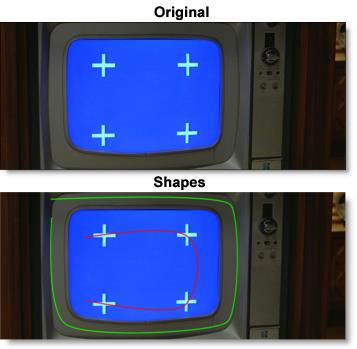
Let’s start by creating some open shapes. The shapes should be near the boundary of the foreground or background, but not right up against the edge. Also, if the foreground or background has varying colors, the shapes should cross over these colors.
1 Define foreground area (what you want to cut out) by drawing a open shape.
2 Start by selecting either Bézier, B-Spline or X-Spline from the Toolbar.
3 Draw a shape around the edge of the object that you want to cutout, in this case, the television screen. When done adding points, press the Esc key to finish the open shape. 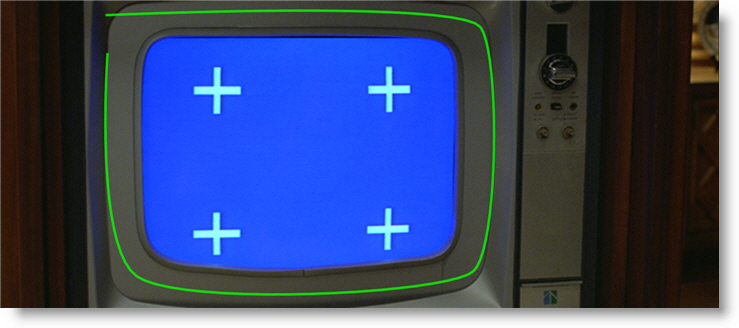
4 Next, draw a shape to define background areas. In the example below, this would be the blue area within the television screen. Press the Esc key when you want to finish the open shape.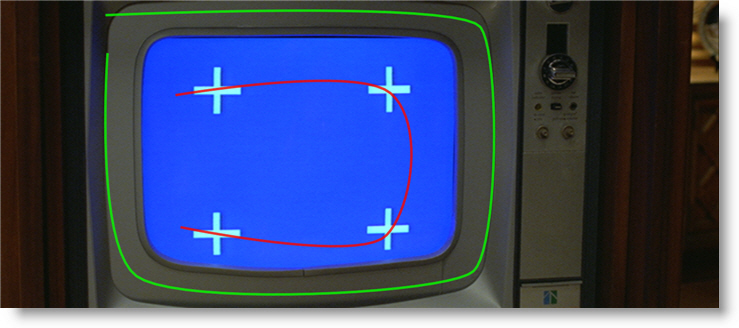
5 Choose the Reshape tool when you are done drawing the open shapes.
Power Matte won’t process until you assign the shapes as either foreground or background.
6 Select the foreground shape and in the Object window, set the Type to FG.
7 Select the background shape and in the Object window, set the type to BG.
Once a foreground and background shape are assigned, Power Matte processes the matte. The Viewer displays the composite of the foreground over the background based on your shapes. In this example, I am using black as the background clip.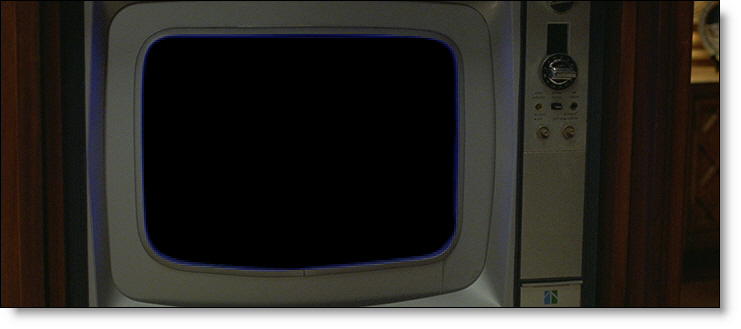
Now that you have foreground and background shapes, animate them over time so that they follow the motion of what you are cutting out. However, since you already assigned the shapes as foreground and background, Power Matte will try and update every time you adjust the shapes.
8 Set the View to Foreground. This way Power Matte is not constantly trying to update when you change a parameter.
9 Animate the foreground and background shapes over time so that they follow the motion of what you are cutting out.
It is best to use the Tracker (Shift-T) to animate the motion of your shapes as it will most likely ensure that the motion is consistent from frame to frame.
10 Play through the clip to make sure that the shapes are properly following your object.
11 Use View > Matte to display the generated matte.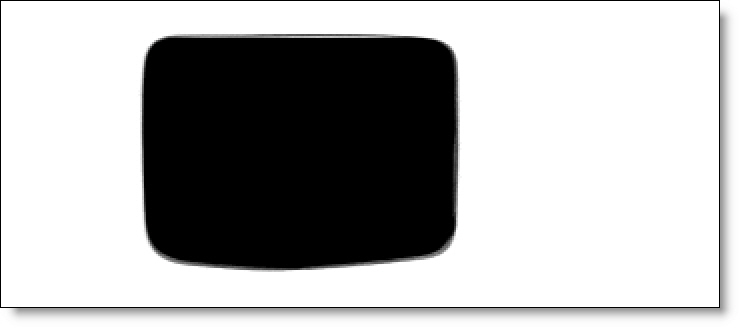
12 Hit the Play button to check your results so far. When you hit the Play button, Power Matte renders each frame.
13 If at any time you want to turn off the display of the shapes, click the Overlay icon above the Viewer or press 0 (the number zero) shortcut key.
In the generated matte, white is foreground, black is background and any gray areas in between represent a level of transparency. If the matte is not acceptable after processing, you can adjust the shapes.
14 If you see gray areas in the foreground object that should be completely white, adjust the foreground shape in those areas.
15 If you see gray areas in the background that should be completely black, adjust the background shape in those areas.
16 Gray values in Unknown areas can be reduced by increasing the Deartifact value located in the Node parameters.
If you need to adjust the shapes after they have been created and assigned in Power Matte, you can enhance performance by either:
• Set the View to Foreground while editing shapes.
• Set the Update mode to Manual and hit the Enter key when you want to process. This way Power Matte is not constantly trying to update when you change a parameter.
• Use a lower quality proxy image by using the Proxy pull-down menu above the Viewer.
17 Choose View > Composite to display the Composite.
When a foreground object has been photographed against a solid blue or green backdrop, the blue or green color can have a tendency to spill onto the foreground object. When extracting an object photographed against one of these colors, you may find it necessary to remove the blue or green spill. This is a process called Color Suppression.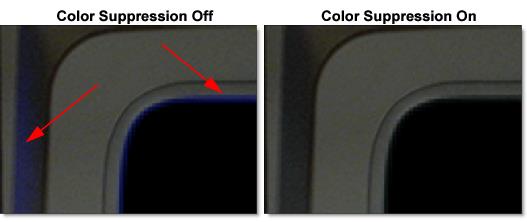
18 To remove color spill from your object, go to the Node parameters and change the Color Suppression > Type parameter from None to Blue or Green.
19 Click the Play button to see the results.