


Replaced by BCC+ Rays
We recommend use of BCC+ Rays instead of BCC Rays Streaky. The newer BCC+ Rays filter streamlines the Rays filter family to create stunning and realistic light ray effects quickly and easily. Known as volumetric lighting in computer graphics or crepuscular rays in atmospheric optics, this dramatic effect adds polish and style. The filter also contains GPU accelleration for faster smoother results, and FX Editor support.
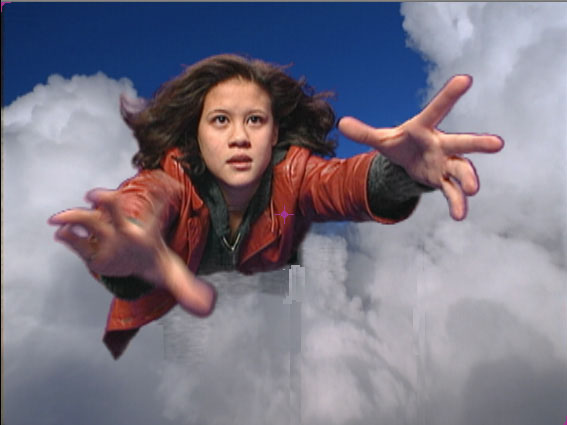 | 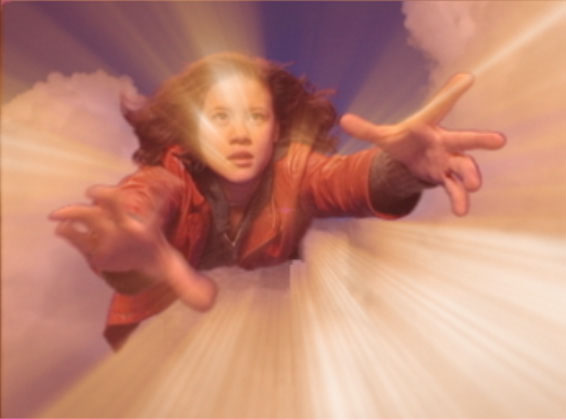 |
| Source image | Filtered image |
Overview
The BCC Rays Streaky filter produces a light that contains streaks. The resulting light is generated from a chosen channel in the source image, and spreads from a source point in all directions.
This filter is one of a family of related BCC volumetric light rays generators which each give their own variation on the look and shape of the light rays:
- BCC Rays Cartoon
- BCC Rays Puffy
- BCC Rays Radiant Edges
- BCC Rays Radiant Spotlight
- BCC Rays Ring
- BCC Rays Ripply
- BCC Rays Streaky
- BCC Rays Textured
- BCC Rays Wedge
Function
Presets and Common Controls
BCC filters come with a library of factory installed presets plus the ability to create your own custom presets and preview them with the BCC FX Browser™.
BCC filters also include common controls that configure global effect preferences and other host-specific effect settings.
For more information about working with presets and other common controls, Click Here.
TheLight Source position point sets the location of the simulated light source on the X and Y axis.
Intensity adjusts the intensity of the light source.
Ray Length controls the length of the rays of light that emanate from the source. Ray Length also affects controls in the Custom Look group if the Look menu is not set to Custom.
The Ray Style menu determines what type of rays are created. The choices are Detailed and *Fat.*Detailed produces rays that retain a great deal of detail as they spread from the Light Source. Fat produces less distinct rays. Fat Style produces rays similar to those produced by the Light Zoom filter.
The Look menu determines a look for the rays in the effect. The choices are Default, Custom, Extended 1, Extended 2, Extended Bloom, Extend and Contract,Tight, Tight and Extend and Tight Bloom. The Default setting gives the best look for each particular filter, so its effect varies from filter to filter. When Custom is chosen, you can use the controls in the Custom Look parameter group to finetune the rays. See “Custom Look Parameter Group” below.
Custom Look Parameter Group
The controls in the Custom Look parameter group allow you to customize and finetune the light rays precisely when the Look menu is set to Custom. If the Look menu is not set to Custom, these controls have no affect. The Default Look simply sets all of the Custom Look controls to their default values for the filter, so switching between Default and Custom has no affect until the Custom Look parameters are adjusted.
Extend Rays allows you to extends the rays by favoring light pixels over dark.
Contract Rays contracts the rays. While this may seem to be the opposite of Extend Rays, this parameter adjusts the algorithm differently, so increasing Contract Rays is not the same as decreasing Extend Rays.
Holdout Radius determines where the rays of light start in relation to the light source. Positive values create a circular region centered around the light source beyond which the rays emanate. Attenuation does not begin until after the radius is reached. Decreasing negative values cause the attenuation to start closer to the light source point.
The Color menu determines how the applied light affects the source image. You can also use this menu to preview the source channel used by the filter to create the effect.
- Colorize converts the light to colors using the controls in the Colorize Controls Parameter Group.
- Image produces a colored lighting effect using color information from the image that the filter is applied to.
- Light Matte uses the applied light to modify or create an alpha channel and displays a grayscale matte.
- Inverse Light Matte works similarly to Light Matte, but inverts the result.
- Alpha uses the applied light to modify or create an alpha channel and uses it to composite the source image.
- View Sourcedisplays the chosen Light From Channel (the source channel used by the filter to create the effect). This can be especially useful if you are using edges in the image as the Light From Channel.
The Color Source Layer menu sets the layer used when the Color menu is set to Image.
Working with the Color Preset Menu
The Color Preset menuallows you to choose a Colorize preset (a gradient of up to six colors to tone the light rays). If the Mode menu is not set to Colorize, the presets have no affect.
The Gradient displays a preview of the gradient that you create.
Gradient
The BCC Gradient group enables complex, multi-color gradients for use in a variety of effect settings such as colorizing light sources.
For more information on the BCC Gradient tool, Click Here.
TheApply Mode menu controls how the filter composites the applied light with the image. For information on the available apply modes, Click Here.
Composite Parameter Group
This parameter group determine how the light is composited over the underlying image. These controls are only active when either Colorize or Use Source Color are chosen as the Light Mode menu.
Source Threshold subtracts the threshold from each pixel value when computing the light.
Light Threshold sets a value that is subtracted from the light at each pixel before it is applied. If you are animating the position of an object, increasing Light Threshold causes the light to fade out more rapidly as you move away from the source image.
Source Opacity adjusts the opacity of the source image in the final composite. Setting source Opacity to 0 has the same effect as setting Apply Mode to None.
Light Opacity controls the opacity of the light as it is composited over the source image. This parameter can be overdriven.
Many hosts process media one field at a time which can cause flickering to occur on filtered effects. The Reduce Flicker menu allows you to reduce flicker in the rendered image. The only way to evaluate a deflicker setting is to render and play back the effect on an NTSC monitor. Choose from the following options in the Reduce Flicker menu.
- 1-2-1 mixes each pixel with the pixels above and below it, with the input pixel getting twice the weight as the ones above and below. For After Effects users, this works the same as applying the AE Reduce Flicker filter at a setting of 0.5.
- 2-3-2 provides more softening than 1-2-1.
- 1-1-1 provides the most softening for effects that still contain flicker with the above options.
- Off is the default. If Off is chosen, no deflickering will be done.
Mix with Original blends the source and filtered images. Use this parameter to animate the effect from the unfiltered to the filtered image without adjusting other settings, or to reduce the effect of the filter by mixing it with the source image.
The Light From menu determines which source color channel is used to create the light and to calculate the intensities of the source pixels. Pixels with higher values in the selected channel are considered to have higher intensities.
- Luma, Red, Green, and Blue use the corresponding color channel and multiply it by the source alpha channel.
- Luma Inverse uses the inverted luma channel to make the light.
- Unmultiplied Luma and Alpha use the unmodified corresponding source channels.
- Luma Cartoon Edges and Alpha Cartoon Edges find edges in the corresponding source channel, apply outlines to the edges, and use the resulting image. When Luma Cartoon Edges or Alpha Cartoon Edges is chosen,Thickness/Intensity adjusts the width of the outlined edges, andCartoon Threshold sets the value in the threshold above which pixels are considered fully on.
- Luma Edges and Alpha Edges find edges in the corresponding source channel and use the resulting image. When Luma Edges or Alpha Edges is chosen, Thickness/Intensity adjusts the intensity of the edges, and Edge Floor adjusts the sensitivity of the filter when searching for edges in the source. Lower values increase sensitivity.
- When PixelChooser is chosen, the PixelChooser setting determines how the edges are created.
Edges Parameter Group
The Edges Parameter group provides additional control if either Alpha Edges, Luma Edges, Alpha Cartoon Edge or Luma Cartoon Edges is chosen in the Light From menu. If any of the other settings are chosen, the parameters in this section have no affect.
When the Light From menu is set to Alpha Edge or Luma Edges, Thickness/Intensity controls the intensity of the edges. When the Light From menu is set toAlpha Cartoon Edge or Luma Cartoon Edges, Thickness/Intensity adjusts the thickness of the outside edges.
Smooth Details blurs the source image before the filter searches for edges. This blur does not appear in the output; it is used only in edge detection. This parameter only works if the Light From menu is set to Luma Edges, Alpha Edges, Luma Cartoon Edges or Alpha Cartoon Edges.
Edge Bloom blurs the edges before they are used to create the applied light. This parameter only works if theLight From menu is set to Luma Edges, Alpha Edges, Luma Cartoon Edges or Alpha Cartoon Edges. The following example shows Light from Luma Edges.
Cartoon Threshold sets the value in the threshold above which pixels are considered fully on. This parameter is only available if theLight From menu is set toLuma Cartoon Edges or Alpha Cartoon Edges.
Texture Menu and Texture Controls Parameter Group
These parameters allow you to set and finetune a light texture. The Texture menu and Texture Intensity control appear in a parameter group above the Texture Controls Parameter Group.
Two kinds of texture can be implemented, Strings and Shimmer.
The Texture menu allows you to select any combination of Shimmer and Strings. The options are Strings, Contracted Strings, Shimmer, Shimmer and Strings, Shimmer and Contracted Strings and Off. When Off is chosen, no texture is applied. The Shimmer controls create a texture that depends on the angle of the line from each point of the image to the light source. The Strings controls cause noise to affect the amount of attenuation the light rays experience as the emanate from the source and interact with the pixels they cross.
No Texture Shimmer Strings
Texture Intensity scales the selected textures. You can create a basic textured look by selecting one of the texture settings and adjusting its intensity. You can then finetune its look by adjusting the parameters in the Texture Controls Group.
Stringiness controls the intensity of the texture when the Texture menu is set to one of the Strings options.
String Softness controls the softness applied to the string texture.
String Seed determines the value input to the random number used by the filter to adjust the strings. Adjust this value when you like the overall appearance of the effect but want to change the random configuration of the strings.
String Morph Rate controls the rate at which the strings evolve over time. This parameter can be animated, so you can animate from evolving strings to static strings.
Shimmer Intensity controls the intensity of the texture when the Texture menu is set to one of the shimmer options.
Shimmer Detail adjusts the amount of detail in the shimmer.
Shimmer Rotate rotates the shimmer pattern.
Shimmer Seed determines the value input to the random number used by the filter to adjust the shimmer. Adjust this value when you like the overall appearance of the effect but want to change the random configuration of the shimmer.
Shimmer Morph Rate controls the rate at which the Shimmer pattern evolves over time.
Expand Source % allows you to expand the rays outside the outside edges of the image.
Motion Tracker
The BCC Motion Tracker allows you to track the motion of an object, then use the motion path to drive other geometric properties of the effect without the need for keyframing.
For more information on the Motion Tracker, Click Here.
PixelChooser
The BCC PixelChooser provides simple, built-in masking of the effect result. The PixelChooser is generally used to select a portion of the image and restrict an effect to just the selected area while maintaining the original image content in unselected regions. The selection can be based on geometric shapes or on the image’s luma/color properties.
For more information on the PixelChooser, Click Here.
The PixelChooser Target menu sets which parameters are affected by the PixelChooser.
- Choosing Light scales down the light level at each point in the effect.
- Mix makes the PixelChooser behave in the same way that it does in most filters – it mixes the original image with the filtered image.
- Source Light scales down the intensity of each pixel as it interacts with the rays crossing it, making the image darker.
- Attenuation scales the attenuation at each point where pixels are not fully chosen. This tends to make the rays shorter. You can stop the rays in an unchosen region and pick them up again in the chosen region.
- Attenuation Boost creates the reverse of Attenuation; rays travel further in unchosen regions.
- Off turns off these options.
Beat Reactor
The BCC Beat Reactor is an animation control suite which drives effect properties based on the contents of an audio track. This lets you seamlessly tie visual FX to an audio soundtrack without the need for ANY manual keyframing.
For more information on the Beat Reactor, Click Here.