


When it comes to video editing software, Adobe Premiere Pro is one of the best on offer. There's plenty of scope to explore your creative flair with an industry-standard piece of software.
And there are many different effects you can use when it comes to video editing software. One of the simplest to use, but one which can be hugely effective, is reversing video clips.
What is Reversing a Video?

It's all right there in the name! Reversing a video clip is just that - taking a section of video you have recorded and playing it in reverse. Or to put it another way, the video clip is adjusted to play backwards.
That means the footage you have shot will run in the opposite direction. The speed of the video clip can also be changed - you can run it at any speed, it doesn't really matter. The important detail is that the video itself is backwards.
Why Do We Need to Reverse Video in Premiere Pro?
There can be several different reasons for using this effect, but all of them allow you to express your creativity and find interesting things to do with your footage.
Capturing Your Audience's Attention
One of the most striking things about reversing video is that it immediately stands out. This is a great way of ensuring that you hold your audience's attention and keep them focused on your work. Anything that helps to keep eyeballs on screen is going to be to your advantage! Inserting different types of effects, including reverse video, is a great way to keep your audience engaged.
Highlighting A Section
If you need to draw your audience's attention to a particular piece in your video, or if there is something you want to ensure doesn't pass by and get missed, using a technique like reverse video can be extremely effective. When you combine the effect with others - for example, running footage in slow motion - it can really show off the footage you have captured.
Imagine you have footage of a skilled driver pulling off a tricky stunt or perhaps a sports star landing an impressive moment. By reversing the video footage you show the audience how they came to achieve something so meaningful and thus greatly increase its impact. It draws attention to and highlights the skill of the person you have recorded, as well as your skill as a video editor!
Uniqueness
If you want your footage to stand out and get noticed, then using effects like reversing video is a great way to do it. So much video footage is shot straightforwardly, so anything you can do to make your footage seem unique and interesting is only going to help enhance your video clip.
It's Fun!
What better reason could there be? It's a great chance to have fun with the project you are putting together. It can show off your creative flair, it gives you a chance to enhance your footage, and by using techniques like changing the reverse speed of your footage you might even get a laugh!
How to Reverse a Video In Adobe Premiere Pro

It's easy to reverse a video clip in Premiere Pro.m The short version looks like this:
To reverse a clip in Premiere Pro, right-click on it and select the "Speed/Duration" option. A checkbox will pop up with a window that reads "Reverse Speed". It's as simple as that says, checking this box will reverse your clip.Import Video Clip
First, you need to import your video clip into Adobe Premiere Pro.
Go to the File menu, then click on Import. Browse your computer for the video file you want to upload. Choose Open and Premiere Pro will import your video file.
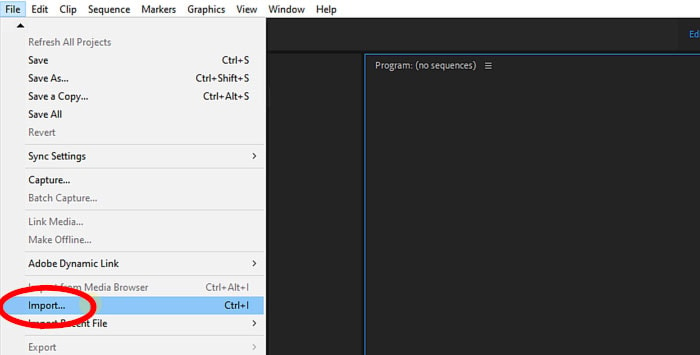 KEYBOARD SHORTCUT: CTRL + I (Windows), CMD + I (Mac)
Import Video Clip
First, you need to import your video clip into Adobe Premiere Pro.
Go to the File menu, then click on Import. Browse your computer for the video file you want to upload. Choose Open and Premiere Pro will import your video file.
KEYBOARD SHORTCUT: CTRL + I (Windows), CMD + I (Mac)Import Video Clip
First, you need to import your video clip into Adobe Premiere Pro.
Go to the File menu, then click on Import. Browse your computer for the video file you want to upload. Choose Open and Premiere Pro will import your video file.
KEYBOARD SHORTCUT: CTRL + I (Windows), CMD + I (Mac)Video Editing
Once the video clip has been imported into Adobe Premiere Pro, you will be able to see it on your timeline. Right-click the clip and go to the Speed / Duration menu. This is where you want to go to reverse video.
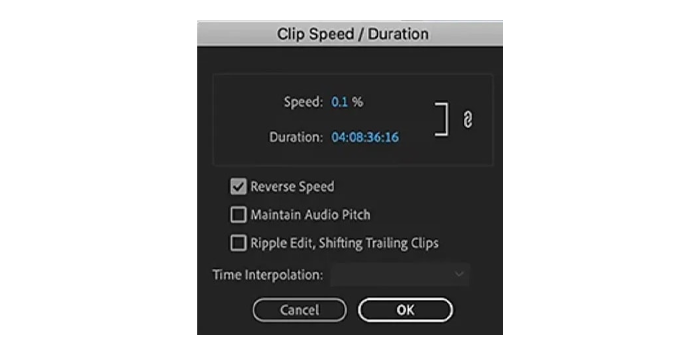
Put a tick in the "Reverse Speed" box.
Once you have done this, you can select what speed you want the reversed clip to be played at. This is expressed as a percentage, so 100% is normal speed, 50% will be half the original speed, and so on. If you set a value higher than 100%, the reverse speed will be faster, so 200% means it will play back twice as fast.
Play with the speed settings to get a feel for how you want your video playback to look. Once you are happy with the speed you have, click on OK to apply the chance to your reversed video.
Audio
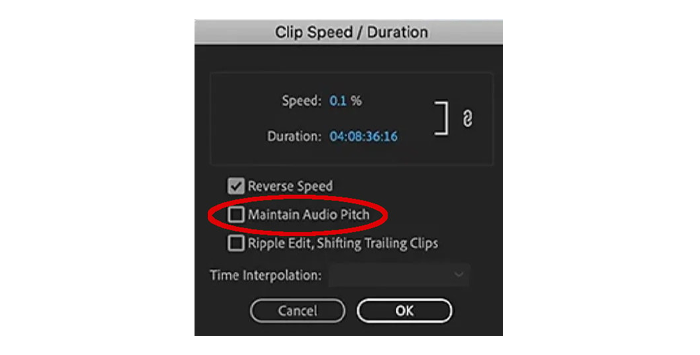
It is important to note that when you reverse a video clip, the audio is also reversed as well. So if you play the clip back at 100% any audio, such as music or speech, will play at the correct speed and sound normal but will be backwards. The more you change the speed of the clip, the more the audio will sound distorted.
If you want Adobe Premiere Pro to try and keep the clip sounding as normal and natural, put a tick in the "Maintain Audio Pitch" box under the Speed / Duration menu.
The final option on that menu, Ripple Edit, Shifting Trailing Clips, will help you get rid of any gaps that have been created by the process of reversing video.
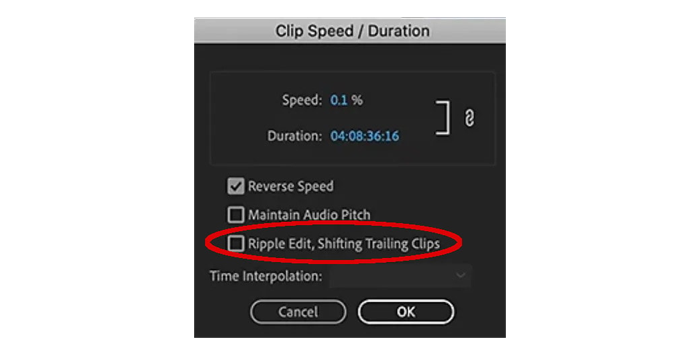
As always, the best approach is to try these settings, listen to the changes they make, and then decide if you want to apply them. Not all reversed footage will require all settings, and each video project will be unique, so learn the settings to decide whether you will require them or not.
Time Interpolation Settings
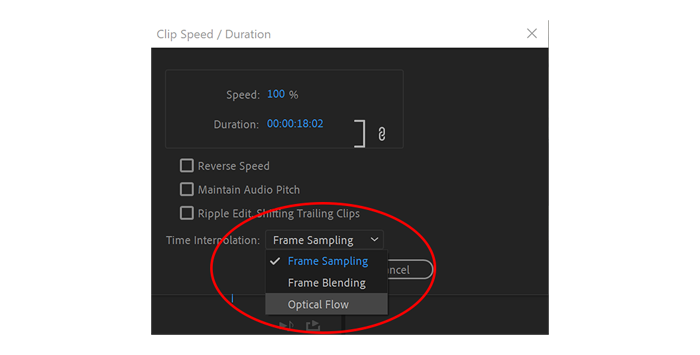
Adobe Premiere Pro has three other tools under the Time Interpolation setting. These tools allow you to fine-tune the changes you are making. These are:
- Frame Sampling: This will either add or remove frames if you have made your video clip longer or shorter. This helps to keep everything in the correct place within your video project.
- Frame Blending: This is used to help keep the motion in the clip looking smooth and fluid in any duplicated frames. The results look smooth and less "jerky."
- Optical Flow: This will add more frames to your clip. This is especially useful if your reverse videos are being run in slow motion. As with Frame Blending, this will keep the results looking smooth and fluid.
When you are happy with the way everything looks, click on OK. The changes will then be applied to your video clip.
Once you have completed the work, you will need to export your project from Adobe Premiere Pro.
Go to the File menu, then choose Export and select Media.
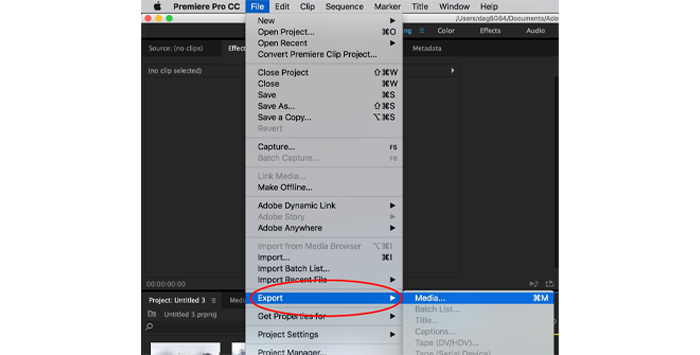 KEYBOARD SHORTCUT: CTRL + M (Windows), CMD + M (Mac)
Choose the type of export that you want from your video files, then click the Export button. Premiere Pro will then export your video.
Alternative Method: How To Reverse a Video in Premiere Pro with ReverseClip
Alongside Adobe Premiere Pro's reverse video settings, you can also use third-party software as well. The Sapphire Plug-ins for OpenFX from Boris FX allow you to easily reverse video in Premiere Pro, but with a greater range of settings, you can get even more creative.

Once you have installed the Sapphire Plugins, open your video file as before by going to File, then Import, and then select the video file from your computer. This will put it into your timeline.
Open the Effects tab and type ReverseClip in the search bar. This will bring up S_ReverseClip.
Drag and drop this into your video timeline and apply it to your clip. And that's it! It really couldn't be simpler!
There are a range ofsapphire
Conclusion
Video editing software and video editing apps are designed to make your life as easy as possible. If you want to reverse a clip in Adobe Premiere Pro, the actual process of doing it is very simple.
So, if you want to edit videos and add your creative flair to them, techniques like reversing videos are at your fingertips to make your footage stand out from the crowd.
The only thing you need to decide is just how your project will benefit from it!
FAQ
Does Reversing a Video Have Quality Loss?
No, reversing a video does not, in itself, lead to any loss in quality. Because everything is being processed digitally, a reverse video will play in the same quality as it did when it was running forward.
However, if you change the speed of your clip in Premiere Pro, remember that you may need to adjust your footage to match. So, if your clip is played back at half speed without the length of it being adjusted, it will take twice as long to play. For this reason, it is better to apply changes such as the reverse effect before adding other elements like music or voice over.


