


In the world of filmography and videography, post-production, a process that takes place after the recording and "basic" editing, is considered to be where the magic happens. Of course, nothing is possible without having perfectly recorded raw material to work with, but when it comes to charming viewers with the special film look, post-production is where it's at.
There are many ways to change the look of your film project, video, or any recorded material you have. Nowadays, modern video editors, such as Premiere Pro for example, offer various effects and filters that in just a few clicks will completely transform what you have into something that looks much more magical on the film canvas.
This "How to Make Video Look Like VHS Premiere" guide will cover everything about the VHS video look, what it is, and how to achieve the same aesthetic for your video projects, all in a few concise, step-by-step sections.
Without further ado, let's get started.
What Is the VHS Look and Why Should I Care?
The VHS look refers to the visual aesthetic of videos recorded on VHS (Video Home System) tapes, popular in the 1980s and 1990s. This look is characterized by grainy, low-resolution footage, faded or muted colors, visual artifacts like static lines or glitches, and occasional tracking issues. The audio may also have a slightly muffled or distorted quality.
People often use the VHS aesthetic in modern videos to evoke a sense of nostalgia, as it recalls the home movies and TV recordings of earlier decades. It can also give a video a vintage or retro vibe, creating a sense of authenticity or warmth that's often lacking in today’s crisp, high-definition digital formats. Filmmakers, artists, and content creators use this effect to create a mood that feels personal, aged, or reminiscent of a different era.
It's also often used purely for aesthetic purposes, as VHS does make some footage look a lot more interesting despite being considered aged and dated.
That said, let's take a look at how you can make your video look like those from VHS tapes in Adobe Premiere Pro.
How to Make Video Look like VHS in Premiere Pro Using Built-in Tools
Adobe Premiere Pro is a well-known video editing program. It's versatile and easy to learn, but all while offering everything an advanced editor would need.

Within the software, you can find an Effects panel where tons of pre-installed filters, transitions, and effects are available for use.
Step 1: Import Media and Create a Sequence/Timeline
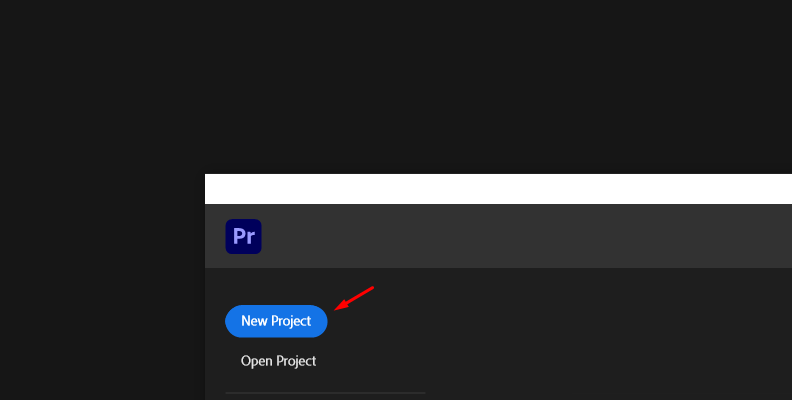
The first step to creating a VHS look for your video in Adobe Premiere is to create a new project and import the video you wish to edit. Once you launch the software, click the "New Project" button to create a fresh project file where you can experiment without making any unwanted changes to work that you've already started.
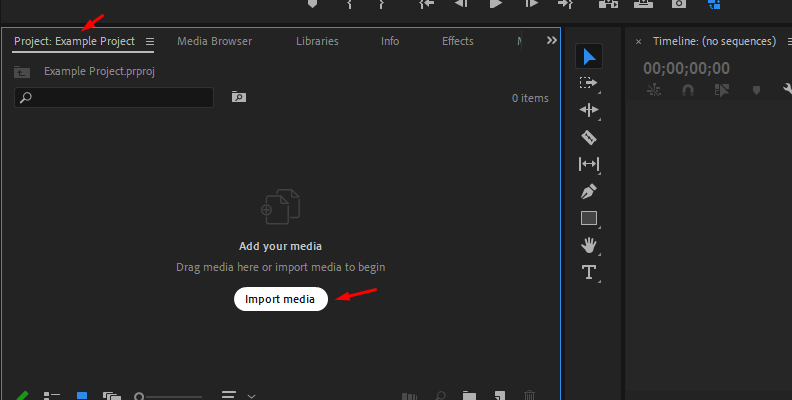
Now that you're in the project, click on the "Project" tab, then click on "Import Media" to start adding video clips you want to edit within the software.
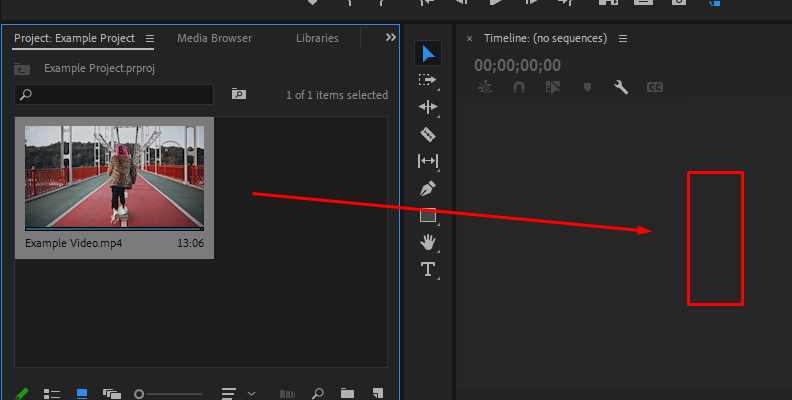
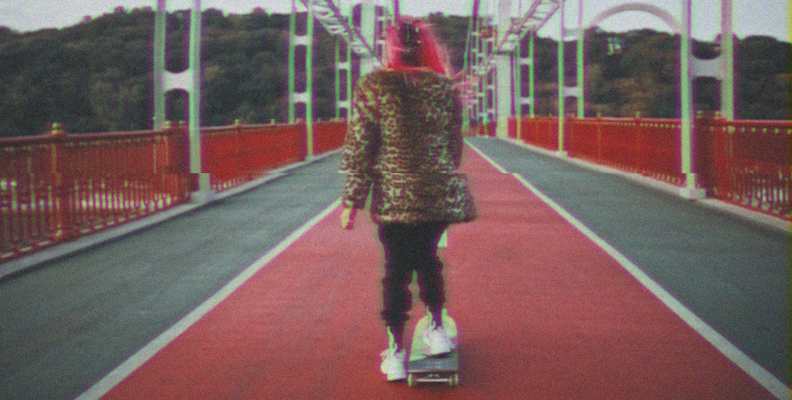
In this case, we'll only need one video clip to create and try the VHS effect.
Import the clip and drag it to the timeline area, as shown in the image below.
Step 2: Create an Adjustment Layer
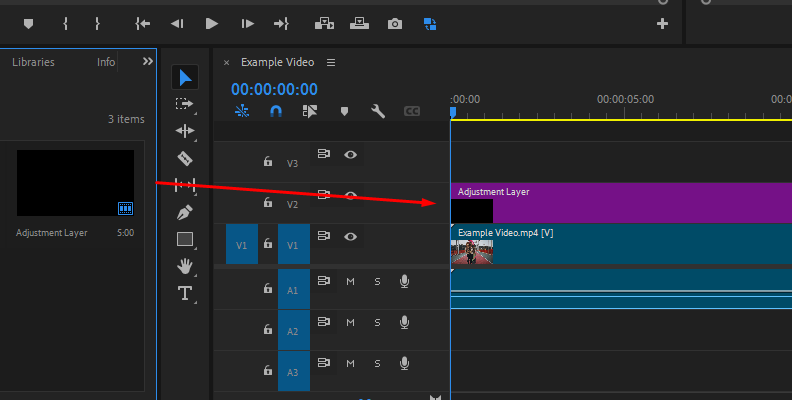
Now that the video is on the timeline and you have a sequence ready, it's time to create an adjustment layer so that we don't edit the original video clip.
To do this, right-click anywhere on an empty area within the Project panel, then choose "New Item" -> "Adjustment Layer" and press "OK" in the window that shows up on the screen.

Now, drag the adjustment layer on top of your main video clip. We'll be making all changes to this layer to achieve the VHS tape look for our original clip.
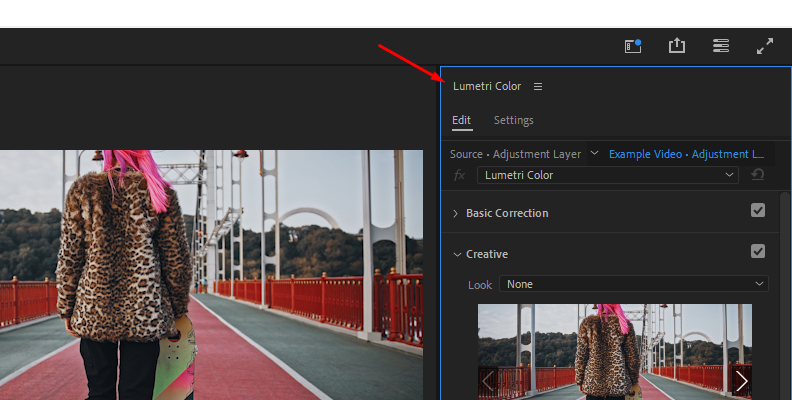
Step 3: Editing the Adjustment Layer in Lumetri Color Panel
Click the adjustment layer on your timeline to select it. Now, click on "Window" -> "Lumetri Color" to activate the Lumetri color panel in Premiere. You should be able to see it on the right side.
Now, in the Lumetri color panel, expand the "Creative" section and find the "Faded Film" setting, then change its value from "0" to "50".
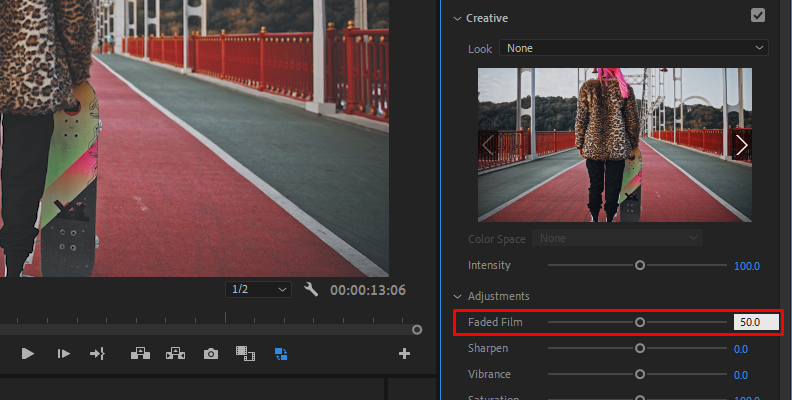
This alone will make the video look a lot older and pale. The faded film effect is a core part of all VHS presets.
Then, just below that setting, find "Sharpen" and change its value to "-50".

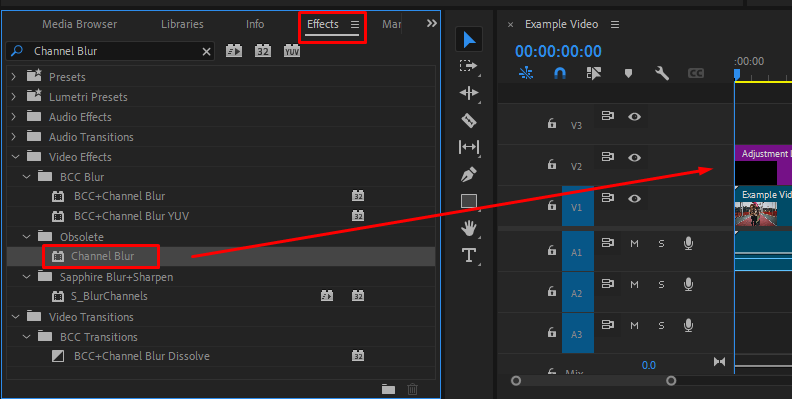
Step 4: Add the Channel Blur Effect
Now, we need to access the Effects panel and search for the channel blur effect to apply it to our adjustment layer.
Use the search bar to find the effect and then drag and drop it over the adjustment layer, as shown in the image below.
Once you add the effect, navigate to the effect controls panel in the top-left corner. Then, set the "Red Blurriness" setting to "30" and in the Blur Dimension Drop Down menu, set the value to "Horizontal".
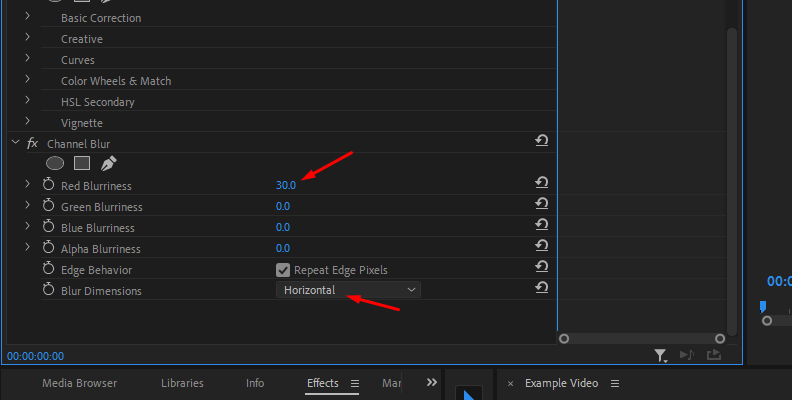
Now, you need to add a second channel blur effect. The process is the same. Drag and drop the effect once more to the adjustment layer. Both channel blur effects will work together to achieve the VHS look for you.
In the second channel blur effect that you add, set the Blue Blurriness parameter's value to "30" and the Blur Dimensions value to "Horizontal".
You can "tick" the repeat edge pixels box and preview the changes in the program monitor window to see if you like the look it adds to the edges of your clip.
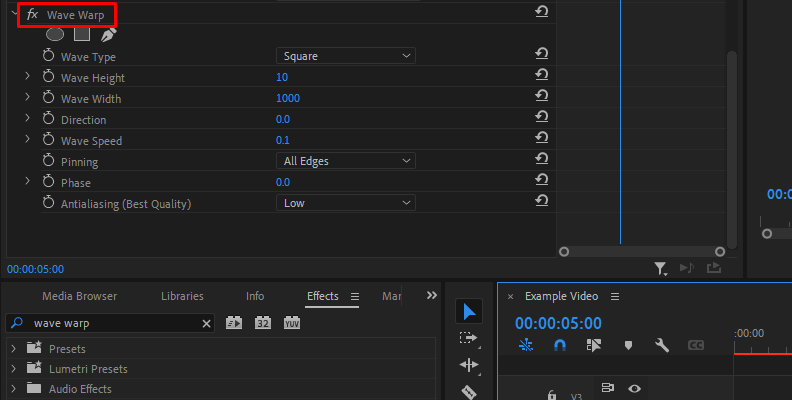
Step 5: Add the Wave Warp Effect
To finalize the look seen in old VHS tapes, we recommend adding the wave warp effect. This will help you create those scan lines seen in old VHS tapes content, such as music videos and other recordings.
Locate the effect using the search bar in the Effects panel, then drag and drop it over your adjustment layer as you did with the other effects.
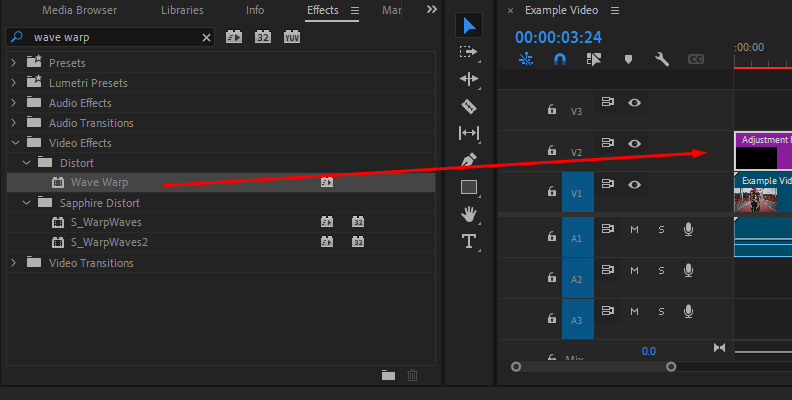
Now, go back to the effect controls panel and set the following values:
Wave Type: Square
Wave Height: 10
Wave Width: 1000
Direction: 0
Wave Speed: 0.1
Pinning: All Edges
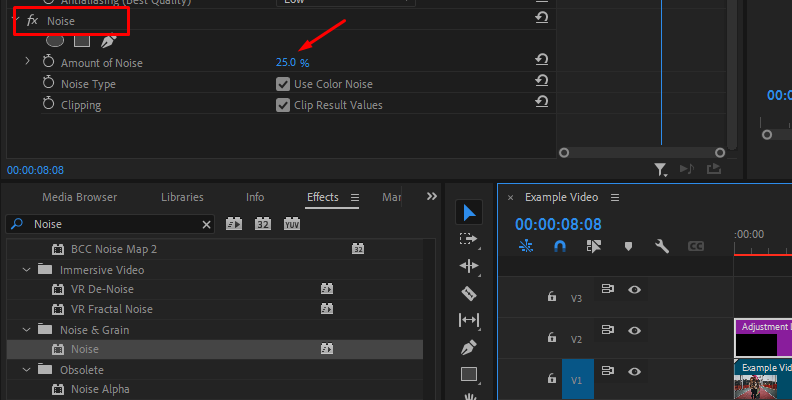
Step 6: Add Noise
The last step is to add a noise effect to your video. This is optional but will make the VHS tape effect much more authentic.
Simply search for any noise effect in Premiere Pro, add it to the adjustment layer, and then increase the amount in the effect controls panel until you like the look.
Here are the results!
How to Make Video Look like VHS in Premiere Pro With BCC+ Film Grunge
Creating a VHS effect look for your video project in Premiere is not complicated, but it can be much simpler. Plug-ins such as Continuum by Boris FX make every creator's work much easier by offering various customizable presets for effects, transitions, and a lot more.
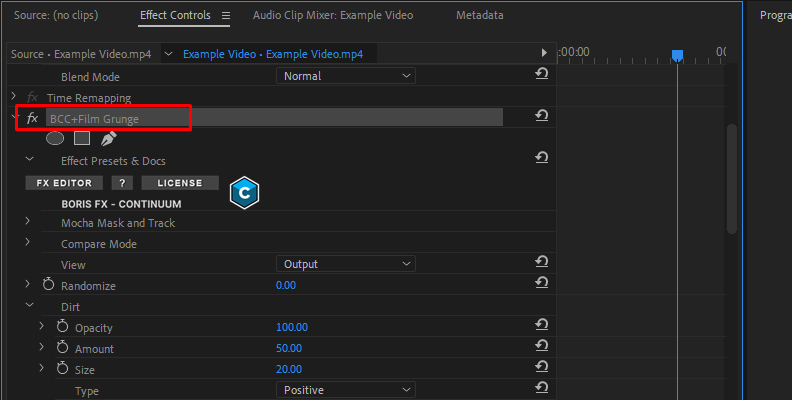
If you download and install Continuum for Premiere Pro, which is also available for every other popular video editing program, you will see the BCC+ effects available in your effects tab.
One of those effects will be the BCC+ Film Grunge.

Drag and drop the effect directly to your video, and you'll immediately notice a difference. However, the best thing about Continuum effects is that you can heavily customize them.
Access the effect controls panel and scroll down to see the dozens of available settings that you can adjust.
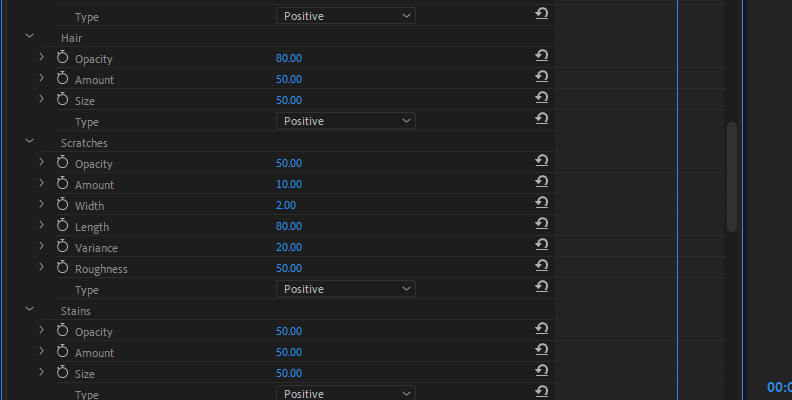
From here, you can make endless combinations by adjusting parameters until you get the look that you want. Take a look at the BCC+ Grunge webpage where every setting is explained separately.
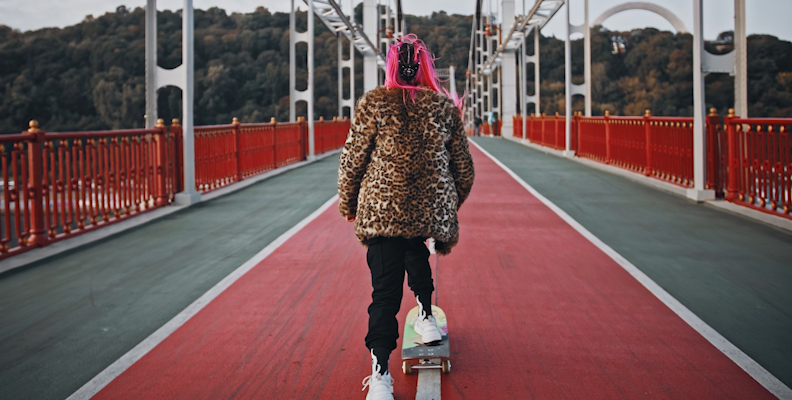
Here are the results in just a few clicks, using only one of the many available presets with default settings.
Final Words
That's all there's to it! You now know how to make a VHS effect from scratch in Premiere Pro, both manually and as quickly as in two clicks using the BCC+ Film Grunge effect.
Hopefully, this helps you with your future work. Best of luck, and thanks for reading.


