


In audio production, there are two concepts that can be challenging for beginners to grasp. I'm talking about compressors and limiters, two tools that can affect the dynamic range and volume of an input signal, with some differences and blurry lines between the two.
Understanding what a compressor and a limiter are is already hard enough, and when you look at the two, you may find yourself thinking, "Aren't those two similar?" When does compression end, and when does limiting begin?"
In today’s article, we’ll shine a light on these two crucial elements of audio post-production. You’ll learn what a compressor and limiter are, how they work, their uses, and their main differences. All in this complete guide on compressors and limiters.
Let’s dive in!
What’s the Difference Between a Compressor and a Limiter?
A compressor and a limiter are both tools used to control the dynamic range of audio. Compressors work by reducing the volume of loud sounds by a set ratio, such as 3:1. In contrast, a limiter uses an infinite ratio to prevent the signal from exceeding a certain peak, a process also called "brickwalling." Limiters are mainly used to catch and control sudden peaks, while compressors help manage the overall dynamics and shape the balance of a track.
Their main differences lie in their functionality or primary goals. A compressor shapes the dynamic range of an audio signal to make the volume more consistent across the signal and can add color to the sound while compressing. A limiter caps the maximum level of an audio signal to prevent clipping and distortion while preserving the integrity of the sound.
That's the short answer, but there are a few more key differences I'd like to explore before diving into each one and its uses. Take a look at the following table that summarizes their differences. Below that, I'll go over each of them to clarify their key differences.
| Feature | Compressor | Limiter |
| Main goal | Shape dynamic range, keep consistent volume levelsAdds color and rhythm | Cap the maximum level of an input signal, catch peaks, and prevent audio clipping and distortion. |
| Ratio | Low to medium ratio (usually below 10:1) | Higher or extremely high ratio (often referred to as infinite:1) |
| Applied to | Individual tracks and buses | Generally, only in the master bus |
| What it does (Effect) | Reduces the loudest parts of an audio and raises the quietest ones to achieve a balanced mix. Adds presence, sustain, and punch | Prevents distortion, acting like a brick wall |
Main Goal

The core difference lies in the compressor's vs the limiter's main goal. As I mentioned at the beginning, a compressor is used when an audio track has a wide dynamic range. When a track presents a high dynamic range, it means there is a large gap between the loudest and quietest sounds. The compressor pushes down the loud parts and raises the quiet ones. It is used during mixing to achieve a balanced audio and ensure that everything in a song gets heard.
A limiter is used when you have a very loud audio signal and want to avoid clipping and distortion. Limiters are more aggressive than compressors when compressing the audio signal and are used in mastering to catch peaks that may cause trouble.
Ratio
Another key difference is their ratio. If you do a quick search for 'compressor vs limiter,' you'll find many answers claiming that a limiter is just a compressor with an extremely high ratio. Others say that a compressor with a 10:1 ratio or higher is limiting. Here's when some confusion begins: "Can compressors be limiters?" However, we'll come back to that when we see how they work.
In the meantime, know that a difference with a ratio is that a compressor starts to reduce volume while still allowing some of the volume above the threshold through. The limiter on the other side, with a higher ratio, reduces all volumes above the threshold. That’s why it is commonly used after compression in mastering, to catch those remaining peaks.
Where to Apply Them?
Compressors are used during mixing. You can apply them to individual tracks, such as a vocal or instrument track, or to mix buses.
You can also apply more than one compressor to a track to make the compression softer across multiple compressors.
Some people use limiters in tracks, for specific genres and creative purposes. Usually, you'll use them in the master bus in the last step in post-production.
What Effects Do They Have?
Compressors can have several effects on your music or audio projects. They can maintain a consistent audio level across your tracks, add presence, make percussions punchier and more impactful, and increase sustain in instruments like electric guitars or pianos. A compressor can make vocals more intelligible. Some compressors can add color to your audio, though it is not their main purpose; some producers prefer compressors that add color.
Limiters protect against clipping, helping achieve a competitive loudness without distortion. They can also add a subtle layer of dynamic control, gluing the mix into a polished final master.
How Does a Compressor Work?
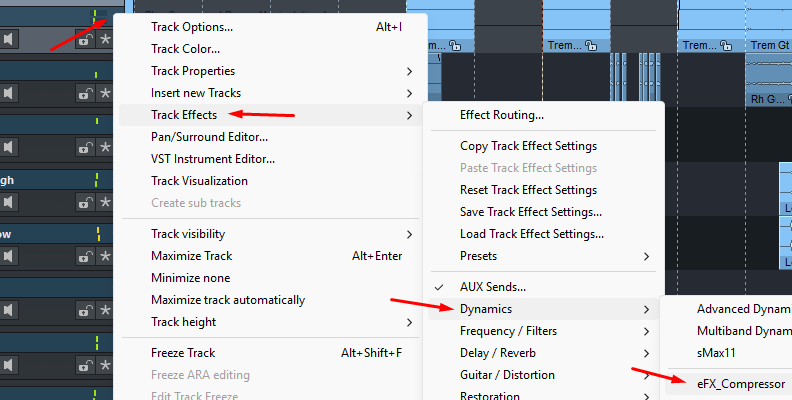
We use a compressor when we have a signal input with a wide dynamic range, such as a vocalist who sings softly then screams, a drum that goes heavy on the chorus, or any other sounds that you want to balance in your mix. You add the compressor to the problematic track.
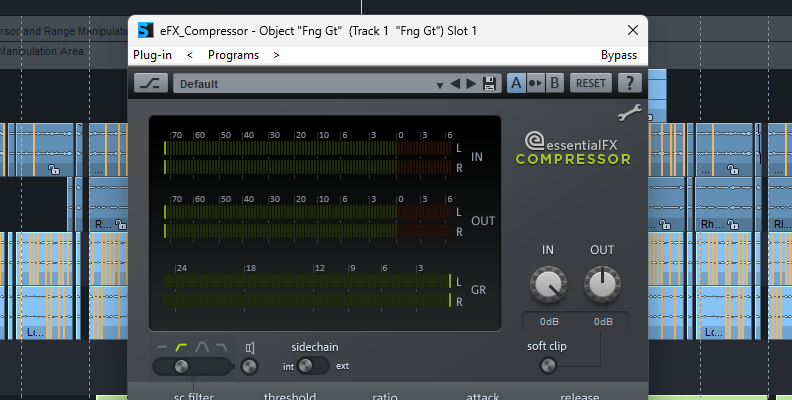
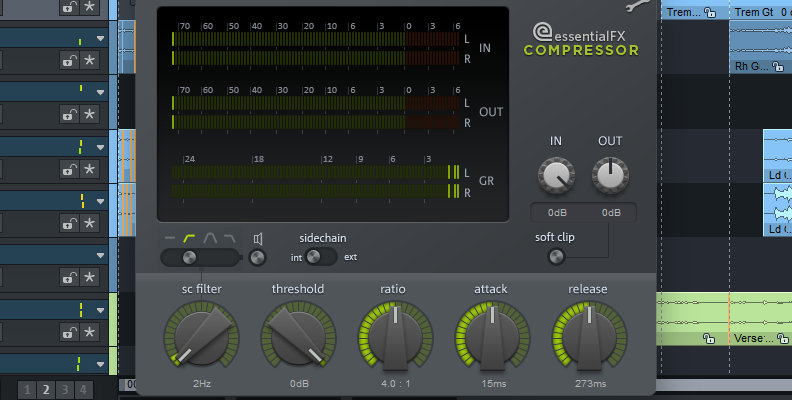
Whether you use a hardware or software compressor, it is controlled by four main controls: threshold, ratio, attack, and release. With only these few parameters, you can set when the compressor kicks in, how much compression is applied, and how quickly it starts and stops.
Threshold
The first step is to decide when the compressor should start compressing, or, as producers say, when the compressor kicks in. This is done by setting a threshold level in decibels. The threshold is the limit; it determines how loud the sound needs to be for the compressor to activate. For example, if a threshold is set at -20 dB, the compressor will begin once it reaches -21 dB.
Depending on the compressor you are using, it may have level meters for the input signal and the output gain, which can help you choose the threshold and visually see how much is being reduced.
Now that you have set when to compress, you need to set how much to compress with the ratio.
Ratio
The ratio determines the amount of compression applied. Ratio is expressed as 1:1, 2:1, 3:1, and so on. It means that, in a x:1 ratio, for every x decibels the audio exceeds the threshold, only 1 dB will pass. Let's see this with a few examples.
If you set a threshold at -20 dB with a 2:1 ratio. This means that for each 2dB the signal goes above -20 dB, only 1 dB will be heard.
If the signal reaches -18 dB (2 dB above the threshold), it will be raised by 1 dB, yielding an output of -19 dB.
If the signal reaches -16 dB, it will only pass 2 dB (output of -18 dB).
If it reaches -14 dB, only 3 dB will pass (output of -17 dB).
In the same example with a threshold of -20 dB, but with a 4:1 ratio, the compressor will let 1 dB pass for every 4 dB the signal exceeds -20 dB.
If it reaches -16 dB, the compressor will let only 1 dB pass, with an output of -19 dB.
If it reaches -12 dB, it will only allow 2 dB up (output of -18 dB).
If it reaches -8 dB, it will only rise by 3 dB to (output of -17 dB).
As you can see, the higher the ratio is set, the greater the compression. With a high ratio and a lower threshold, the compression is even harder.
We now understand when a compressor compresses and by how much. How about how fast it goes on and off?
Attack and Release
Attack and release are time controls, measured in milliseconds, that determine the compressor's behavior.
Attack is like a wake-up alarm for the compressor. It tells the compressor how quickly it starts compressing the signal once it reaches the set threshold.
Release is the compressor’s decay. How fast the compressor stops compressing the signal once it goes below the threshold level.
Attack and release times need to be adjusted accordingly to the audio you're processing and your goals. Some people use a fast attack and release, and others prefer slow attacks to keep a natural sound. It’s all about finding a good rhythm for your sound.
Other Compressor Parameters
A few more controls are available on different compressors, depending on the brand and model. A common one is the knee control. The knee is another control for the compressor's behavior. It determines how sharp the compression is.
You may hear people refer to a hard or soft knee. A hard knee means the compressions start immediately as the threshold is reached. A soft knee means the compressions begin gradually before approaching the threshold, and once the threshold is crossed, it starts compressing at the set ratio.
Another common parameter is the Make Up Gain (Output Gain) dial, which increases the output level. It can be helpful if your signal gets too low due to the compression. To compensate or "make up" for the gain reduction and avoid your instruments or vocals getting too low and lost in the mix.
When to Use a Compressor

A compressor can be used for control and creative effects, mainly to reduce the dynamic range of an audio signal. Here’s my guide to when to use a compressor:
To control the dynamic range of an instrument. When the sound in your track is very inconsistent, with quiet parts and very loud sections. For example, a bass guitar with volume variations due to the player’s technique.
Make vocals consistent and intelligible for spoken recordings, such as podcasts or interviews. Or for singers who vary their performance between whispering and singing loudly.
To add punch and impact to drums for a more snappy sound. Some genres benefit from punchy kicks and snares.
Add sustain to acoustic instruments like guitars and pianos. With a fast attack to compress the loud initial note, a slow release to raise the quiet ending, and increasing the output gain, you can create a sustained tail.
Glue instruments together during mixing. Placing a compressor in a bus to make them all sound cohesive.
Generally, you want to add the compressor only to individual tracks and bus tracks.
How Does a Limiter Work?
We use a limiter mainly at the end of the mastering chain to catch peaks above threshold, and cap the maximum level to avoid audio clipping and distortion. A limiter won’t let anything through after the threshold is reached. While the compressor attenuates the sound going above the threshold, the limiters block it, like a brick wall. Thus, the term brick wall limiter.
The way limiters achieve aggressive compression is by using a very high ratio, which is usually set to infinity by the limiter and not user-set, to ensure the output never exceeds the threshold. It also acts immediately, so you'll rarely find attack and release controls in a limiter.
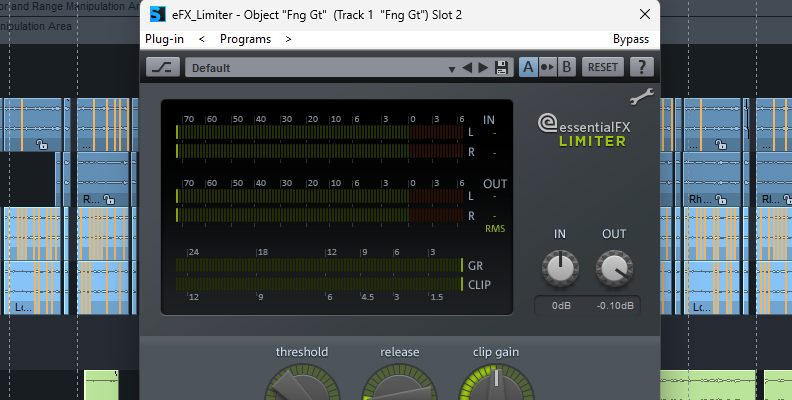
The main settings in a limiter are Output Gain and Threshold (or Ceiling).
The Threshold or ceiling is the maximum value you set for the signal. It tells the limiter when to start compressing the signal. If you set the ceiling to -1.0 dB, the limiter will prevent the sound from getting any louder than -1.0 dB by compressing any sound above that level, which is ideal for avoiding clipping.
The Gain controls the amount of output gain.
Some digital limiters offer a Lookahead feature that can "see" a peak in advance, making gain reduction smoother and resulting in a cleaner sound.
When to Use a Limiter
A limiter is used to ensure the audio never exceeds a point of distortion and clipping. When mastering, it allows you to achieve competitive loudness. Here's my guide to when to use a limiter:
Mastering. A limiter should be the final effect on your master bus, a safety net against distortion and clipping.
Increase perceived loudness without introducing unwanted artifacts or overloading the playback device.
Comply with streaming platforms' loudness standards.
Surgical mixing. When there are still rogue high peaks that cannot be tamed with a compressor.
You want to compress audio without losing its sonic characteristics or affecting the whole mix.
If you're only working on mixing, you usually won't need to add a limiter. These are most commonly used during the mastering process.
Final Words
Compressors and limiters may seem similar, but their different uses set them apart. In summary, you want to use audio compression to achieve a consistent volume and catch subtle peaks, and use a limiter when you need to control the entire audio output and avoid distortion.
Understanding how they work, their main differences, and when to use each will only get you halfway to learning about compressors and limiters. To truly understand how to work with compression and limiting, you'll need to use them in real work.
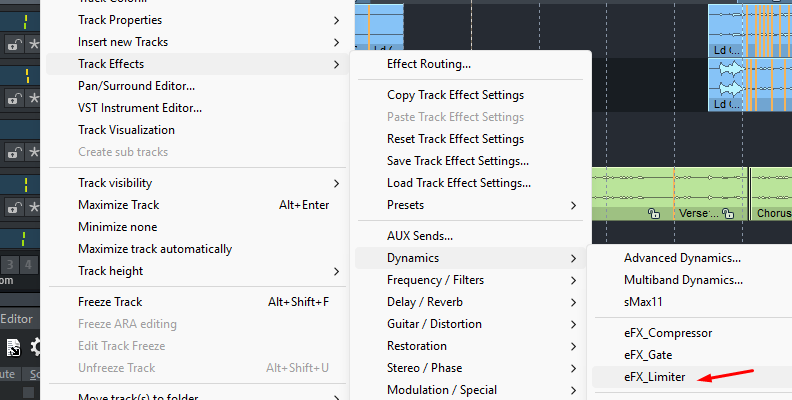
Today, with digital music production, it's very easy to experiment with compressors and limiters. Open your DAW, import an audio track or record something, then add a compressor or limiter (use stock plug-ins if you are a beginner, as they work well for learning). I always recommend you set extreme values for the threshold, ratio, release, and attack to hear how the audio sounds. Then take the time to set each parameter until it sounds good.
Remember, there is no universal setting for a compressor and limiters. Every voice, every instrument's performance is different. You'll have to trust your ears when mixing your projects. Keep practicing applying the essentials, and you'll master compression and limiting.
Good luck!


