There's nothing worse than spending hours working on a project and receiving the After Effects preview not working error when you need to see any changes in your composition or preview an animation.
This dreadful crash can slow down your progress as you try to figure out how to solve it with the fear of losing hours of hard work. It's especially painful when you're on a deadline, and every second counts.
Today, we'll look at the main reasons for this problem and provide fifteen methods to fix the After Effects Preview not working issue.
Let’s dive in!
Reasons Why Preview Might not Work in After Effects

It's always good to know the origin of the problem so that you can solve it using the right method. Below are the main reasons for the After Effects preview not working problem; if you already know the reason for the error message, jump to the next section to find the right solution for you.
After Effect Version
The After Effects preview not working problem may be related to your After Effects version. Make sure you have the latest version, and stay tuned for updates and notices, as some new releases can come with bugs and glitches, which are usually fixed quickly.
If a newer version is the reason that the preview is not working, you can return to a previous version in the Creative Cloud app.
RAM Cache
Your RAM is what After Effects uses to play the temporary video files during the preview. The green line in the timeline shows the temporary video files (RAM cache files) being played using your RAM. When the preview error occurs, it's usually because your system does not have enough RAM for this process.
There are a few solutions regarding RAM that you can check in the next section. You can check After Effects system requirements to ensure you have the minimum required RAM. As a rule of thumb, at least 16 GB is recommended to run HD projects smoothly.
Disk Cache
Like RAM, Disk cache is another common root of After Effects problems. The disk cache is where the temporary files are rendered and stored for playback. If your computer storage is limited and you're using the same drive for your projects and disk cache, you may encounter the After Effects preview not working error often.
Solutions for disk cache include using different drives for project storage and disk cache, purging the disk cache, and others you can read in the troubleshooting section.
15 Ways to Fix Preview Errors in After Effects
Here’s a comprehensive troubleshooting guide for After Effects preview not working. You can try each method one by one or go straight to the solution if you know the reason behind the error.
Method 1: Restart After Effects
Sometimes, basic actions are the most effective! Restarting After Effects allows closing the task that After Effects may be running in the background, causing the preview not to work properly. Save your project, close the application, and re-launch After Effects.
If the problem persists, then try one of the following methods.
Method 2: Restart Computer
Restarting your computer can help close some applications and end tasks that may be in conflict with After Effects and allow you to use the computer and After Effects with a fresh start. Don’t forget to save your After Effects project before closing the app and restarting your system.
Method 3: Check for After Effects Updates
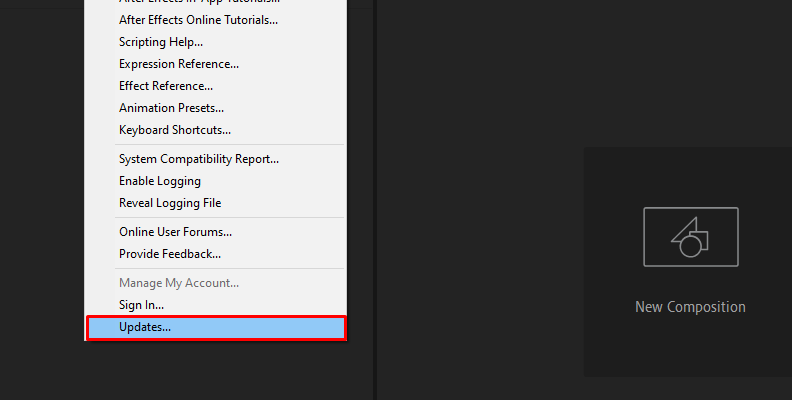
When an older software update causes the error, the solution is to keep up to date by checking for updates regularly. In After Effects, go to the Help menu and click Updates at the bottom of the options. It will launch the update window and show if there are any available. If it finds a new version, click “Update Now” and wait for it to install.
Method 4: Roll Back to an Older After Effects Version
When you update After Effects, the newer version may have glitches. You can return to a stable older version from the Creative Cloud app.
Launch the Creative Cloud app and select the Apps tab. Scroll to the “Find Additional Apps” and click View Previous Versions. Choose the older version you wish to install and click Install.
Method 5: Update Your Graphics Card Drivers
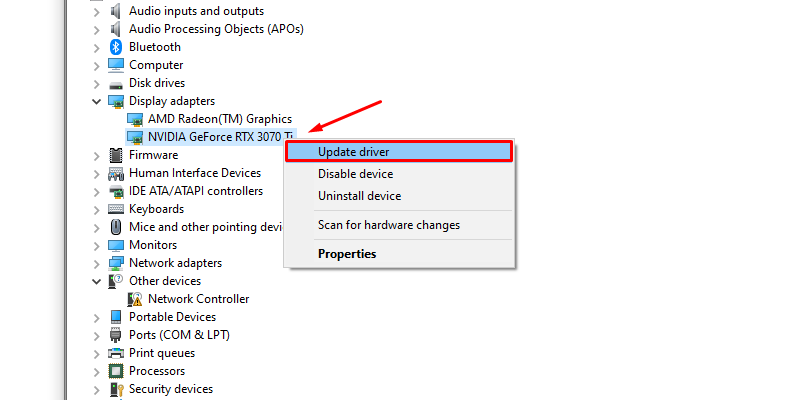
Ensure that your graphics card’s latest drivers are installed in your system. Outdated drivers commonly cause incompatibility, crashes, and preview errors in After Effects, Adobe applications, and other software.
Download the drivers from the graphics card manufacturer's website. Some graphics cards have software that automatically analyzes your computer and searches for new updates, so it's worth checking for updates constantly.
Method 6: Purge the RAM Cache
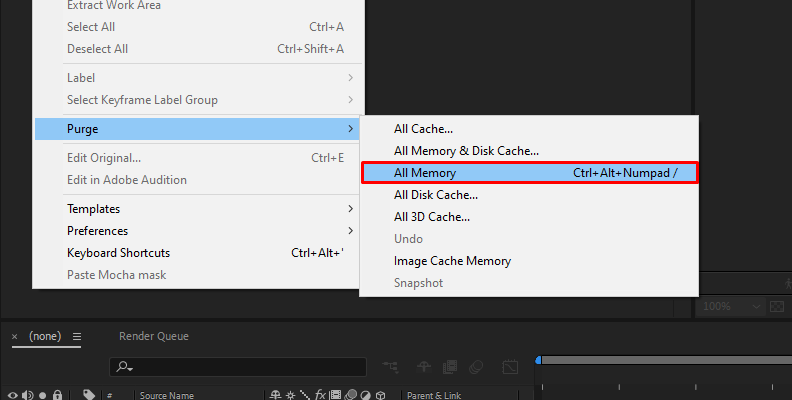
When dealing with RAM issues, your first step should be to purge RAM cache files to free your RAM and allow more room to process the stored files for playback. This should be a recurring process if your computer has limited RAM or less than the recommended for After Effects.
Go to the Edit menu and click Purge > All Memory. With your RAM cache cleared, you should have more room for After Effects to process the preview. You may need to restart After Effects, but don't forget to save your project!
Method 7: Increase Memory Allowed
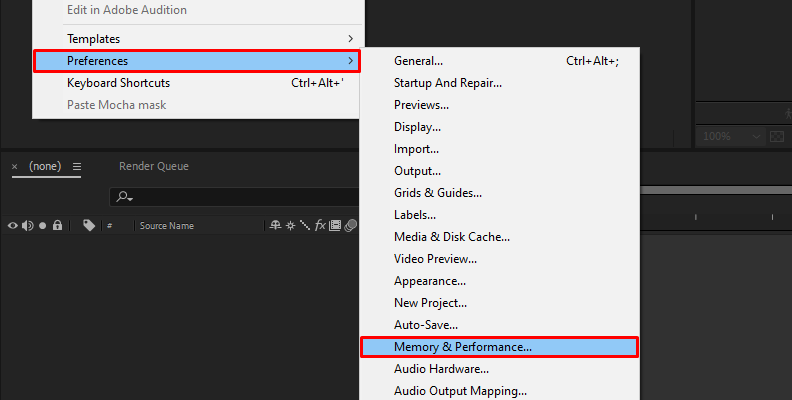
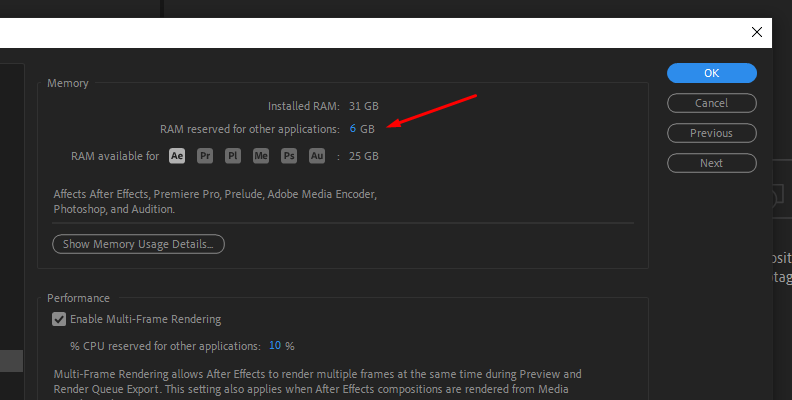
Another fix for RAM issues is to increase the memory reserved for After Effects. It will reserve more RAM for After Effects than other applications on your computer. Go to Edit > Preferences > Memory and reduce the "RAM reserved for other applications" value so you have more for After Effects.
Method 8: Empty Disk Cache
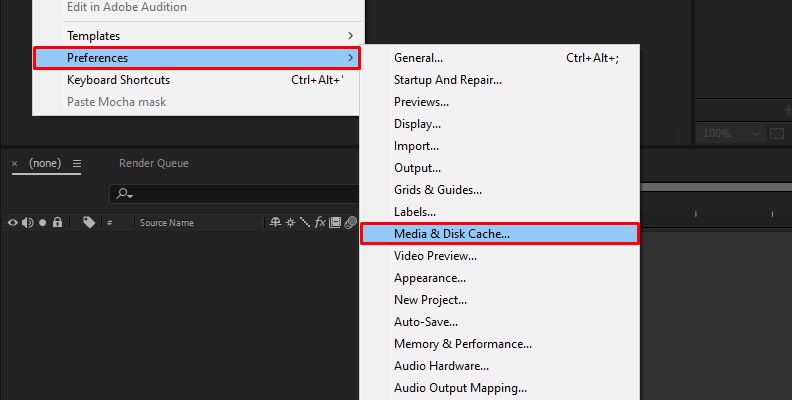
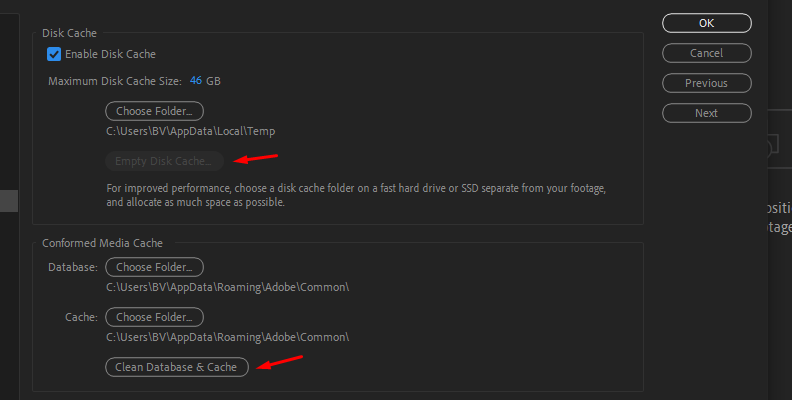
When the issue is related to the disk cache, the first option is to clear the cache, as you do with the RAM. Go to the Edit and select Preferences > Media & Disk Cache. On the Preferences window, click the Empty Disk Cache button. You can also press the Clean Database & Cache button on the same window.
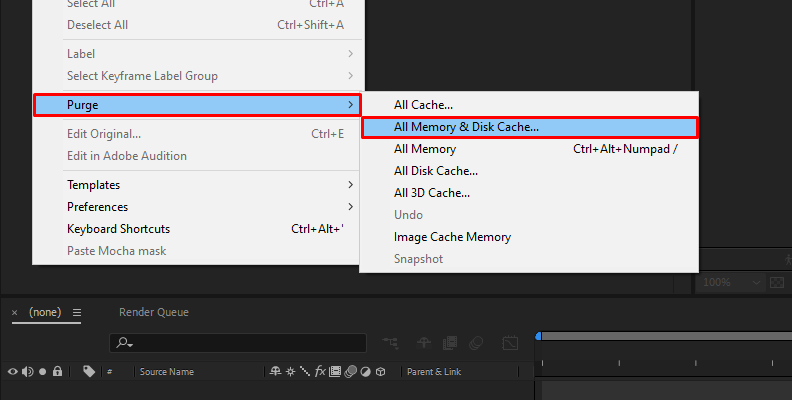
When you need to purge both RAM and Disk cache, you can do it from Edit > Purge and select All Memory & Disk Cache.
Method 9: Increase Disk Cache Size
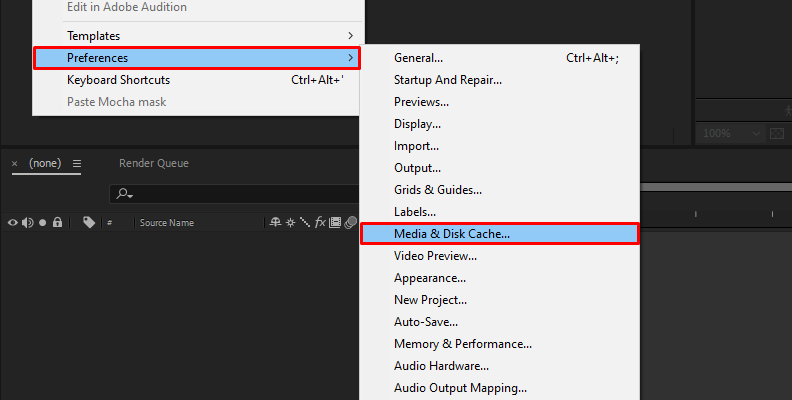
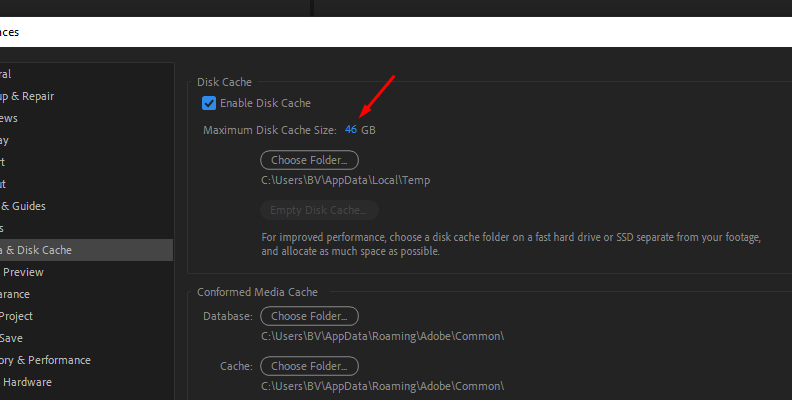
To avoid running out of disk cache, you can increase the size of the disk cache. Go to Edit > Preferences > Media & Disk Cache. At the top of the windows, you’ll see the Maximum Disk Cache Size option, which you can increase.
Method 10: Change Disk Cache Location
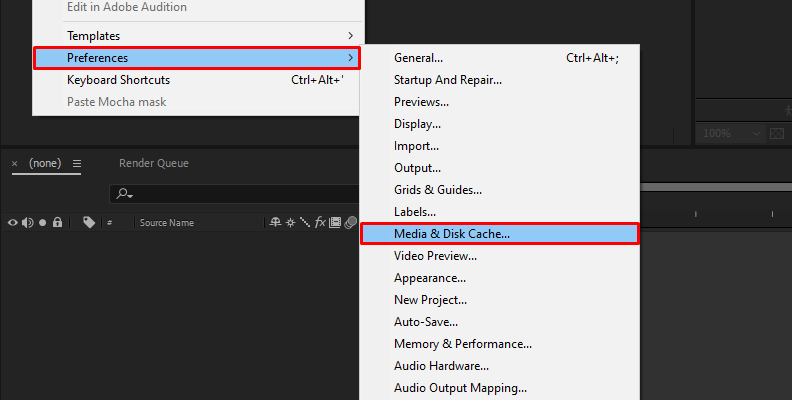
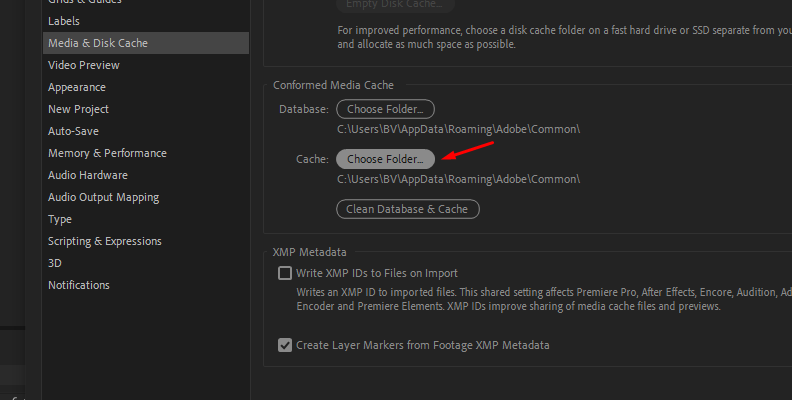
Another fix is to change the disk cache location. Navigate to Edit > Preferences > Media & Disk Cache. Click the Choose Folder button under the Disk Cache section and select the new folder from a separate hard drive.
Method 11: Reduce the Preview Quality
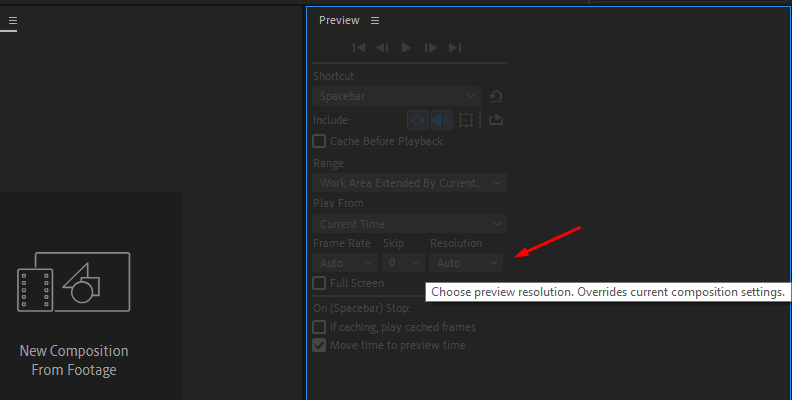
Decreasing the preview resolution will reduce the RAM and disk consumption and prevent After Effects preview not working. By default, the preview is set to Auto.
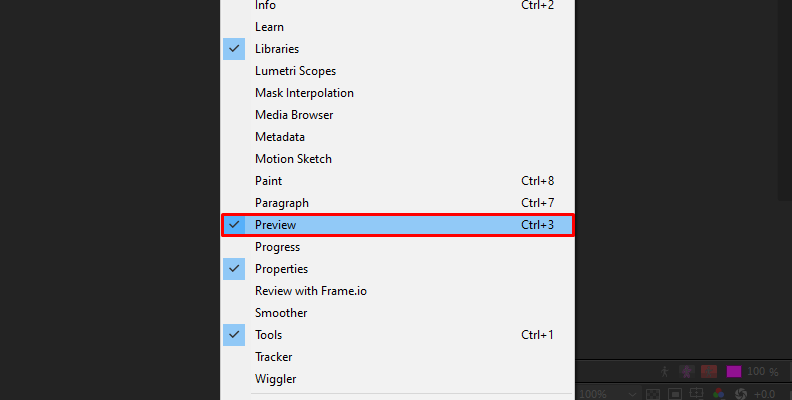
Display the Preview panel (enable it from Window > Preview) and change the Resolution to Full, Half, Third, Quarter, or Custom.
Method 12: Close Other Applications
After Effects is a very demanding software, so it's best to avoid running other applications in the background. Close all unnecessary apps with huge RAM usage, such as Premiere Pro, Audition, and other Adobe apps, as well as Chrome, Spotify, Zoom, etc.
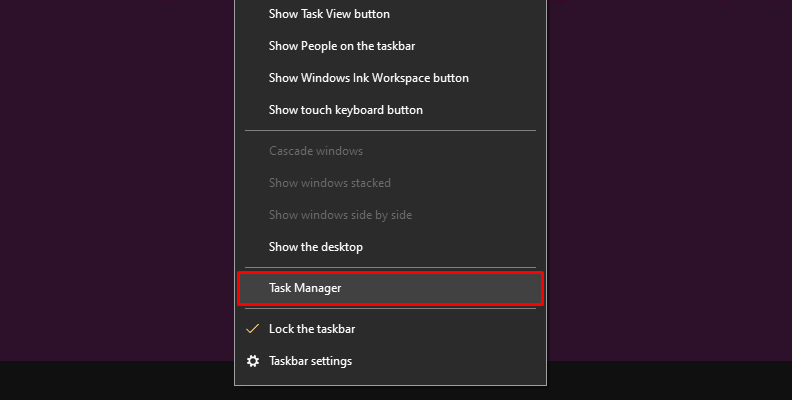
You can close these apps or use the Task Manager on Windows or Activity Monitor on Mac. On Windows, press CTRL + Shift + ESC, select the app, and click End Task. For Mac computers, press Option + CMD + ESC, choose the app you want to close, and click Force Quit.
Method 13: Render Instead of Preview
Rendering the project instead of previewing can be effective if your system has the minimum requirements and you have already tried purging the RAM and Disk cache without success.
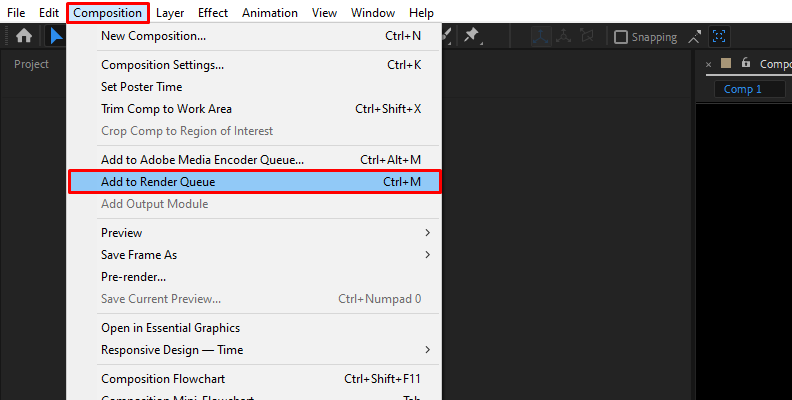
Select the composition, go to the Composition menu, and select Add to Render Queue. Open the Render Queue and choose your rendering settings. You can use a lower quality to render quickly.
Method 14: Remove Unused Assets From Your Project
The problem may be caused by many assets and files in your project panel that are left unused in your composition. There’s a quick way to clean your projects and remove unused layers and files.
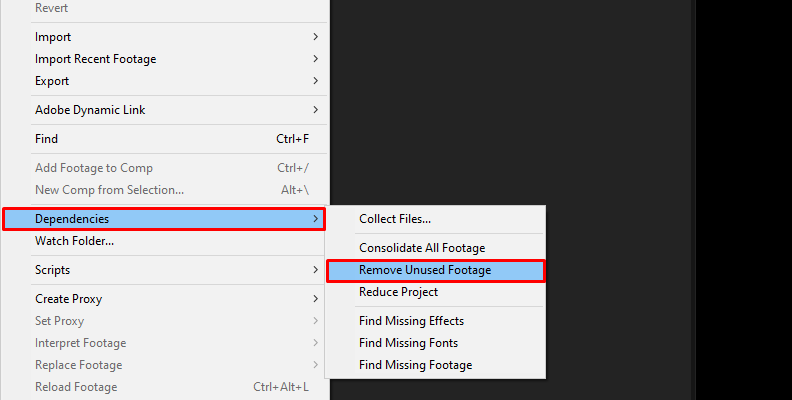
Start by saving your project. Go to File > Dependencies and select Remove Unused Footage. After Effects will then delete all unused files and folders and prompt with a message about how many items were removed. You can undo this change if you need something back.
Method 15: Reinstall After Effects
As a last resource, you may need to go over the After Effects installation process once again. As always, save your project and uninstall After Effects. Uninstall the software from your computer, then download and install it again from the Creative Cloud App. Once reinstalled, open your project and try to preview it as normal.
If you have tried all the methods above to no avail, the problem may be with your computer’s hardware. Upgrading your RAM, graphics card, processor, or HDD are other solutions to try.
Final Words
Preview errors in After Effects can often be fixed, but they may reoccur if your computer video or audio hardware has issues. If upgrading your system isn't an option, remember to clear your RAM, memory, and disk cache files often, reduce the preview quality, and use an external SSD for both your projects and disk cache storage.
Finally, another good practice is to close other applications when using After Effects and keep your version up to date for smoother editing sessions.
Good luck!


