


Today, creating a podcast is something anyone can do. With the good recording quality provided by everyday devices like mobile phones, portable recorders, and laptop computers, you don't need a fancy studio or a lot of equipment to get started. However, if you want to stand out in the ultra-competitive world of podcasting, you need to sound better and more professional than anyone else. Even in video production, audio plays a crucial role.
Today, we compare the breakthrough AI-powered tool Voice Enhance to the browser-based AI tool Adobe Podcast. Which is the best tool for audio restoration and improving voice and dialogue recordings for podcasts and videos? Let's find out!
CrumplePop Voice Enhance Overview
Try Voice Enhance Now!
Instantly transform any voice recording into professional-quality sound with the power of AI. No internet access required- your audio stays private and secure. Toggle it on/off to hear the difference.
On-location Interview
Selfie-style Phone Audio
Zoom Call
Ridiculous Echo
Traffic Noise
Far from Mic
Untreated Room
Recording at Home
On-location Interview
CrumplePop Voice Enhance is a game-changing AI-powered tool that improves the clarity of your vocal recordings in real-time. It makes your voice clearer, warmer, and richer regardless of the recording environment, fixing bad audio from a laptop mic, a Zoom recording, unwanted background noise, or echo. With Voice Enhance, your podcasts and videos will be easier to produce and edit, and your audience will have a better experience with higher quality.
Voice enhance runs and processes audio files on your local machine. Forget wasting time uploading files in bulk or one by one to the cloud! Protect your privacy by working with your files and favorite editing software on your computer.
Video Enhance is part of the CrumplePop AI audio restoration plug-ins available for Mac and PC. Voice Enhance is a VST, AAX, and AU plug-in compatible with most popular audio and video editing software, such as Premiere Pro, Audition, GarageBand, Avid Media Composer, Pro Tools, Logic Pro, Final Cut Pro, DaVinci Resolve, and Audacity.
Main Features:
- Brand new AI-powered vocal clarity and noise removal plug-in.
- Easy to use drag and drop design.
- Processes locally on your machine - no need to upload to the cloud.
- Echo, pop, rustle, wind, traffic, clip, and noise remover included along with Voice Enhance
- Improve recorded Zoom interviews, room noise, bad mics, and more.
How Voice Enhance Works:
Voice Enhance uses AI models to enhance voice and dialogue tracks. Depending on your recording scenario, it provides three models: indoor for indoor locations that are not acoustically treated, indoor-noisy for rooms where noise is a big issue, and outdoor for recording podcasts and vlogs in outdoor locations with traffic, wind, and other types of ambient noises.
Video Enhance is easy to set up to make your voice magically clear, warm, and rich. It’s a drag-and-drop plug-in with a few controls, and the brand-new and advanced AI model will take care of the rest.
Because it processes audio locally on your computer, not in the cloud like other AI-powered tools, you can rest assured that your audio data stays on your device. It also allows you to apply different audio effects, like other CrumplePop plug-ins, built-in host effects, or third-party audio plug-ins.
Most content creators would also appreciate speed when working with Voice Enhance: quickly fix audio tracks, listen to the result in real-time, and spend more time creating and less time editing!
How to Use Voice Enhance
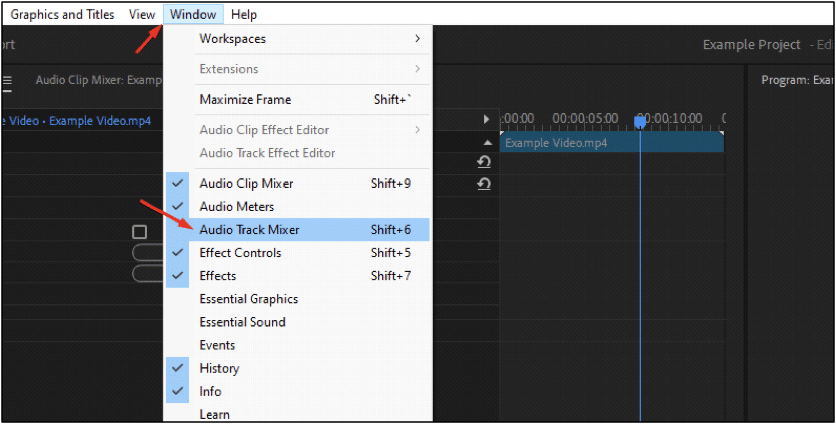
Working with Voice Enhance is quite straightforward, and you'll feel at home if you’ve worked with other CrumplePop tools before. Depending on your software (we'll be using Adobe Premiere Pro), there are two ways to use Voice Enhance: you can apply it directly to an audio clip or track to add other audio effects to the chain.
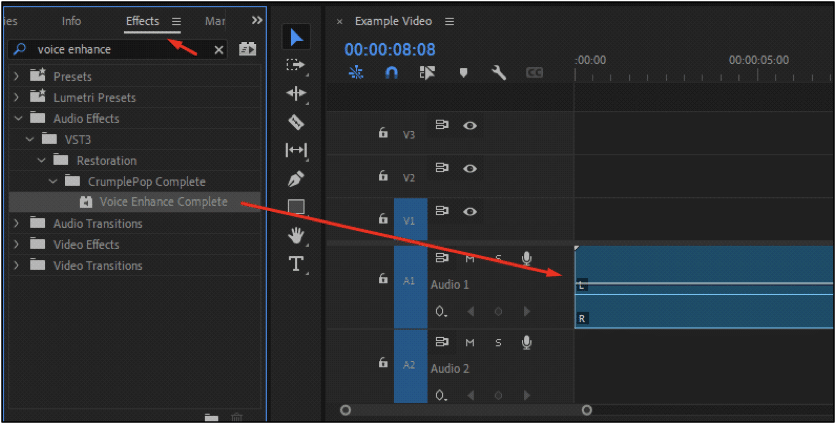
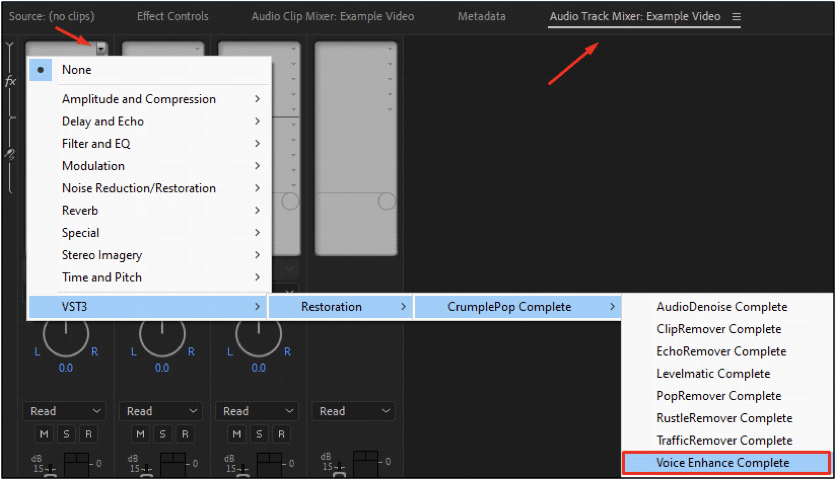
To quickly improve the audio quality of a single audio clip, find your VST/AU plug-ins in your host application's effects library. It may appear under the audio restoration categories. Browse for CrumplePop Complete and then Voice Enhance Complete.
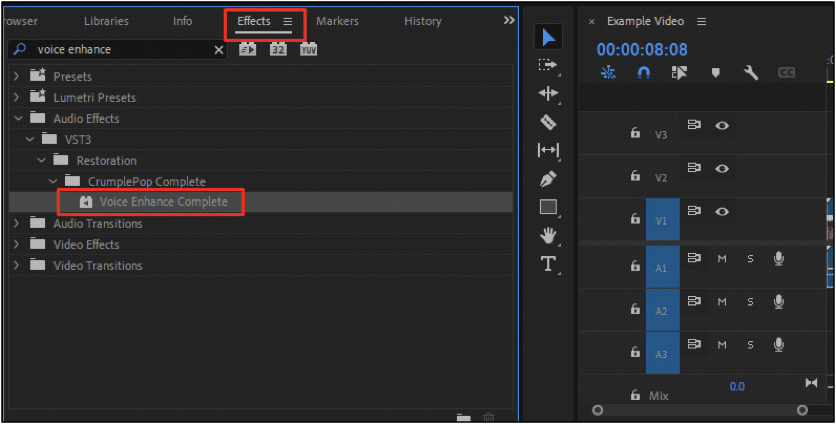
Click and drag Voice Enhance Complete to the audio clip.
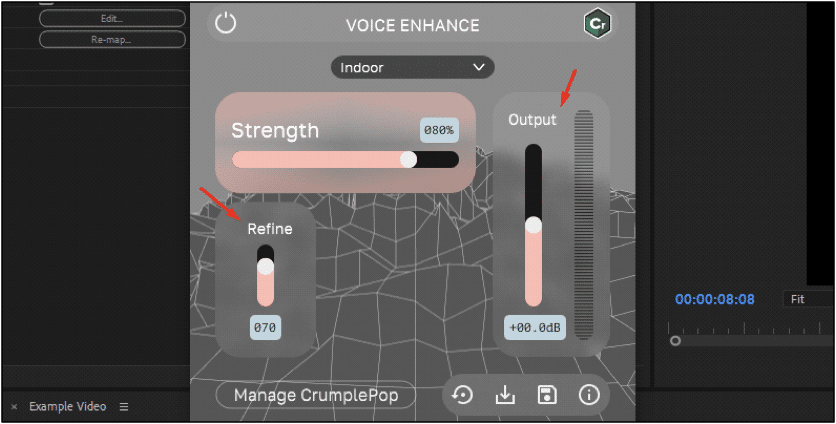
In the effects settings, choose the mode depending on your recording location and the type of background noise, and adjust the “Strength” slider until your audio quality improves. The Strength slider is the main control in Voice Enhance and, most of the time, the only parameter you’ll need to change.
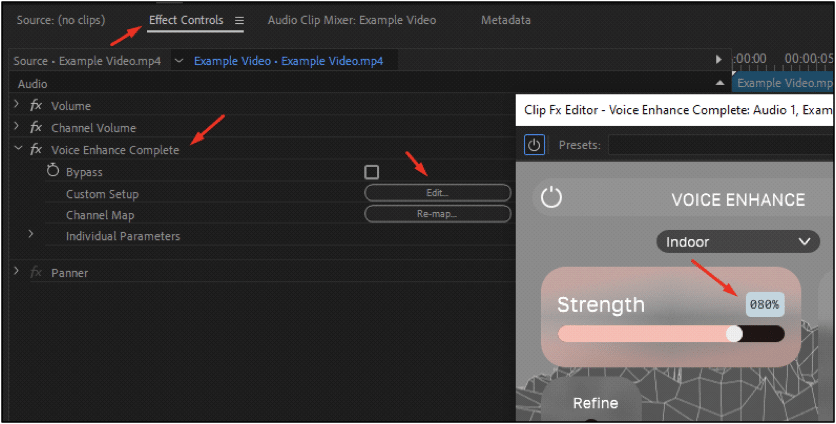
If you must fine-tune the output sound, play with the "Refine" and "Output" sliders. Refine allows you to make subtle adjustments and fix voice artifacts, and Output controls the overall output levels. You won't need to modify many of the default settings.
The second option is when you have multiple audio clips in the same track or want to add a chain of effects to your clip.
Open your track mixer and display the track’s effects area.
The steps will vary depending on your host, but most audio software allows you to add effects in the track mixer. Check with your host application to find out more.
Select an empty slot in the track, search for your VSTs, CrumplePop Complete, and select Voice Enhance Complete. This way, you’ll apply the effect to the whole track with all the clips included and add other effects to the chain, such as an EQ, Noise Gate, etc.
With the new ML model, Voice Enhance is the first step in audio post-production. If you need more noise reduction, you can apply other CrumplePop plug-ins upstream of Voice Enhance.
Consider that Voice Enhance processes the audio and outputs mono audio only since it's designed for voice and dialogue. You can use Voice Enhance in a stereo clip, but it will output mono audio.
Price
CrumplePop offers three plans to suit everyone's needs: a free plan, a subscription, and a perpetual license.
- The Starter plan gives you free RustleRemover, PopRemover, and the SoundApp Basic, plus free trials for the rest of the effects, including Voice Enhance.
- The Creator plan includes all the effects plus the desktop app for one host at $18 monthly or $180 billed yearly, saving over 15%.
- The Pro plan features multi-host support for $29 monthly or $276 monthly billed yearly (a savings of over 15%).
- The perpetual license is a one-time payment of $599, which features all effects for all supported hosts.
Pros of Using Voice Enhance:
- Easy to use drag-and-drop tool.
- Voice Enhance improves the quality of your voice and dialogue quickly.
- Preview in real-time.
- Protects your privacy by processing audio locally without uploading it to a cloud.
- Available as a plugin and standalone desktop app.
- Three different plans are available: Free, Subscription, and Perpetual License.
- You get all CrumplePop tools to target a wide range of audio issues.
Cons of Using Voice Enhance
- It’s unavailable as a single-effect purchase, though you can download the free trial.
- It can be CPU-demanding.
Adobe Podcast
Adobe is renowned for its professional and user-friendly creative tools. They have almost any tool for any creative project. Adobe Podcast is here to let anyone without audio editing skills record and edit audio to deliver high-quality audio projects.
Adobe Podcast is an AI-powered audio tool that allows you to create high-quality podcasts and videos without professional studios. Everything is browser-based, so you do not need to invest in audio equipment or even a high-end computer for editing.
It is aimed at podcasters who want to create podcasts without the nuisance of editing and tweaking effects in a DAW (digital audio workstation). It’s perfect for those on the go who want to keep creating podcasts and interviews and record audio with a guest.
Adobe Podcast offers three main tools: Enhance Speech, Studio, and Mic Check. With Enhance Speech, you can remove noise and echo and improve clarity. Mic Check helps you find the right volume and distance for your microphone. Studio is a virtual studio where you can upload audio files, record, invite guests, add royalty-free music for intros and outros, and edit your audio podcast.
Main Features
- Enhance Speech.
- Mic Check.
- Studio for recording and editing your podcasts.
- Audio file transcription (English only).
- Templates.
- Royalty-free music.
How Adobe Podcast Works
Adobe Podcast is an AI-powered online tool that accompanies you through all stages of your podcast. Its AI model can analyze your microphone and provide solutions to capture better audio with your current mic configuration.
The Enhance Speech tool allows you to upload audio or video files (video only with Express Premium), improve clarity, reduce noise, and achieve optimal volume levels. It's a quick way to enhance an audio file and continue editing in your favorite editing program. It has one simple strength slider to adjust the tool.
With Studio, you can do more than enhance speech. You can record, upload files, and edit podcasts from your browser. In Studio, you can record from scratch alone or with a guest, import audio, and choose from a collection of royalty-free intros, outros, transitions, and underscore to set the mood of your podcast. You can export your audio file in MP3 or WAV and choose to get a transcription text file of your podcast, too.
How to Use Adobe Podcast
For Adobe Podcast, you only need your audio recording, a computer with a web browser, and an Adobe account. Go to the Adobe Podcast website and sign in with your Adobe account. Adobe Podcast offers three workspaces: Enhance Speech, Studio, and Mic Check.
The workflow in Enhance Speech is simple: upload your audio files, wait for Adobe to process them, listen to the result, and download it. However, you have limitations.
- The free version allows you to upload audio files for up to 1 hour per day and up to 30 minutes or 500MB per file.
- With Express Premium, you can bulk upload audio and video files, adjust the strength of the enhancer, and upload audio files up to 4 hours per day or 1GB in size.
In Studio, click New Project to begin from scratch, or use a template if you need help structuring your episode. Once inside the virtual studio, you can invite a guest, start recording, or upload audio files. You must allow your browser to use the microphone and press the red button at the bottom to record.
You can upload more files from the left panel, add music and a placeholder, and apply the Enhance Speech filter. Edit by dragging the audio files to arrange your episode. When you finish, click download, where you can select the audio file format and transcript format and download the original recordings.
In Mic Check, you click Start and then Test Mic. Read the caption and click Stop Test to get the results. The AI will provide three results for mic distance, gain, background noise, echo, and instructions on improving your setup.
Price
Adobe Podcast is available in two plans: free and subscription.
- The Free plan features the three tools, but it has limitations. In Enhance Speech, you can only work with audio files for up to 1 hour daily or 500 MB. In Studio, you can download two projects for up to 30 minutes each daily.
- The Express Premium plan is $9.99 monthly or $99.00 yearly. It offers more features like MP4 and MOV video file support, bulk upload, and the ability to customize the Strength in Enhance Speech. You can work with audio for up to 4 hours and 1 GB daily, and there is no download limit in Studio.
Pros of Using Adobe Podcast
- AI-powered tools to enhance voice recordings.
- Easy to use virtual studio.
- All is done online on the browser.
- The Mic Check feature is very handy for testing your mic; however, you should still perform a test recording before the actual recording.
- Free graphic templates to get you started.
Cons of Using Adobe Podcast
- Limitation with time and size files.
- You must upload your audio files to the Adobe Cloud to process them.
- You must wait for Adobe to process the audio before listening to the results.
- The free plan is limited to audio only. If you work with video, you must upgrade to Express Premium or separate audio from the video.
- Requires an internet connection.
Adobe Podcast vs. CrumplePop Voice Enhance Comparison Table
| Feature | Adobe Podcast | Voice Enhance |
| Features | Online tool, AI speech enhancer, mic test, web-based studio, audio transcription, templates, royalty-free music, processed on the Adobe cloud. | Brand new AI-powered enhancer and noise removal, easy drag and drop plugin, processed locally, desktop and AU, AAX, and VST plugin versions, works offline. |
| Processes audio | In the cloud | Locally |
| Price | $9.99 monthly or $99.99 yearly. | Single host $18 monthly or $180 yearly. Multi-host $29 monthly or $276 yearly. Perpetual license $599 |
| Used by | Beginner content creators and podcasters. | Podcasters, content creators, vloggers, audio editors. |
| Host support | Browse only | Major compatibility with hosts that support VST, AU, and AAX third-party plugins |
| Plugin | No | VST, AU, and AAX |
What's the Difference Between Adobe Podcast and Voice Enhance?
Adobe Podcasts and Voice Enhancer offer similar AI-powered audio tools to refine and polish voice recordings. However, there are still some big differences that can set them apart.
Price
The price is one of the main differences between these two AI audio enhancers.
Adobe Podcast has a free limited plan for short projects or quick audio enhancements.
On the other hand, Voice Enhance is only available in the paid version of CrumplePop. Still, you have more purchasing options: A single or multi-host subscription or a perpetual license. Plus, the CrumplePop subscription induces other plug-ins to remove noise, echo, wind, pop, clipping, rustle, and traffic.
Audio Processing
Another main difference is how both tools process audio. Both use AI and machine learning to analyze and identify faults in your audio and then apply the best settings to enhance it. However, Voice Enhance does all that on your computer with your local files, and you can instantly listen to the improved audio in real-time.
Adobe Podcast requires an internet connection to upload the audio files to the cloud, wait for Adobe to process it there, and then provide a download link with your new, improved audio.
Online Tool vs. Traditional Editing
Another big difference is the workflow. You can use Voice Enhance directly within Premiere Pro, Audition, FCP, or other video and audio editing software without relying on an internet connection.
With Adobe Podcast, you have to upload your video content, which can be over the limit in size, causing more problems. Not to mention, if you want to edit audio in a remote location without internet access.
Final Words
So, who is Voice Enhance best suited for? Voice Enhance is your best choice if you edit longer podcasts or audio projects and like to add extra effects to your audio tracks. It is also ideal if you value your privacy and prefer to edit offline with the tools you already know how to use. However, if you are a beginner who prefers something to edit quickly on the web or working on a less resourceful computer, Adobe Podcast makes it easy to keep creating content.
Although Adobe Podcasts may seem cheaper at first glance, Voice Enhance offers more options, and the perpetual license might be a better choice in the long run. The best way to decide is to try the free version of Adobe Podcats and download the Voice Enhance free trial to experience it yourself.
Good luck!


